Adobe Illustrator Tutorial: Create a Simple Map Illustration
In the following Adobe Illustrator tutorial you will learn how to create your very own simple vector map illustration. First, we'll build the starting shapes using pixel perfect alignment, some basic vector shape building techniques along with a bunch of warp effects. Then we will put on the finishing touches. We will add the colors along with some simple effects and highlights to give it that final bit of character.
 Now that we have the basics of the folds created we shall move on.
 (rb)
(rb)
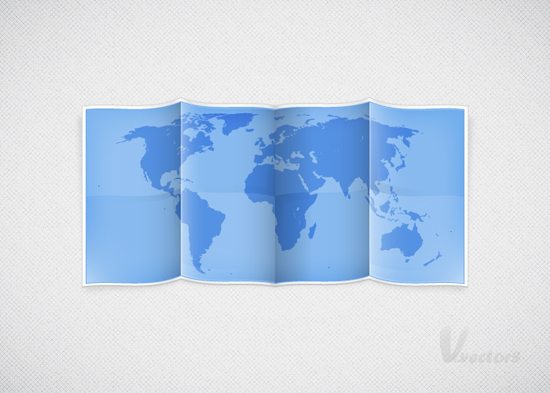
Final Image
As always, this is the final image that we'll be creating:
Step 1
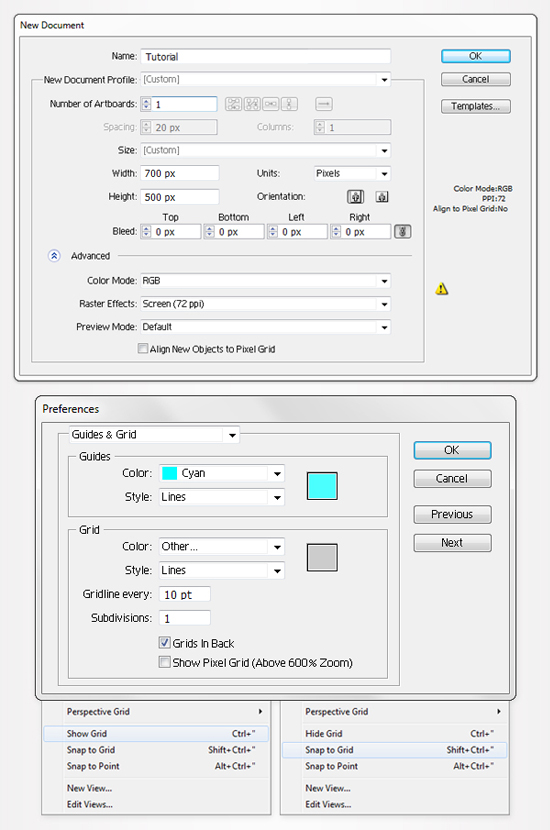
Hit Control + N to create a new document. Enter 700 in the width box and 500 in the height box then click on the Advanced button. Select RGB, Screen (72ppi) and make sure that the "Align New Objects to Pixel Grid" box is unchecked before your click OK. Now, turn on the Grid (View > Grid) and the Snap to Grid (View > Snap to Grid). Next, you'll need a grid every 10px. Go to Edit > Preferences > Guides & Grid, enter 10 in the Gridline every box and 1 in the Subdivisions box. You can also open the Info panel (Window > Info) for a live preview with the size and position of your shapes. Do not forget to set the unit of measurement to pixels from Edit > Preferences > Unit > General. All of these options will significantly increase your work speed.
Step 2
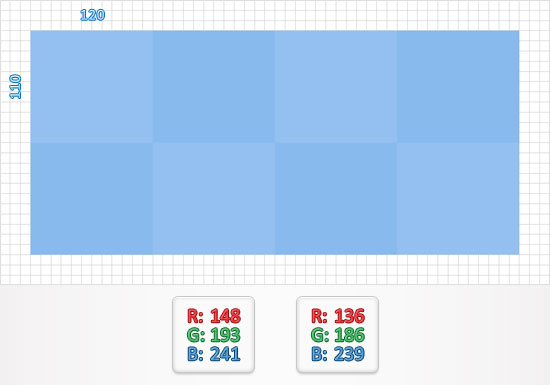
Pick the Rectangle Tool(M) and create eight, 120 by 110px shapes. Place them as shown in the following image and fill them with the two colors shown below.
Step 3
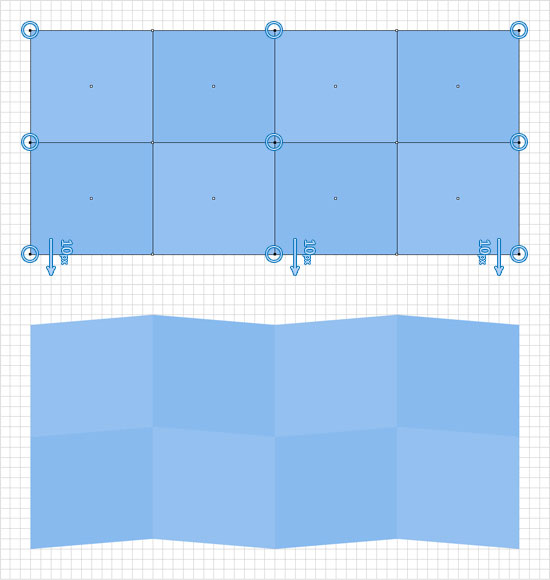
Pick the Direct Selection Tool(A), select the anchor points highlighted in the first image and drag them 10px down. The Snap to Grid should ease your work.
Step 4
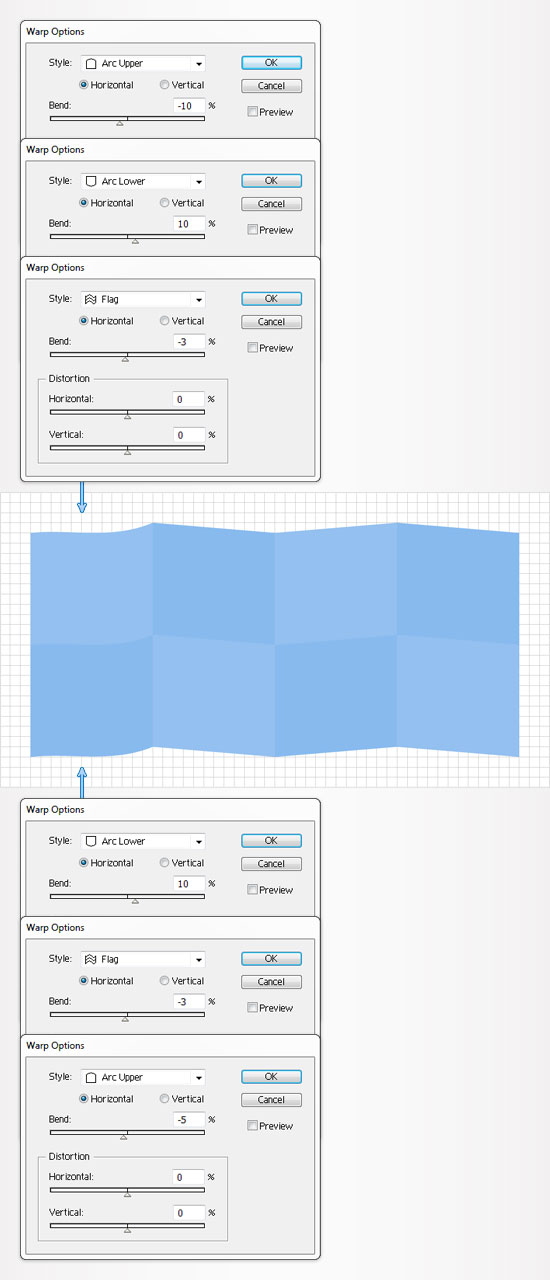
Now we will help the map sections take shape. Take the first column of blue shapes. Select the top shape and go to Effect > Warp > Arc Upper. Enter the data shown below, click OK and go to Effect > Warp > Arc Lower. Again, enter the data shown, click OK and go to Effect > Warp > Flag. Once again, enter the data shown below and click OK. Move on to the bottom shape and go to Effect > Warp > Arc Lower. Enter the data shown in the following image, click OK and go to Effect > Warp > Flag. Again, enter the data shown below, click OK and go to Effect > Warp > Arc Lower. Once again, enter the data shown below and click OK.
Step 5
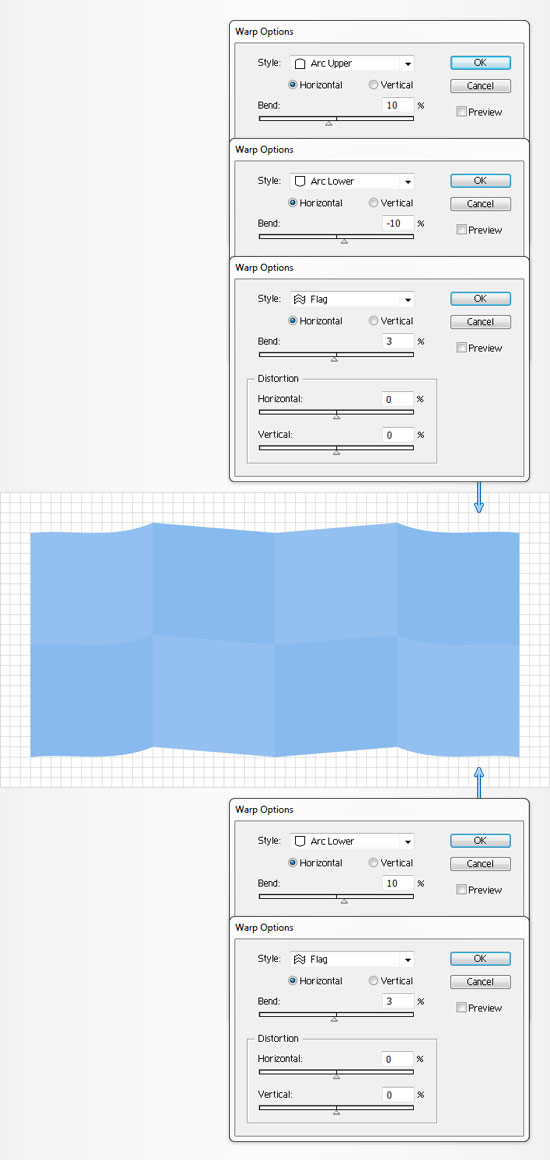
Focus on the fourth column of shapes. Select the top shape and like before, go to Effect > Warp > Arc Upper. Enter the data shown below, click OK and go to Effect > Warp > Arc Lower. Again, enter the data shown below, click OK and go to Effect > Warp > Flag. Once again, use the data provided below and click OK. Move to bottom shape and go to Effect > Warp > Arc Lower. Enter the data shown, click OK and go to Effect > Warp > Flag. Again, enter the data and click OK.
Step 6
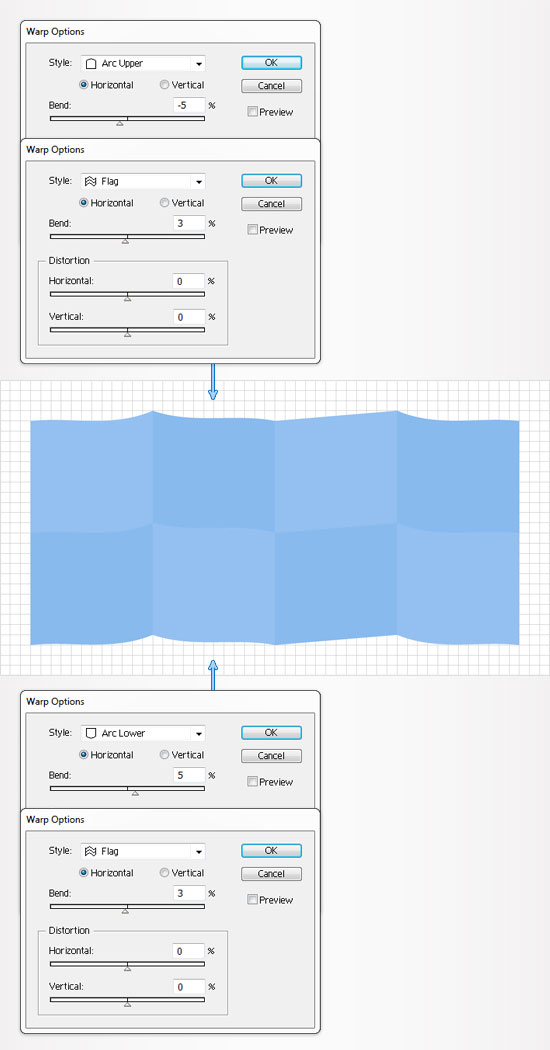
Now move on to the second column of shapes. Select the top shape and go to Effect > Warp > Arc Upper. Use the data provided, click OK and go to Effect > Warp > Flag. Again, enter the data shown below and click OK. Move to the bottom shape and go to Effect > Warp > Arc Lower. Enter the data shown below, click OK and go to Effect > Warp > Flag. Again, enter the data shown and click OK.
Step 7
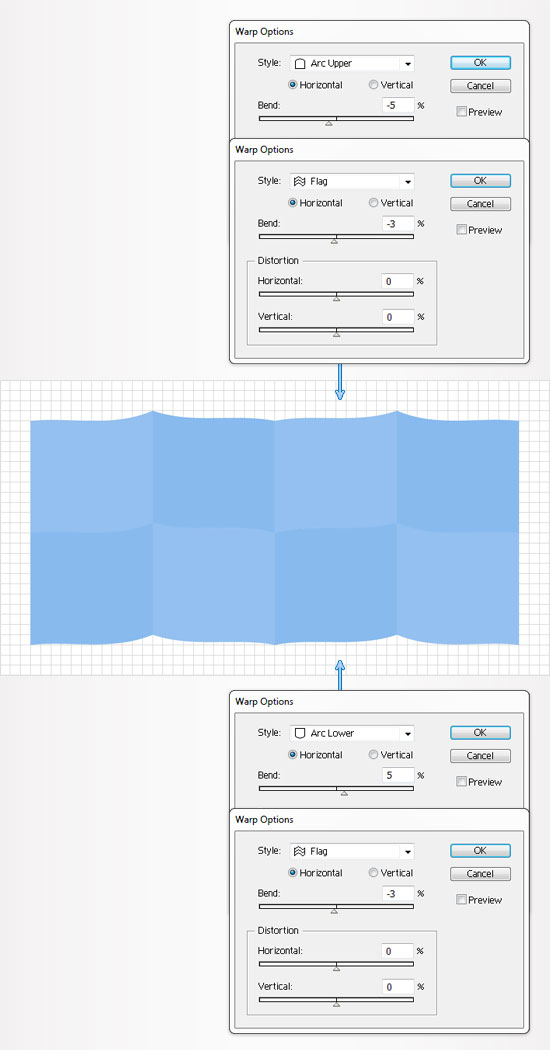
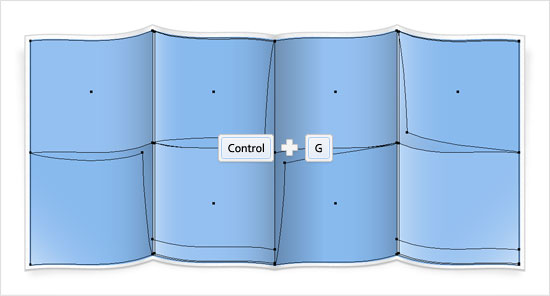
Select the third column of shapes. Take the top shape and go to Effect > Warp > Arc Upper. Enter the data shown below, click OK and go to Effect > Warp > Flag. Again, enter the data shown below and click OK. Now move on to the bottom shape and go to Effect > Warp > Arc Lower. Enter the data provided, click OK and go to Effect > Warp > Flag. Again, enter the data given and click OK. Now that we have the basics of the folds created we shall move on.
Step 8
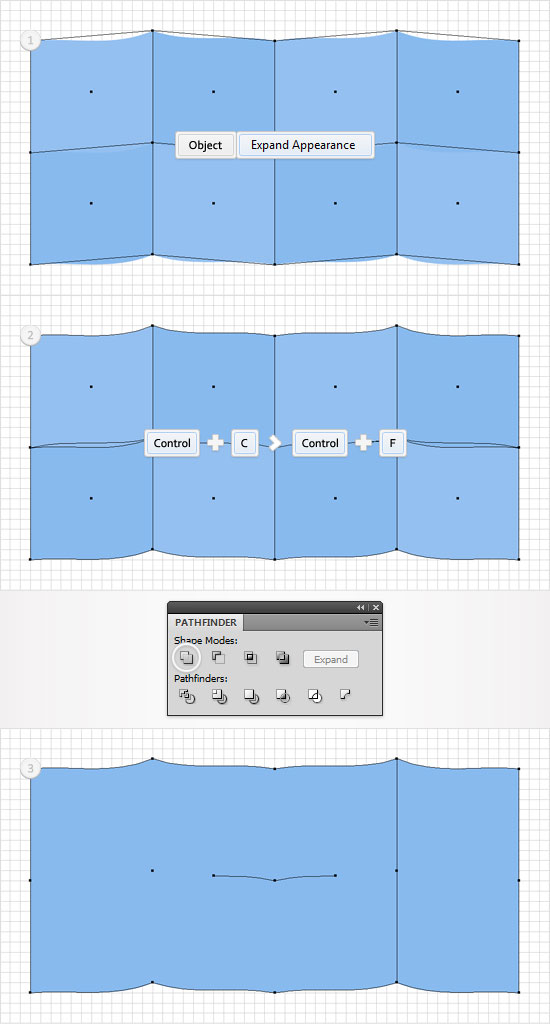
Select all the shapes created so far and go to Object > Expand Appearance. Select the resulting shapes and duplicate them (Control + C > Control + F). Select these copies, open the Pathfinder panel (Window > Pathfinder) and click on the Unite button. Most likely your resulting shape has a few gaps.
Step 9
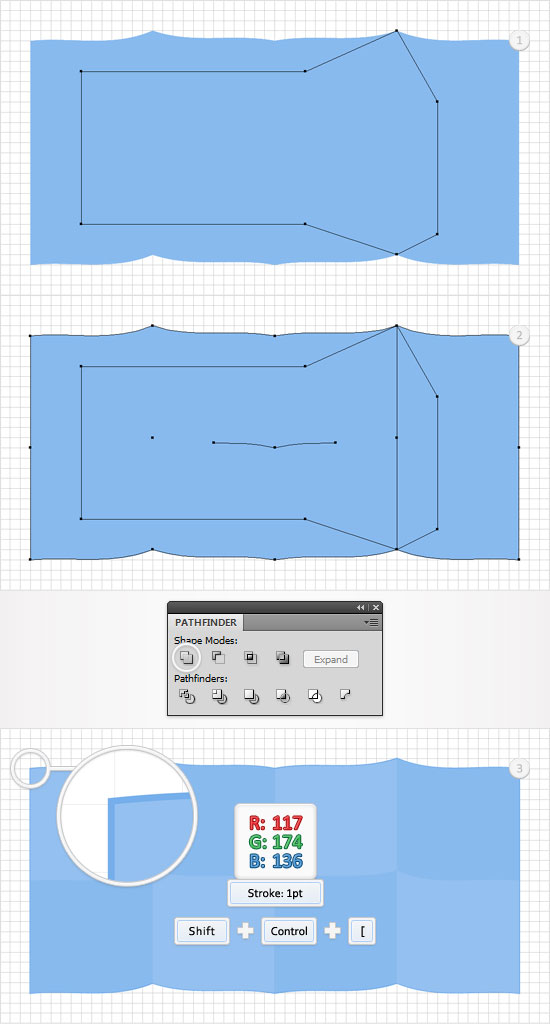
Now we need get rid of these gaps. Pick the Pen Tool(P) and draw a simple shape around those gaps. Select this new shape along with the shape created in the previous step and click on the Unite button from the Pathfinder panel. Send the resulting shape to the back (Shift + Control + [ ) and add a 1pt stroke. Align it to the outside and set its color at R=117 G=174 B=136. Move to the Layers panel, double click on this new shape and name it "Map".
Step 10
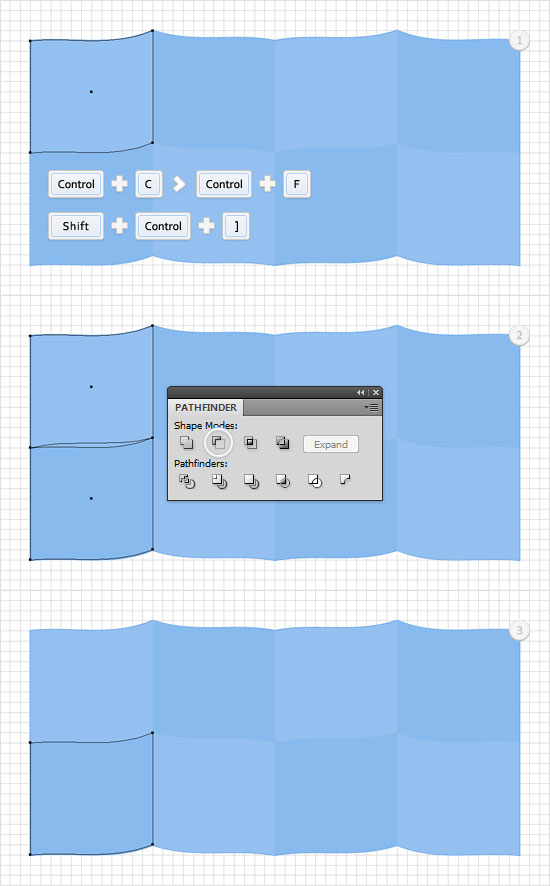
Focus on the eight, blue shapes. Select the top, left shape, make a copy in front (Control + C > Control + F) and bring it to the front (Shift + Control + ] ). Select this copy along with the bottom, right blue shape and click on the Minus Front button from the Pathfinder panel.
Step 11
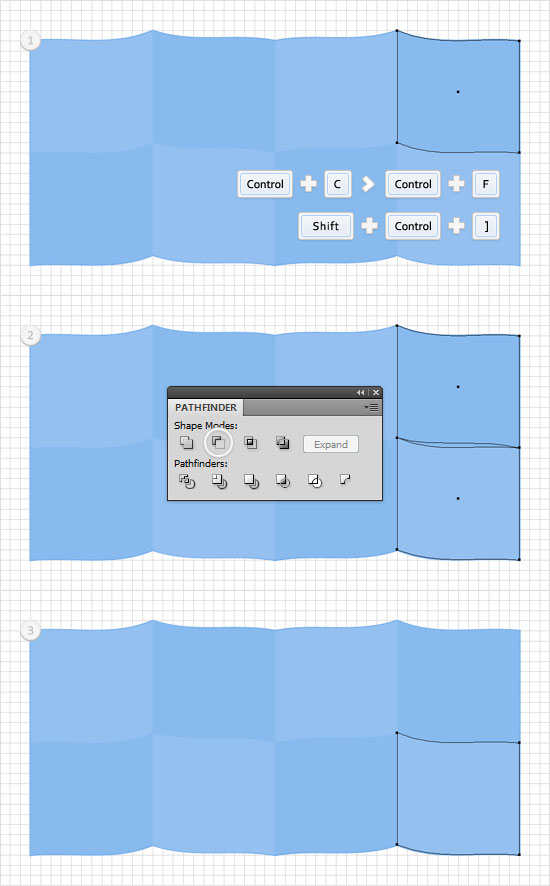
Keep focusing on the eight, blue shapes. Select the top, right shape, make a copy in front (Control + C > Control + F) and bring it to front (Shift + Control + ] ). Select this copy along with the bottom, right blue shape and click on the Minus Front button from the Pathfinder panel.
Step 12
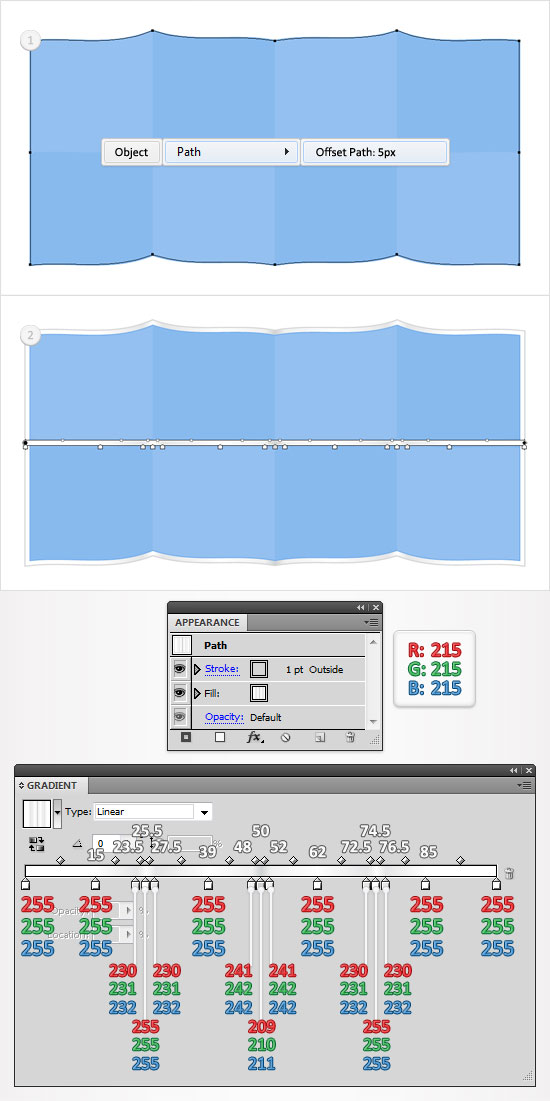
Move over to the Layers panel, select "Map" and go to Object > Path > Offset Path. Enter a 5px offset and click OK. Fill the resulting shape with the linear gradient shown in the second image and set the stroke color at R=215 G=215 B=215. The white numbers from the gradient image stand for location percentage.
Step 13
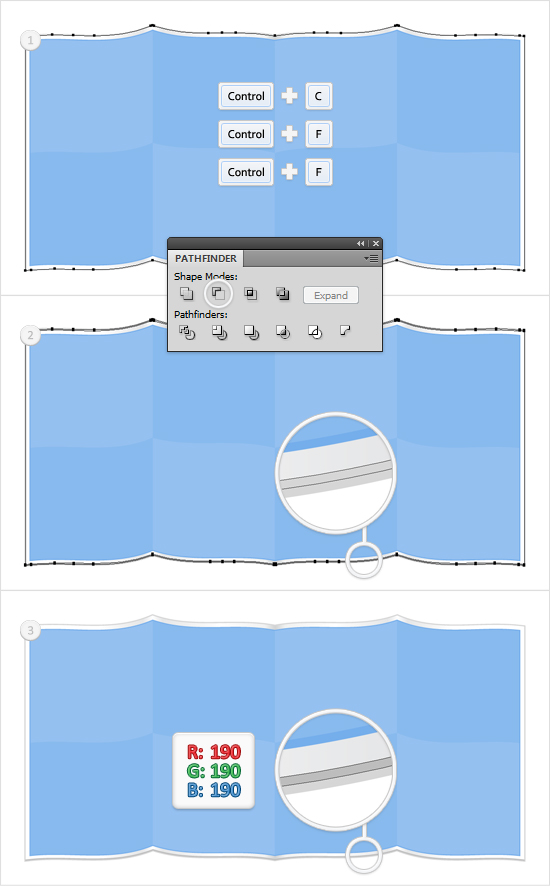
Disable Snap to Grid (View > Snap to Grid) then go to Edit > Preferences > General and make sure that the Keyboard Increment is set at 1px. Select the shape created in the previous step and make two copies in front (Control + C > Control + F > Control + F). Select the top copy and hit the up arrow once (to move it 1px up). Reselect both copies and click on the Minus Front button from the Pathfinder panel. Fill the resulting shape with R=190 G=190 B=190 and remove the color from the stroke.
Step 14
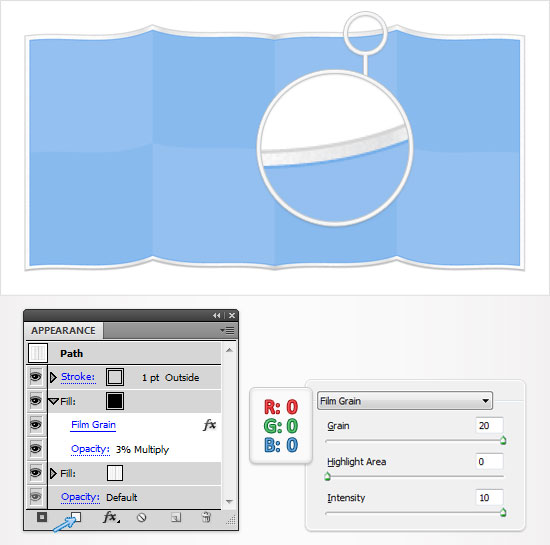
Reselect the shape created in the twelfth step and open the Appearance panel. Add a second fill for this shape using the Add new Fill button. It's the little, white square icon from the bottom of the Appearance panel. Select this new fill, make it black, lower its opacity to 3%, change the blending mode to Multiply and go to Effect > Artistic > Film Grain. Enter the data shown below and click OK.
Step 15
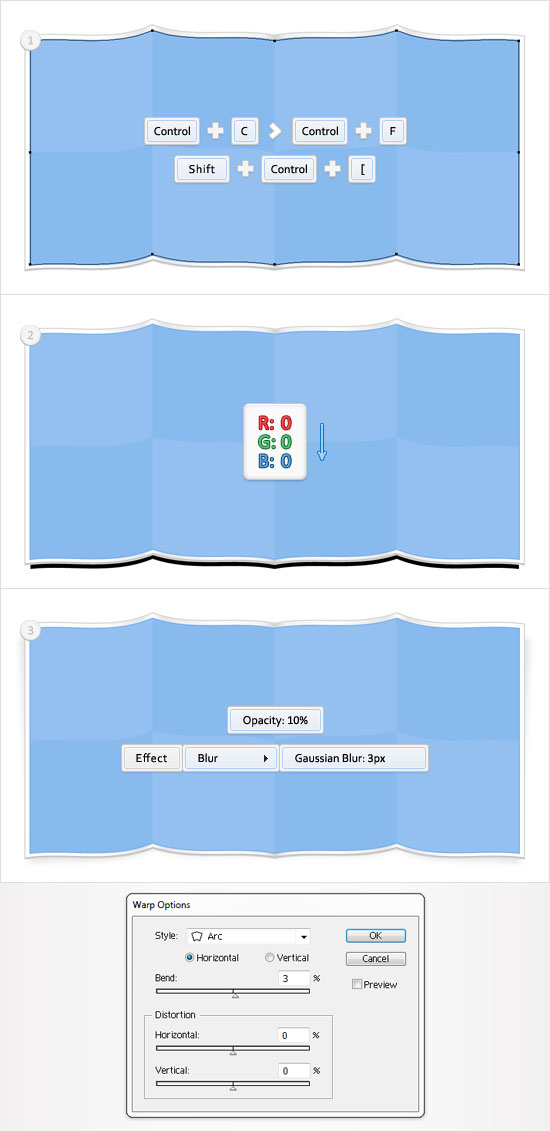
Reselect "Map", make a copy in front (Control + C > Control + F) and send it to the back (Shift + Control + [ ). Fill this copy with black, move it 10px down. Lower its opacity to 10% and go to Effect > Warp > Arc. Enter the data shown in the final image, click OK and go to Effect > Blur > Gaussian Blur. Enter a 3px radius and click OK.
Step 16
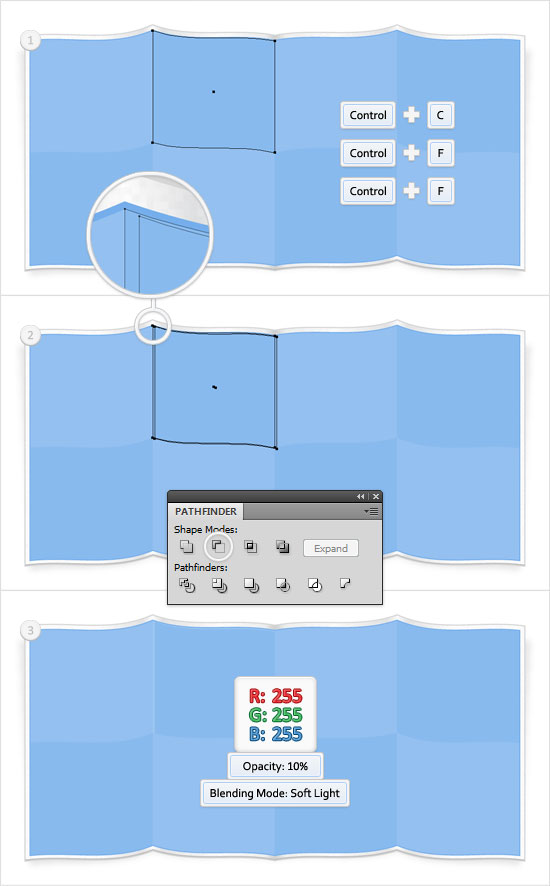
Select the top, blue shape from the second column and make two copies in front (Control + C > Control + F > Control + F). Select the top copy and move it 1px down and 2px to the right. Reselect both copies and click on the Minus Front button from the Pathfinder panel. Fill the resulting shape with white, lower its opacity to 10% and change the blending mode to Soft Light.
Step 17
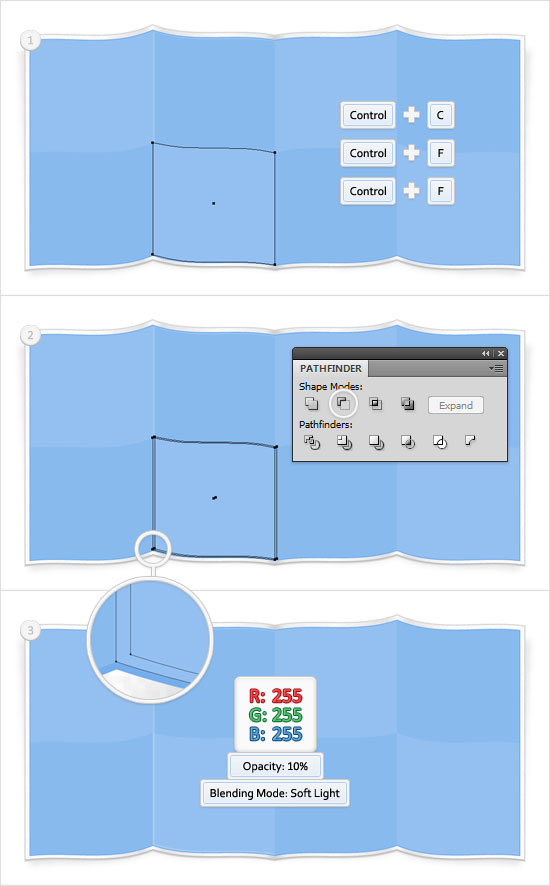
Select the bottom, blue shape from the second column and make two copies in front (Control + C > Control + F > Control + F). Select the top copy and move it 1px up and 2px to the right. Reselect both copies and click on the Minus Front button from the Pathfinder panel. Fill the resulting shape with white, lower its opacity to 10% and change the blending mode to Soft Light.
Step 18
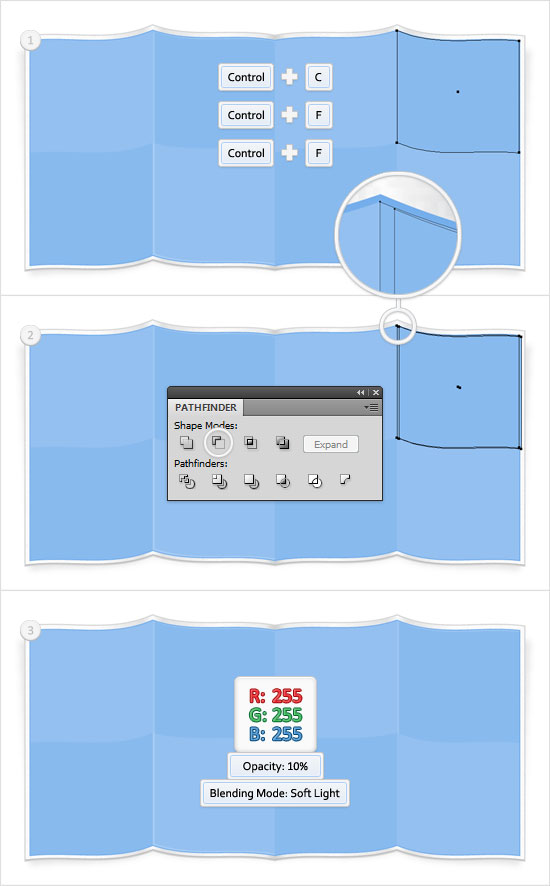
Select the top, blue shape from the fourth column and make two copies in front (Control + C > Control + F > Control + F). Select the top copy and move it 1px down and 2px to the right. Reselect both copies and click on the Minus Front button from the Pathfinder panel. Fill the resulting shape with white, lower its opacity to 10% and change the blending mode to Soft Light.
Step 19
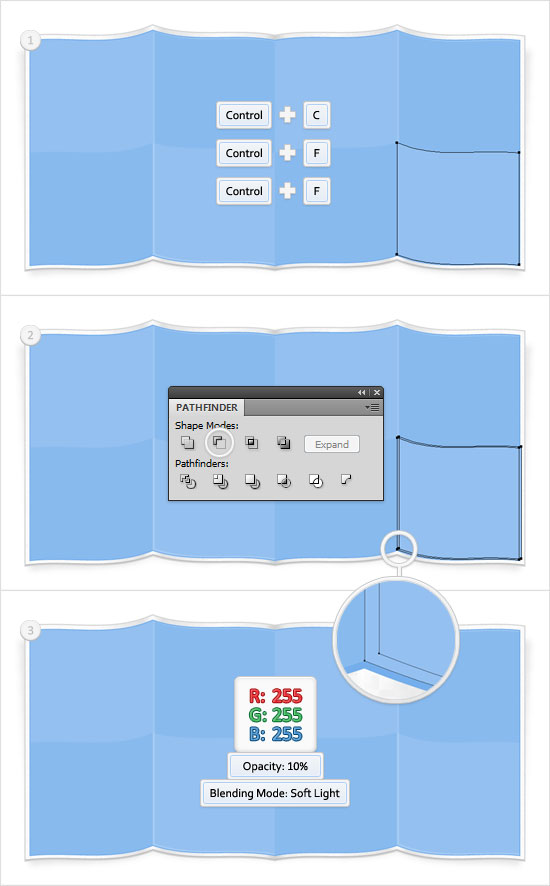
Select the bottom, blue shape from the fourth column and make two copies in front (Control + C > Control + F > Control + F). Select the top copy and move it 1px up and 2px to the right. Reselect both copies and click on the Minus Front button from the Pathfinder panel. Fill the resulting shape with white, lower its opacity to 10% and change the blending mode to Soft Light.
Step 20
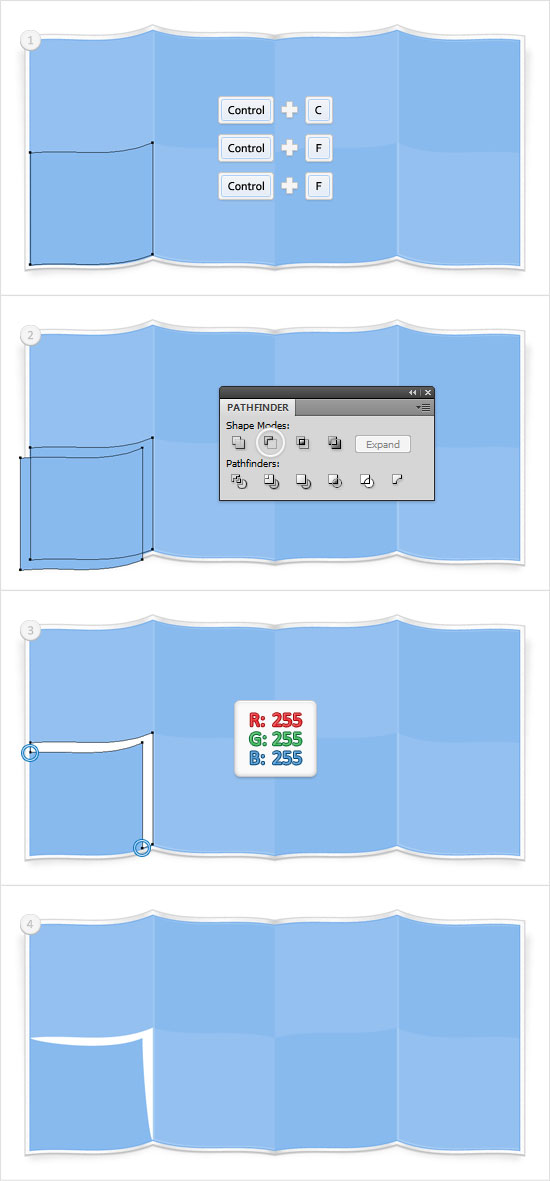
Select the bottom, blue shape from the first column and make two copies in front (Control + C > Control + F > Control + F). Select the top copy and move it 10px down and to the left. Reselect both copies and click on the Minus Front button from the Pathfinder panel. Fill the resulting shape with white. Switch to the Delete Anchor Points Tool(-), make sure that your white shape is still selected and click on the two anchor points highlighted in the third image. In the end your shape should look like is shown in the fourth image.
Step 21
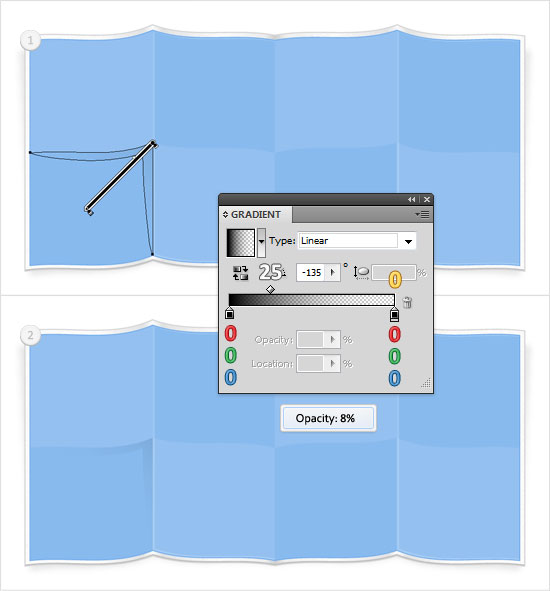
Reselect the shape created in the previous step, lower its opacity to 8% and fill it with the linear gradient shown below. Remember that the white number from the gradient stands for location percentage while the yellow zero stands for opacity percentage.
Step 22
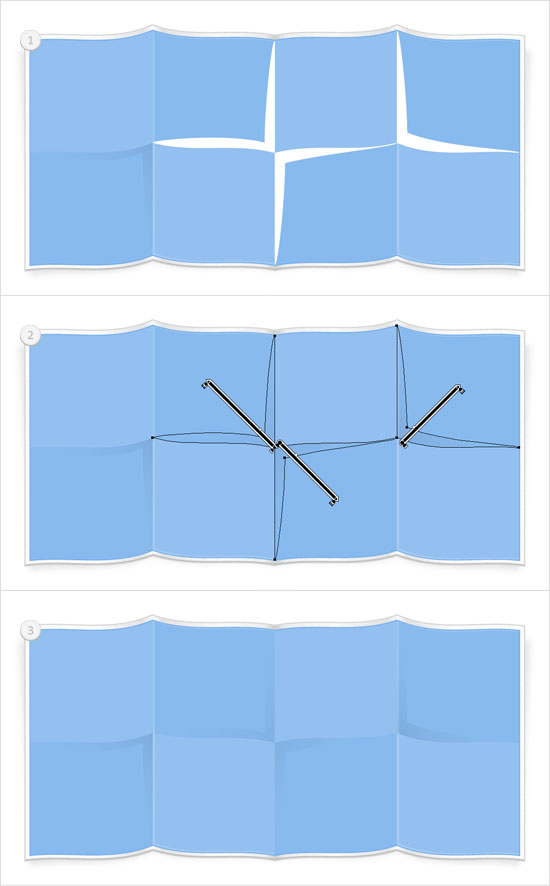
Repeat the techniques mentioned in the last two steps and create the three shapes shown in the following images.
Step 23
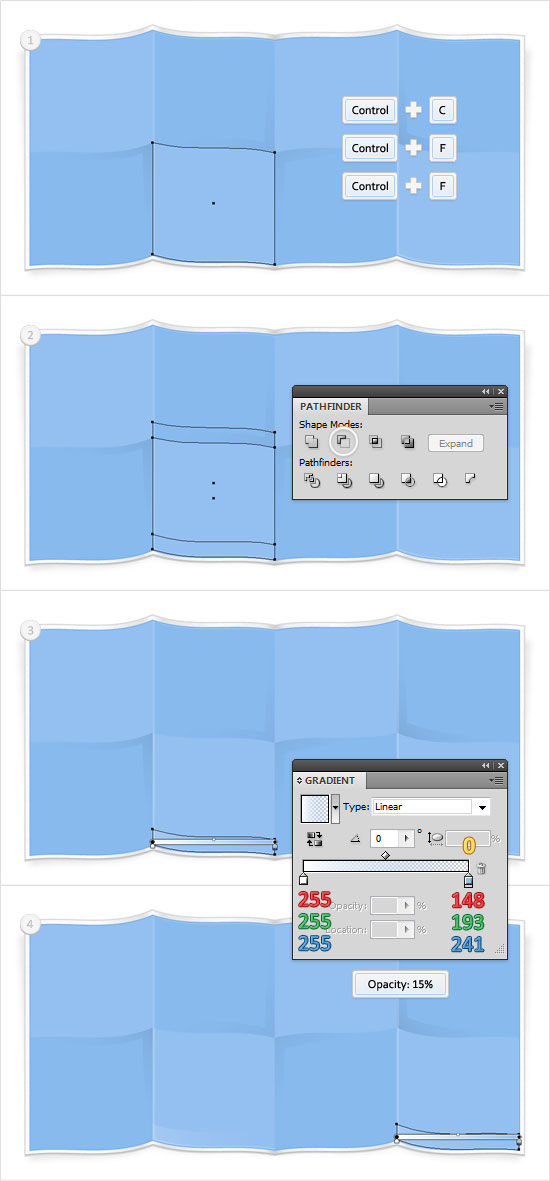
Select the bottom, blue shape from the second column and make two copies in front (Control + C > Control + F > Control + F). Select the top copy and move it 15px up. Reselect both copies and click on the Minus Front button from the Pathfinder panel. Fill the resulting shape with the linear gradient shown in the third image and lower its opacity to 15%. Repeat this technique for the bottom, blue shape from the fourth column.
Step 24
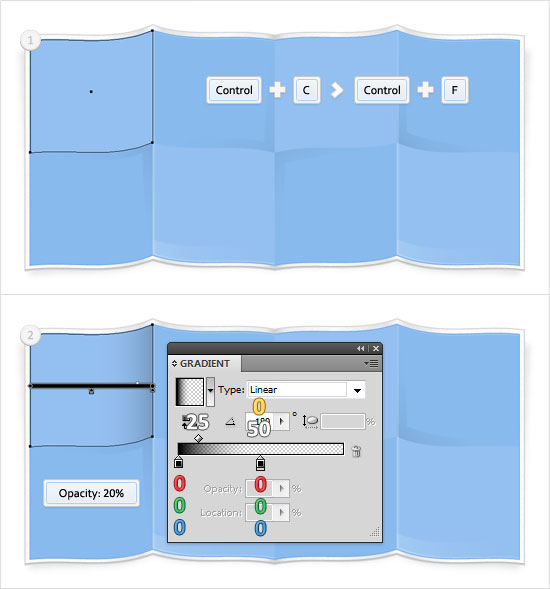
Select the top, blue shape from the first column and make a copy in front (Control + C > Control + F). Lower its opacity to 20% and fill it with the linear gradient shown below.
Step 25
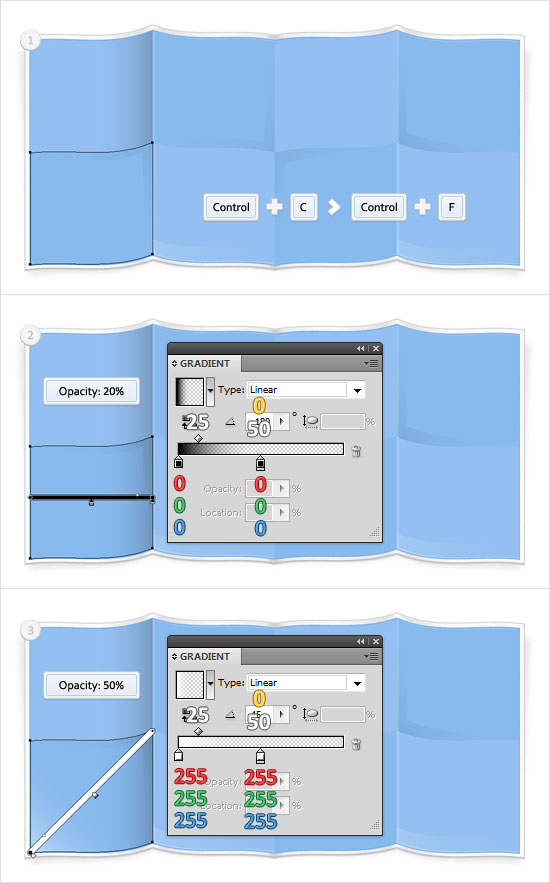
Select the bottom, blue shape from the first column and make a copy in front (Control + C > Control + F). Fill it with the linear gradient shown in the second image and move over to the Appearance panel. Select the existing fill and lower its opacity to 20%. Add a second fill for this shape, select it from the Appearance panel, lower its opacity to 50% and use the linear gradient shown in the third image.
Step 26
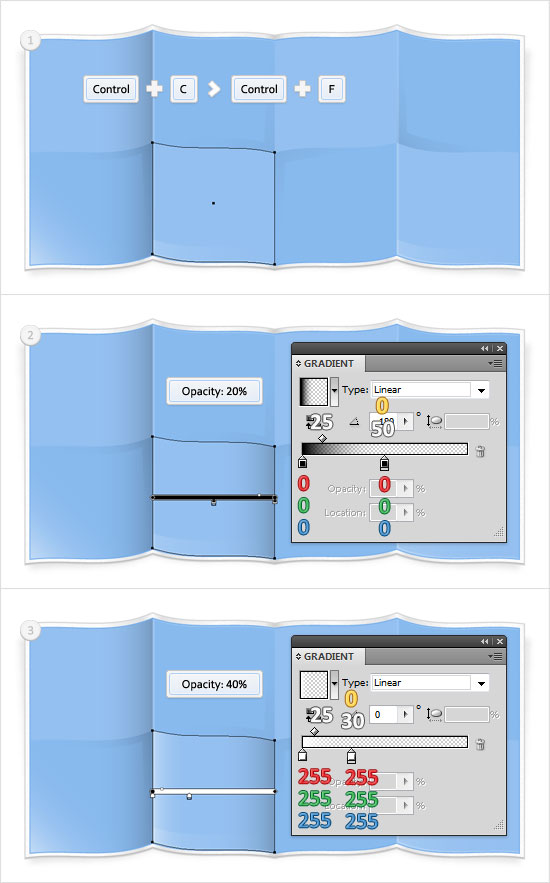
Select the bottom, blue shape from the second column and make a copy in front (Control + C > Control + F). Fill it with the linear gradient shown in the second image and move to the Appearance panel. Select the existing fill and lower its opacity to 20%. Add a second fill for this shape, select it from the Appearance panel, lower its opacity to 40% and use the linear gradient shown in the third image.
Step 27
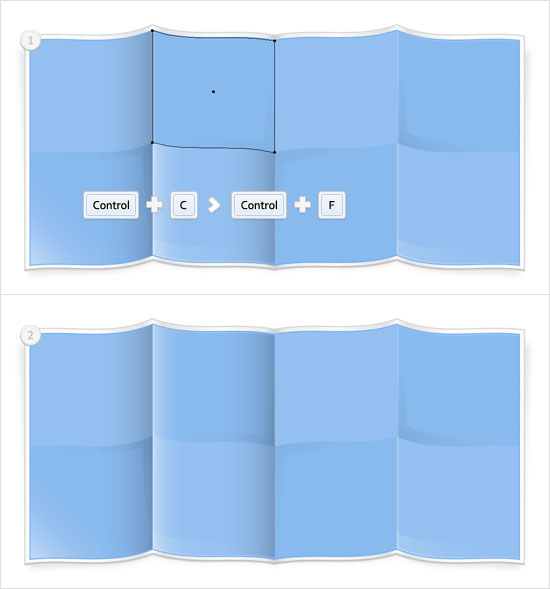
Select the top, blue shape from the second column and make a copy in front (Control + C > Control + F). Now, you need to copy the properties added for the shape created in the previous step to this copy. Here is how you can easily do it. Go to the Layers panel, focus on the right side and you'll notice that every shape comes with a little grey circle. It's called a target icon. Hold Alt, click on the circle that stands for the shape created in the previous step and drag onto the circle that stands for the copy created in the beginning of this step.
Step 28
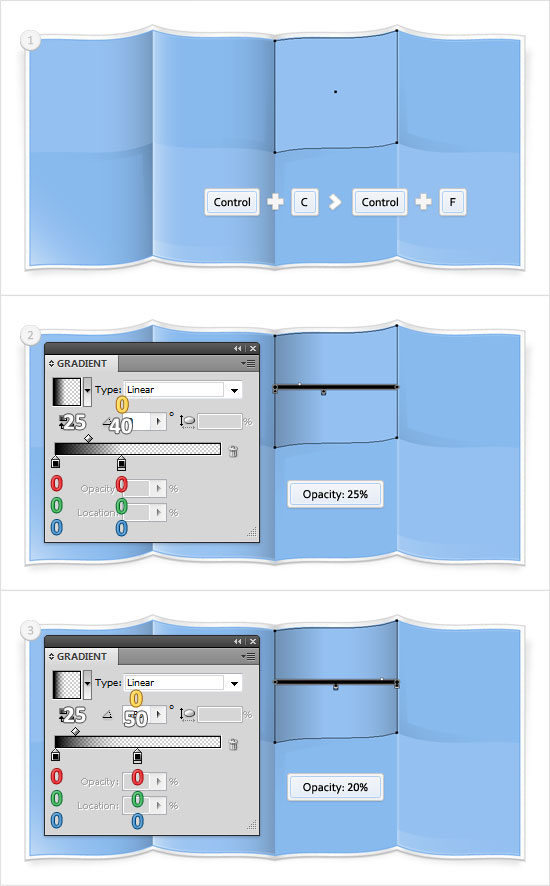
Select the top, blue shape from the third column and make a copy in front (Control + C > Control + F). Fill it with the linear gradient shown in the second image and move to the Appearance panel. Select the existing fill and lower its opacity to 25%. Add a second fill for this shape, select it from the Appearance panel, lower its opacity to 20% and use the linear gradient shown in the third image.
Step 29
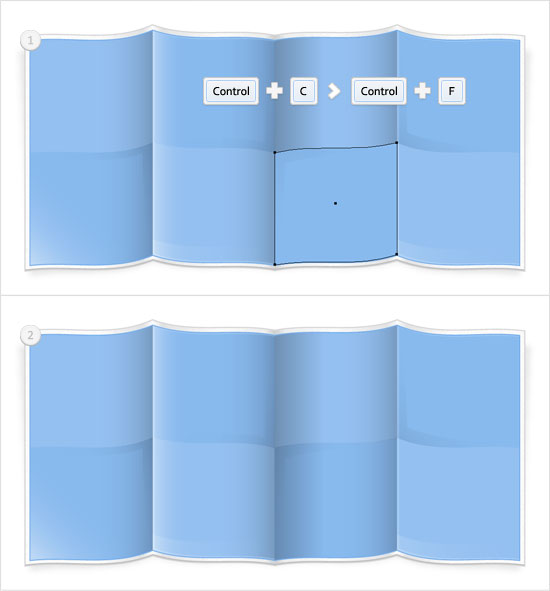
Select the bottom, blue shape from the third column and make a copy in front (Control + C > Control + F). Again, copy the properties from the shape created in the previous step to this fresh copy.
Step 30
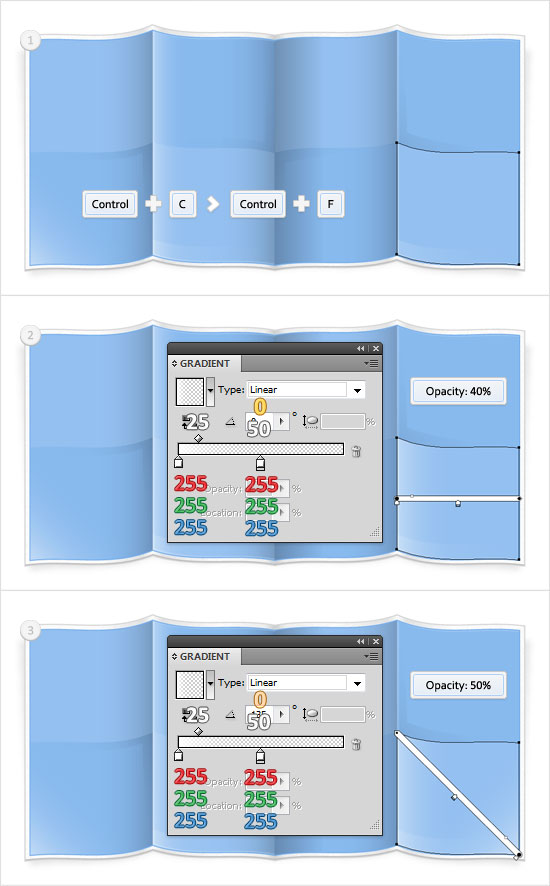
Select the bottom, blue shape from the fourth column and make a copy in front (Control + C > Control + F). Fill it with the linear gradient shown in the second image and move over to the Appearance panel. Select the existing fill and lower its opacity to 40%. Add a second fill for this shape, select it from the Appearance panel, lower its opacity to 50% and use the linear gradient shown in the third image.
Step 31
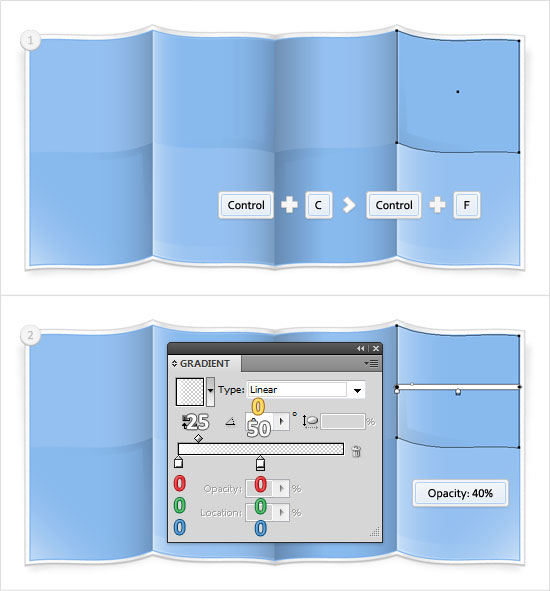
Select the top, blue shape from the fourth column and make a copy in front (Control + C > Control + F). Lower its opacity to 40% and fill it with the linear gradient shown below.
Step 32
Select all the shapes created in the last sixteen steps and group them (Control + G).
Step 33
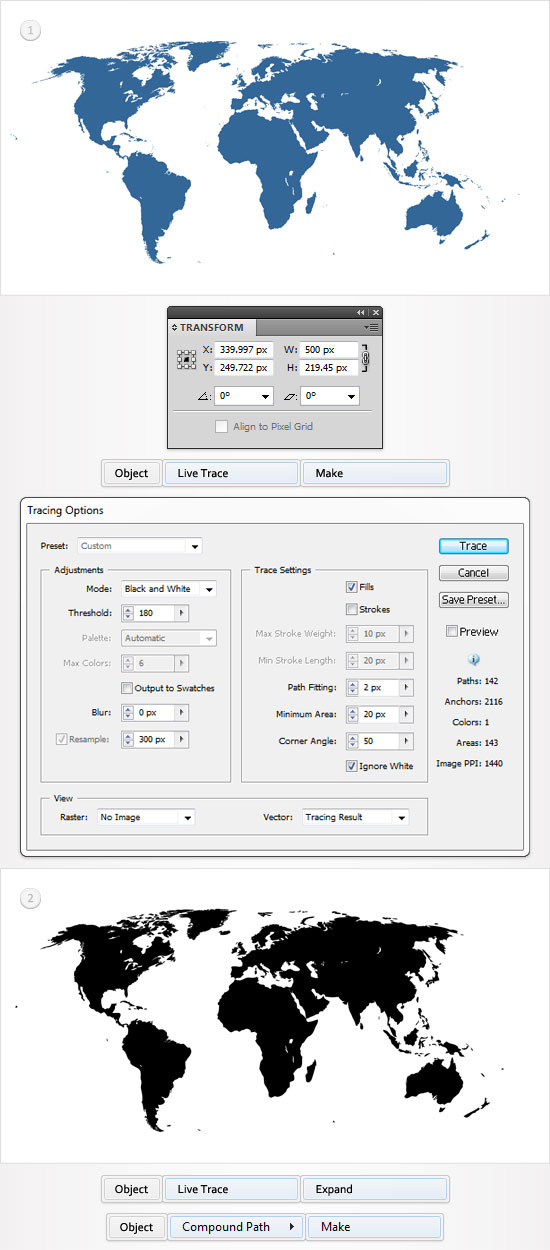
For the map you need to start with this simple image . Save it to your hard drive and drag it inside your Ai file. Select it and open the Transform panel (Window > Transform). Check the "Constrain Width and Height" button then enter 500 in the Width box. Select this resized shape. First, go to Object > Live Trace > Make then go to Object > Live Trace > Tracing Options. Enter the data shown below, make sure that you check the "Ignore White" box, click on the Trance button then go to Object > Live Trace > Expand. Select the resulting group of shapes and go to Object > Compound Path > Make.
Step 34
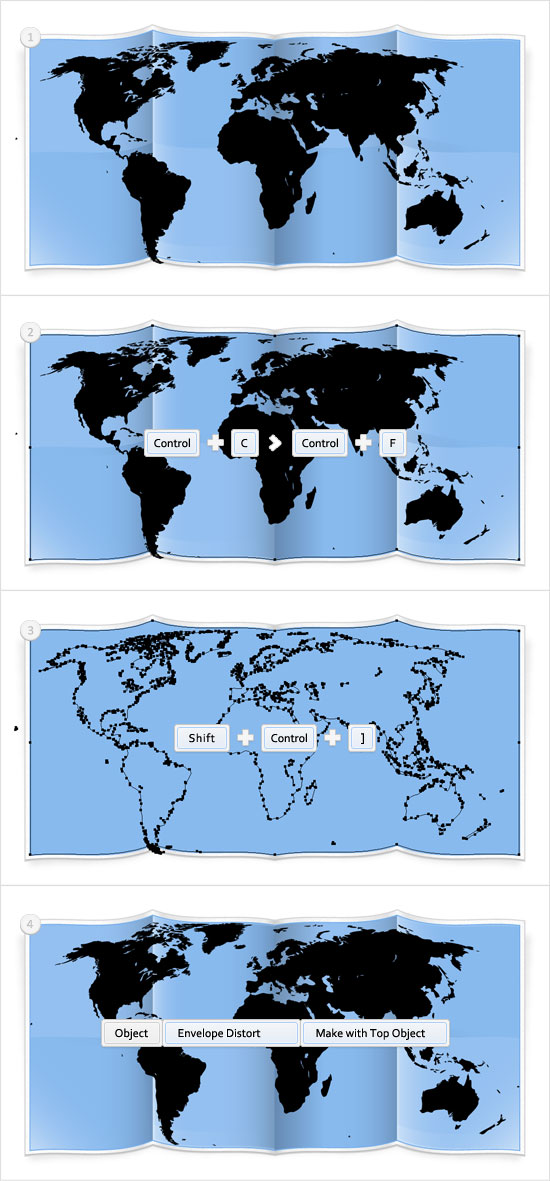
Select the compound path created in the previous step and place it as shown in the first image. Reselect the "Map" shape, make a copy in front (Control + C > Control + F) and bring it to front (Shift + Control + ] ). Select this new copy along with the compound path and go to Object > Envelope Distort > Make with Top Object. In the end your compound path should look like it's shown in the fourth image.
Step 35
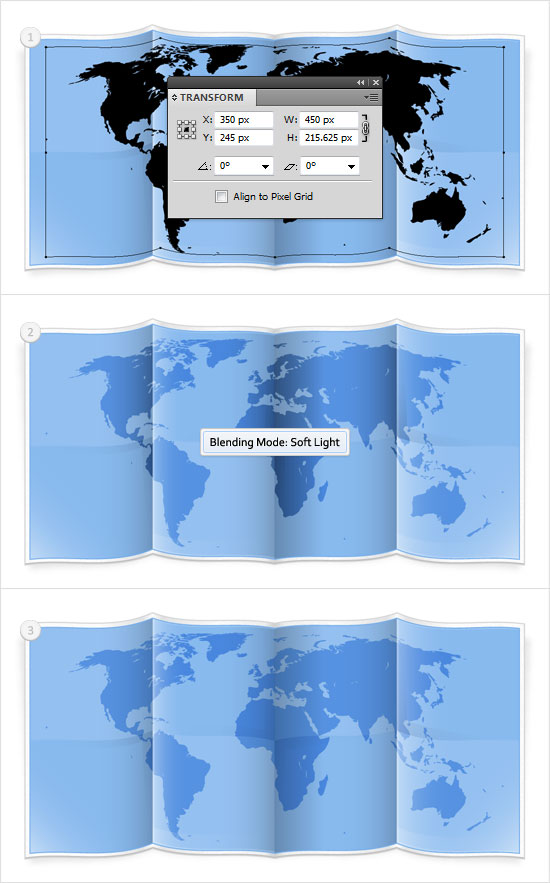
Reselect the compound path, move to the Transform panel and enter 350 in the Width box. Make sure that your compound path is still selected, change its blending mode to Soft Light then drag it below the group created in step #32 (in the Layers panel).
Step 36
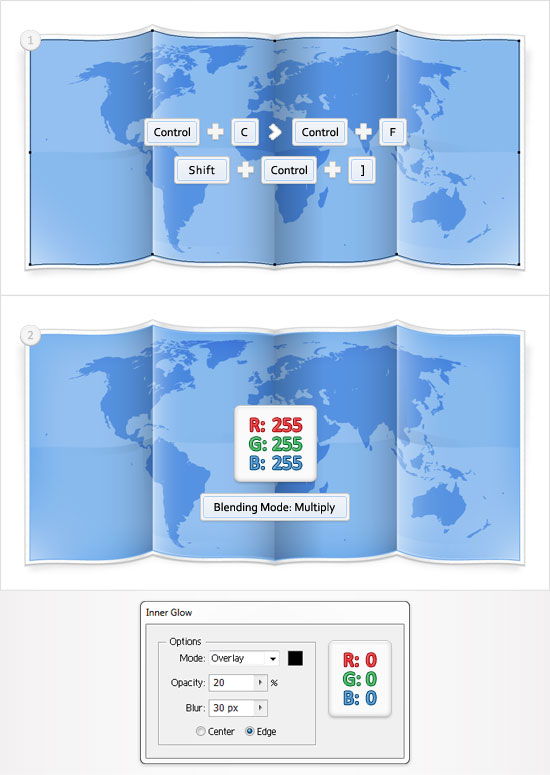
Reselect the "Map", make a copy in front (Control + C > Control + F) and bring it to front (Shift + Control + ] ). Fill it with white, change its blending mode to Multiply and go to Effect > Stylize > Inner Glow. Enter the data shown below and click OK.
Step 37
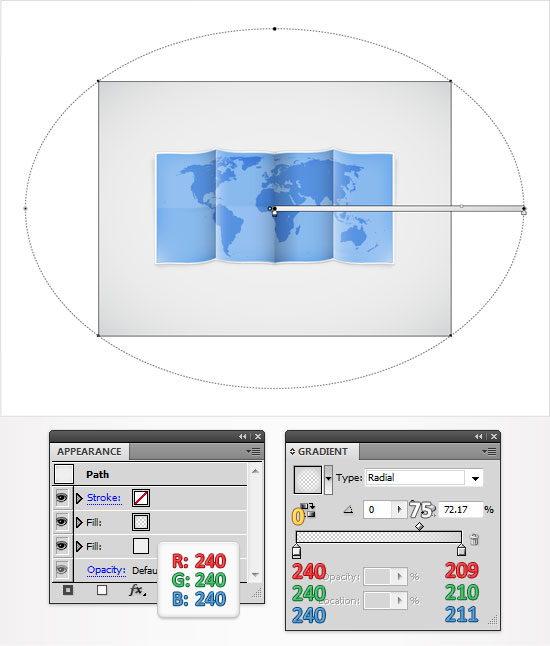
Finally, let's add a nice background. Pick the Rectangle Tool(M), create a shape the size of your artboard, fill it with R=240 G=240 B=240 and send it to the back (Shift + Control + [ ). Add a second fill for this shape and use the radial gradient shown below.
Step 38
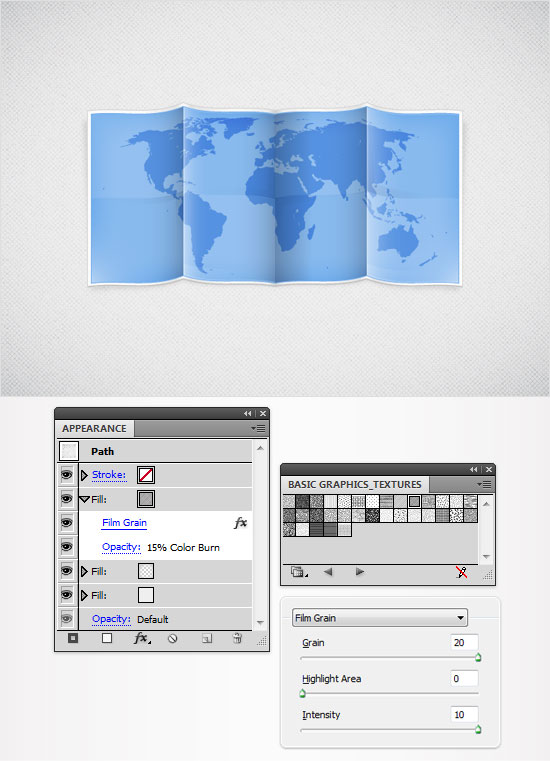
For this final step you will need a built-in pattern. Open the fly-out menu of the Swatches panel (Window > Swatches) and go to Open Swatch Library > Patterns > Basic Graphics > Basic Graphics_Textures. A new window with a bunch of patterns should open. Look for the "Diamond" pattern. Reselect the shape created in the previous step and add a new fill. Select it from the Appearance panel, lower its opacity to 15%, change the blending mode to Color Burn, add the "Diamond" pattern and go to Effect > Artistic > Film Grain. Enter the data shown below, click OK.
And We're Done!
Once more here is a look at what your final result should resemble. We hope that you all enjoyed this all new Adobe Illustrator tutorial and that it was easy to follow along with. Feel free to leave us your thoughts, critiques, or questions in the comment section below. (rb)
(rb) 
Really nice, I might try to make this effect in Photoshop!
Cripes – that’s look tricky :/
Very amazing! Love this sooo much! :)
You rock.. Very clean n easy to understand tutorial :D
Very NICE ….
Here is my map. Somehow I couldn’t follow the exact tut as it gave me a different result when I try to import the image. Back track a couple of times but I couldn’t figure out what I did wrong. So, I improvised. It came out pretty exact.
http://img.photobucket.com/albums/v645/duceduc/themes/map-illustration-vector.png
There were some typo. I have listed below for anyone who have the same issue.
step9: border color is wrong.
step31: white gradient not black
step 35 verbal instructions says ‘350px’ but the image reads ‘450px’. Choice the 450px instead.
Great Tutorial! I just finished it and the result is awesome. except some little mistakes in the colors, everything is ok. :) Thanks
what a great tutorial!!!
Thx a lot guys.