
Hands-On: Build a Node.js-powered Chatroom Web App (Part Six)
This Node.js tutorial series will help you build a Node.js powered real-time chatroom web app fully deployed in the cloud. Throughout the series, you will learn how to setup Node.js on your Windows machine, how to develop a web frontend with Express, how to deploy a Node Express-based app to Microsoft Azure, how to use Socket.IO to add a real-time layer, and how to deploy it all together.
Level: Beginner to Intermediate--you are expected to know HTML5 and JavaScript
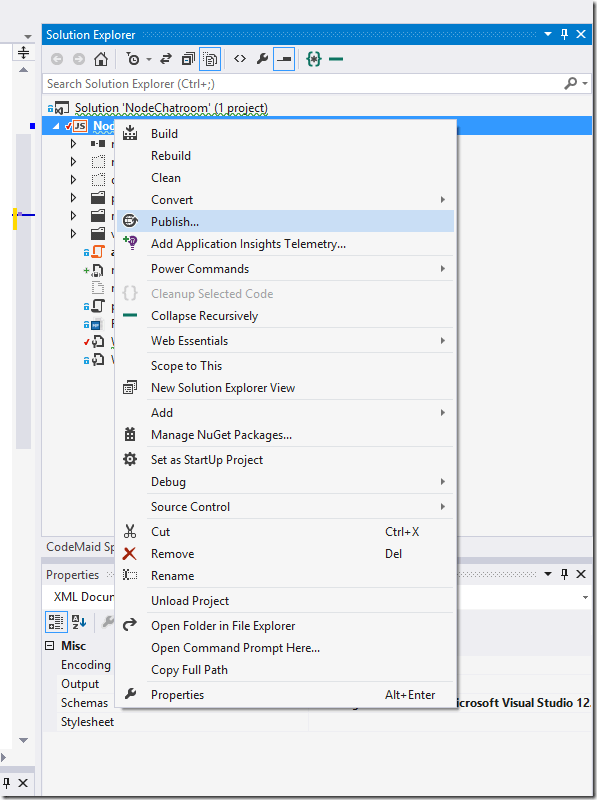 2. Clicking Publish will open a wizard with a few options, select the target Microsoft Azure Websites.
3. You will be asked to sign in at this step, please use the same Microsoft Account here as you did on the Azure sign up.
4. Click New to create a new Azure website or, if you already have one created, you can select it from the dropdown.
2. Clicking Publish will open a wizard with a few options, select the target Microsoft Azure Websites.
3. You will be asked to sign in at this step, please use the same Microsoft Account here as you did on the Azure sign up.
4. Click New to create a new Azure website or, if you already have one created, you can select it from the dropdown.
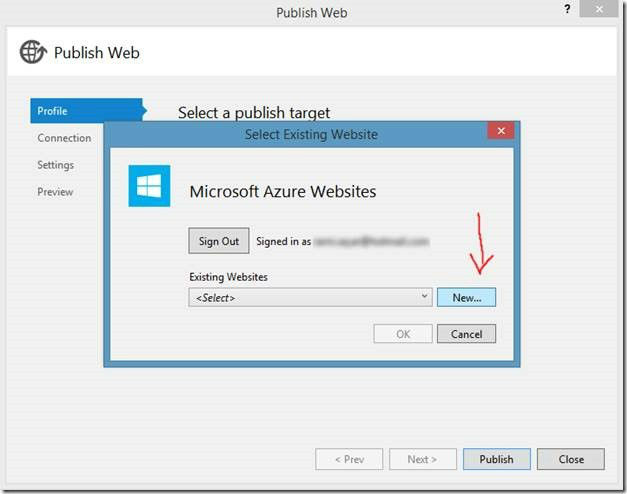 5. You will want to complete the fields in the wizard (just like below). Make sure to choose a unique site name, and then click Create.
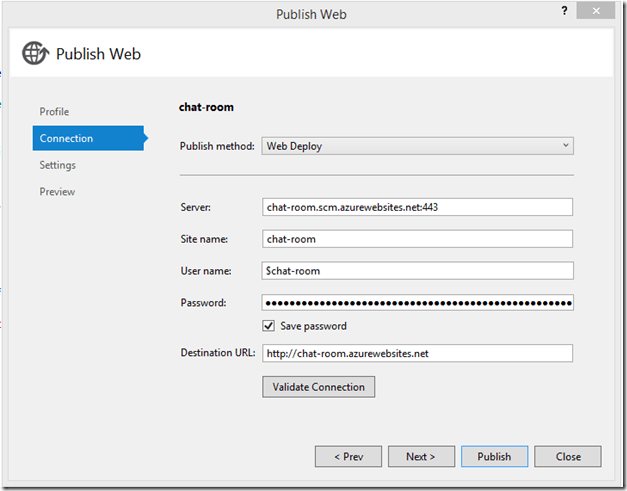
 6. You will be presented with a pre-filled wizard. Click Publish.
 WE HAVE DEPLOYED TO THE CLOUD BUT THE WORK IS NOT OVER YET!
 Second, you will want to modify your web.config file and the following line to the system.webServer XML element.
![clip_image001[1]](https://www.noupe.com/wp-content/uploads/2015/05/art11-nodejs-chatroom-pic06.png) 2. Select the Settings tab on the left and be sure to choose the “Debug” configuration from the dropdown.
2. Select the Settings tab on the left and be sure to choose the “Debug” configuration from the dropdown.
 3. Click Publish.
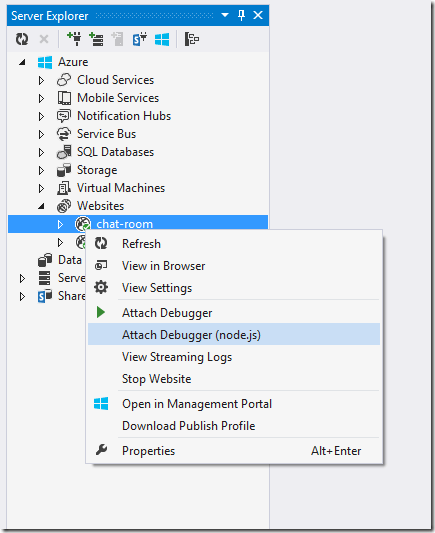
Once your project is properly deployed and WebSockets are enabled, you can attach to the web site from Server Explorer. If you do not have the Server Explorer window open, you can open it via View ? Server Explorer. Then, locate your web site under Windows Azure ? Web Sites, and right-click on it. If it is running, and your project has been deployed to it using the Debug configuration, you should see the "Attach Debugger (Node.js)" command in the context menu.
3. Click Publish.
Once your project is properly deployed and WebSockets are enabled, you can attach to the web site from Server Explorer. If you do not have the Server Explorer window open, you can open it via View ? Server Explorer. Then, locate your web site under Windows Azure ? Web Sites, and right-click on it. If it is running, and your project has been deployed to it using the Debug configuration, you should see the "Attach Debugger (Node.js)" command in the context menu.
Part 6 – The Finale and Debugging Remote Node Apps!
Welcome to Part 6 of the hands-on Node.js tutorial series: Build a Node.js-powered chatroom web app. In this final installment, I will show you how to do a final deployment of your chatroom and how to perform remote debugging.Deploying to Azure!
Now that we’ve got our Node.js-powered anonymous chatroom app working, let’s deploy it to the cloud in a few clicks. You can deploy to any cloud that supports Node.js. I will be using Microsoft Azure as I can run a Node.js website on there for free. You can sign up for a free trial of Microsoft Azure here. You will get trial credits to spend on all Azure services. For the service we are using, Azure Websites, you can actually run 10 websites without spending a dime. 1. Once you have your Azure account setup, go back to the IDE,right click on the project and click Publish. 2. Clicking Publish will open a wizard with a few options, select the target Microsoft Azure Websites.
3. You will be asked to sign in at this step, please use the same Microsoft Account here as you did on the Azure sign up.
4. Click New to create a new Azure website or, if you already have one created, you can select it from the dropdown.
2. Clicking Publish will open a wizard with a few options, select the target Microsoft Azure Websites.
3. You will be asked to sign in at this step, please use the same Microsoft Account here as you did on the Azure sign up.
4. Click New to create a new Azure website or, if you already have one created, you can select it from the dropdown.
 5. You will want to complete the fields in the wizard (just like below). Make sure to choose a unique site name, and then click Create.
 6. You will be presented with a pre-filled wizard. Click Publish.
 WE HAVE DEPLOYED TO THE CLOUD BUT THE WORK IS NOT OVER YET!
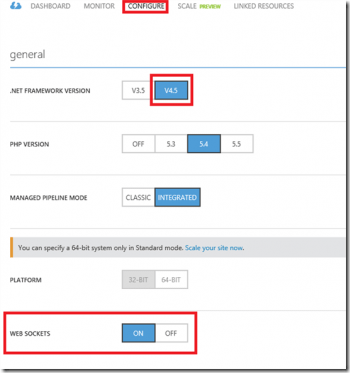
Enabling WebSockets in Azure Websites
There are a few things you need to do to ensure that WebSockets is enabled in your website. If you want more detailed steps or FAQ, be sure to visit this page. First, you will need to enable WebSockets from the Azure command-line or the Configuration tab, like so: Second, you will want to modify your web.config file and the following line to the system.webServer XML element.
<webSocket enabled="false" />It may seem counterintuitive, but this disables the IIS WebSockets module, which includes its own implementation of WebSockets and conflicts with Node.js specific WebSockets modules such as Socket.IO.
Debugging Remote Node Apps
Node Tools for Visual Studio comes with several advanced debugging features such as conditional breakpoints, “hit count” breakpoints, tracepoints and remote debugging support for Windows, Linux and OS X. Read more here.Connecting to Remote Node Instances
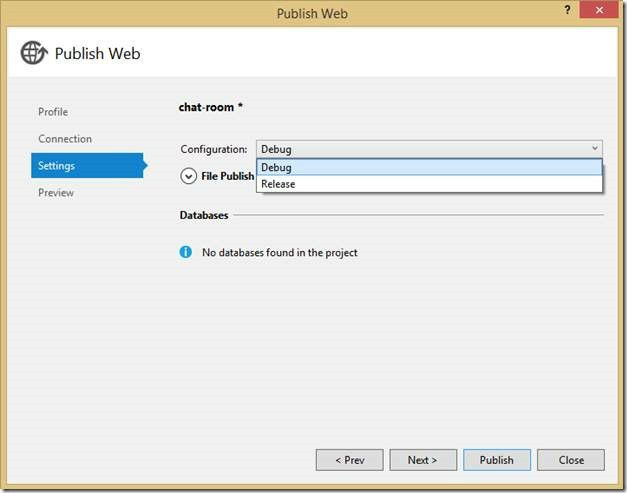
NTVS has support for remote debugging code running on Azure Web Sites. Unlike regular remote debugging, the target machine is not directly accessible over TCP. NTVS comes with a WebSocket proxy for the debugging protocol that exposes the debugger protocol via HTTP. When you create a new Windows Azure project, the proxy is fully configured for you in Web.Debug.config, and will be enabled on the Azure WebSite if you publish your project in the "Debug" configuration by following the next couple of steps. 1. Right click on the project and select Publish.![clip_image001[1]](http://blogs.msdn.com/cfs-file.ashx/__key/communityserver-blogs-components-weblogfiles/00-00-00-60-29-metablogapi/5353.clip_5F00_image0011_5F00_1CBF11A8.png) 2. Select the Settings tab on the left and be sure to choose the “Debug” configuration from the dropdown.
2. Select the Settings tab on the left and be sure to choose the “Debug” configuration from the dropdown.
 3. Click Publish.
Once your project is properly deployed and WebSockets are enabled, you can attach to the web site from Server Explorer. If you do not have the Server Explorer window open, you can open it via View ? Server Explorer. Then, locate your web site under Windows Azure ? Web Sites, and right-click on it. If it is running, and your project has been deployed to it using the Debug configuration, you should see the "Attach Debugger (Node.js)" command in the context menu.
3. Click Publish.
Once your project is properly deployed and WebSockets are enabled, you can attach to the web site from Server Explorer. If you do not have the Server Explorer window open, you can open it via View ? Server Explorer. Then, locate your web site under Windows Azure ? Web Sites, and right-click on it. If it is running, and your project has been deployed to it using the Debug configuration, you should see the "Attach Debugger (Node.js)" command in the context menu.

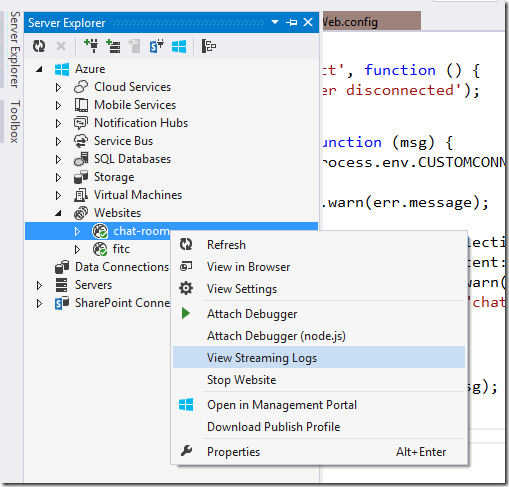
Reading Logs and Streaming Logs
If you want to stream the latest logs, it’s quite easy! All you have to do is right click on your website in the Server Explorer and press View Stream Logs.