
Vorlon.js: How to Create a Plug-in to Test Your JavaScript Remotely
During the keynote at the recent //BUILD 2015 conference, our team at Microsoft released Vorlon.js, a tool to debug your website. Vorlon.js is mainly composed of a dashboard which displays data coming from your site. To make it work, you only have to reference a script in your site code. We (Pierre Lagarde, David Catuhe, David Rousset and myself) built this primarily to help web developers debug their websites on mobile devices. Of course, proprietary solutions already exist like Chrome developer tools to debug chrome mobile, or the equivalent for Safari and Visual Studio for Internet Explorer or even Weinre; but none of these is really technology and platform-agnostic. This is the gap we wanted to fill with Vorlon.js.
 You can install Vorlon.js either from npm or by cloning the GitHub repository and using gulp to make it ready to use.
 You can find more information about that on our website (http://vorlonjs.io/) or on the blog article my friend David wrote.
To create a plugin for Vorlon, you can use TypeScript or directly with JavaScript.
I will give you the JavaScript and TypeScript code so you can read it in your favorite language :)
You can find more information about that on our website (http://vorlonjs.io/) or on the blog article my friend David wrote.
To create a plugin for Vorlon, you can use TypeScript or directly with JavaScript.
I will give you the JavaScript and TypeScript code so you can read it in your favorite language :)
 With this plugin activated, the vorlon.js Dashboard will display size information coming from the client.
Before going more into details, have a look at this quick video which shows you what we will create.
In this video, I do a demo on a desktop browser but this obviously also works on a mobile phone or tablet.
With this plugin activated, the vorlon.js Dashboard will display size information coming from the client.
Before going more into details, have a look at this quick video which shows you what we will create.
In this video, I do a demo on a desktop browser but this obviously also works on a mobile phone or tablet.
 The HTML code is pretty light:
 You can try to change the size of the browser in which you display your client code, you will see it change live on the dashboard.
Easy, isn’t it? :-)
You can try to change the size of the browser in which you display your client code, you will see it change live on the dashboard.
Easy, isn’t it? :-)
You can install Vorlon.js either from npm or by cloning the GitHub repository and using gulp to make it ready to use.
You can find more information about that on our website (http://vorlonjs.io/) or on the blog article my friend David wrote.
To create a plugin for Vorlon, you can use TypeScript or directly with JavaScript.
I will give you the JavaScript and TypeScript code so you can read it in your favorite language :)
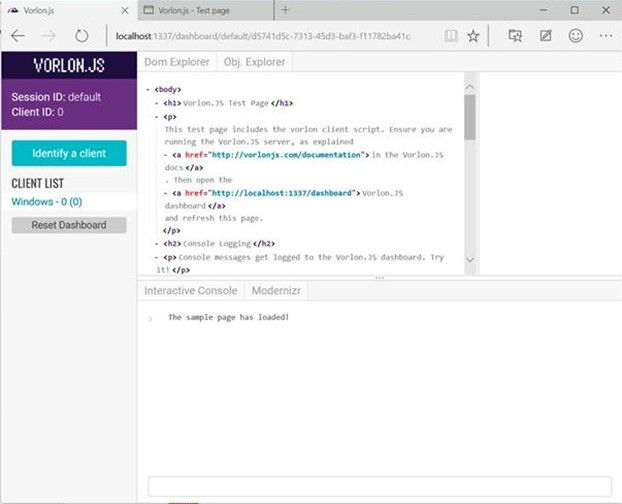
What We Are Going to Create
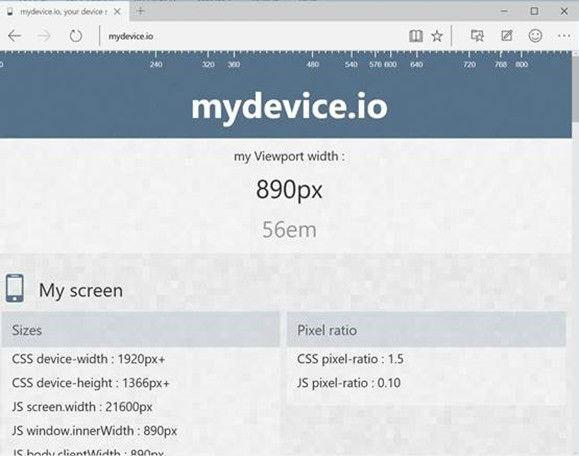
In this article I chose to create a plugin which will get device information. This is based on the website http://mydevice.io/ created by Raphaël Goetter. To keep it simple I will only get the data from the Sizes section of the My Screen category.
With this plugin activated, the vorlon.js Dashboard will display size information coming from the client.
Before going more into details, have a look at this quick video which shows you what we will create.
In this video, I do a demo on a desktop browser but this obviously also works on a mobile phone or tablet.
First Step: Writing Your Code Outside of Vorlon.js
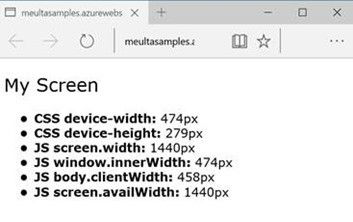
A vorlon.js plugin is nothing more than HTML, CSS and JavaScript code. Your plugin is getting data from the client and sending it to the server to display it on the Dashboard. This means that you can first do it without Vorlon.js, write everything on a simple web project and then include it in the Vorlon.js plugin architecture. Our plugin will get some information related to the client size and display it on an HTML list. It will also refresh the data when resizing the browser. You can see the full sample running here (it is not pretty, but does the job! ;-)).
The HTML code is pretty light:
<!DOCTYPE html>
	<html xmlns="http://www.w3.org/1999/xhtml">
		<head>
		<title></title>
		<link href="control.css" rel="stylesheet" />
		<script src="vorlon.deviceinfo.js"></script>
		</head>
	<body>
		<div id="deviceinfo" class="deviceinfo-container">
			<h2>My Screen</h2>
			<ul>
				<li>CSS device-width: <span id="devicewidth"></span></li>
				<li>CSS device-height: <span id="deviceheight"></span></li>
				<li>JS screen.width: <span id="screenwidth"></span></li>
				<li>JS window.innerWidth: <span id="windowinnerwidth"></span></li>
				<li>JS body.clientWidth: <span id="bodyclientwidth"></span></li>
				<li>JS screen.availWidth: <span id="screenavailwidth"></span></li>
			</ul>
		</div>
	</body>
</html>
It is using the following control.css file:
.deviceinfo-container {
    font-family: "Verdana", "Comic Sans MS";
}

.deviceinfo-container h2 {
    font-weight: normal;
}

.deviceinfo-container ul li {
    font-weight: bold;
}

.deviceinfo-container ul span {
    font-weight: normal;
}
And the JavaScript code gets the data once the page is loaded and each time the window is resized and updates the list:
(function(){
    var compute = function() {
        document.getElementById('devicewidth').innerText = document.documentElement.clientWidth + 'px';
        document.getElementById('deviceheight').innerText = document.documentElement.clientHeight + 'px';
        document.getElementById('screenwidth').innerText =  screen.width + 'px';;
        document.getElementById('windowinnerwidth').innerText = window.innerWidth + 'px';
        document.getElementById('bodyclientwidth').innerText = document.body.clientWidth + 'px';
        document.getElementById('screenavailwidth').innerText = screen.availWidth + 'px';
    };

    window.onresize = function(event) {
        compute();
    };

    document.addEventListener("DOMContentLoaded", compute);

})();
So, until now we are only writing simple classic web code :)
Let’s now have a look at how to transform that into a Vorlon.js plugin!
Create the Basic JavaScript/TypeScript Code for the Plugin
In Vorlon.js, a plugin is a JavaScript class that inherits from the Plugin class. The minimum code contains a constructor and the getID function.JavaScript
var __extends = this.__extends || function (d, b) {
    for (var p in b) if (b.hasOwnProperty(p)) d[p] = b[p];
    function __() { this.constructor = d; }
    __.prototype = b.prototype;
    d.prototype = new __();
};
var VORLON;
(function (VORLON) {
    var MyDeviceInfo = (function (_super) {
        __extends(MyDeviceInfo, _super);
        function MyDeviceInfo() {
            _super.call(this, "mydeviceinfo", "control.html", "control.css");
            this._ready = true;
        }
        MyDeviceInfo.prototype.getID = function () {
            return "MYDEVICEINFO";
        };
        return MyDeviceInfo;
    })(Plugin);
    VORLON.MyDeviceInfo = MyDeviceInfo;

    //Register the plugin with vorlon core
    Core.RegisterPlugin(new MyDeviceInfo());
})(VORLON || (VORLON = {}));
TypeScript
module VORLON {
    export class MyDeviceInfo extends Plugin {

        constructor() {
            super("mydeviceinfo", "control.html", "control.css");
            this._ready = true;
        }

        public getID(): string {
            return "MYDEVICEINFO";
        }
    }

    //Register the plugin with vorlon core
    Core.RegisterPlugin(new MyDeviceInfo());
}
The ID is simply a string which you can choose. You will need it when you will add your plugin to the dashboard.
The constructor calls the super function and gives it its name, the control.html and control.css files. This is a prerequisite for it to know these files and load them when necessary.
The last line of code is registering the plugin to the list managed by the Core. The Core role is to handle all the communication and data exchange between the client and the dashboard.
Rendering on the Dashboard
Each time it is loading a plugin, the dashboard creates a new tab in its right pane. This is a space for your plugin to render. The layout part for a Vorlon.js plugin is contained in an HTML file. In the sample we are going to create, it is called control.html, which is a convention in Vorlon.js plugins. It is not displayed by default, you have to manage it in you plugin code. This is done using _insertHtmlContentAsync and generally in the startDashboardSide function. startDashboardSide is called when the dashboard is instantiating your plugin on the server side. It only has one parameter which is the HTML div where you can render your control. Basically, it is the div that is displayed on your plugin tab. _insertHtmlContentAsync is a helper that loads asynchronously all the files you gave during the plugin construction. The first argument is the render div and the second is a callback function giving you the loaded div once everything is done.JavaScript
MyDeviceInfo.prototype.startDashboardSide = function (div) {
    if (div === void 0) { div = null; }
    this._insertHtmlContentAsync(div, function (filledDiv) {
        //load data
    });
};
TypeScript
public startDashboardSide(div: HTMLDivElement = null): void {
    this._insertHtmlContentAsync(div, (filledDiv) => {
        //load data
    })
}
On the control.html part, you only have to remove the JavaScript reference which results in the following code:
<!DOCTYPE html>
	<html xmlns="http://www.w3.org/1999/xhtml">
<head>
	<title></title>
	<link href="control.css" rel="stylesheet" />
</head>
	<body>
		<div id="mydeviceinfocontainer" class="deviceinfo-container">
		<h2>My Screen</h2>
			<ul>
			<li>CSS device-width: <span id="devicewidth"></span></li>
			<li>CSS device-height: <span id="deviceheight"></span></li>
			<li>JS screen.width: <span id="screenwidth"></span></li>
			<li>JS window.innerWidth: <span id="windowinnerwidth"></span></li>
			<li>JS body.clientWidth: <span id="bodyclientwidth"></span></li>
			<li>JS screen.availWidth: <span id="screenavailwidth"></span></li>
			</ul>
		</div>
	</body>
</html>
Sending Data From the Client to the Plugin
So, now that you are rendering your control template in the dashboard you need to send it the data from the client. On the initial code it was done on the same page. Now you need to package everything and send it. All the communication process is handle for you. You only have to create an object with data in it and call the correct function. It is a helper available in Core.Messenger named sendRealTimeMessage. In the MyDeviceInfo class we add a custom function named sendClientData. It will get all the current size information and send it.JavaScript
MyDeviceInfo.prototype.sendClientData = function () {
    var data = {
        "devicewidth": document.documentElement.clientWidth,
        "deviceheight": document.documentElement.clientHeight,
        "screenwidth": screen.width,
        "windowinnerwidth": window.innerWidth,
        "bodyclientwidth": document.body.clientWidth,
        "screenavailwidth": screen.availWidth
    };
    VORLON.Core.Messenger.sendRealtimeMessage(this.getID(), data, 0 /* Client */);
};
TypeScript
public sendClientData(): void {
    var data = {
        "devicewidth" : document.documentElement.clientWidth,
        "deviceheight" : document.documentElement.clientHeight,
        "screenwidth" :  screen.width,
        "windowinnerwidth" : window.innerWidth,
        "bodyclientwidth" : document.body.clientWidth,
        "screenavailwidth" : screen.availWidth
    };

    Core.Messenger.sendRealtimeMessage(this.getID(), data, RuntimeSide.Client);
}
SendRealtimeMessage have 3 mandatory parameters:
- The plugin ID (which is the string you return on the getID function)
- The object you want to send (here containing the sizes information)
- The tenant were the request comes from. (Client or Dashboard)
JavaScript
MyDeviceInfo.prototype.startClientSide = function () {
    var that = this;
    window.onresize = function (event) {
        that.sendClientData();
    };
};
TypeScript
public startClientSide(): void {
    var that = this;
    window.onresize = (event) => {
        that.sendClientData();
    };
}
Each time the user changes the size of the browser, this code will send the new information to the dashboard.
And finally we need to add the refresh function. It will be called each time the dashboard need the current information from the client.
JavaScript
MyDeviceInfo.prototype.refresh = function () {
    this.sendClientData();
};
TypeScript
public refresh(): void {
    this.sendClientData();
}
And that is all ! :-)
Displaying Data on the Dashboard
Now that the data are sent from the client to the dashboard, you still need to handle them on the other side. To do this, you can use the onRealtimeMessageReceivedFromClientSide function. It is called each time the client send a message through the Core.Messenger. It only have 1 parameter in which you get the object that you sent. In this sample, we only have to use each value and set the correct DOM element to update the list with the new values.JavaScript
MyDeviceInfo.prototype.onRealtimeMessageReceivedFromClientSide = function (receivedObject) {
    document.getElementById('devicewidth').innerText = receivedObject.devicewidth + 'px';
    document.getElementById('deviceheight').innerText = receivedObject.deviceheight + 'px';
    document.getElementById('screenwidth').innerText = receivedObject.screenwidth + 'px';
    ;
    document.getElementById('windowinnerwidth').innerText = receivedObject.windowinnerwidth + 'px';
    document.getElementById('bodyclientwidth').innerText = receivedObject.bodyclientwidth + 'px';
    document.getElementById('screenavailwidth').innerText = receivedObject.screenavailwidth + 'px';
};
TypeScript
public onRealtimeMessageReceivedFromClientSide(receivedObject: any): void {
    document.getElementById('devicewidth').innerText = receivedObject.devicewidth + 'px';
    document.getElementById('deviceheight').innerText = receivedObject.deviceheight + 'px';
    document.getElementById('screenwidth').innerText =  receivedObject.screenwidth + 'px';;
    document.getElementById('windowinnerwidth').innerText = receivedObject.windowinnerwidth + 'px';
    document.getElementById('bodyclientwidth').innerText = receivedObject.bodyclientwidth + 'px';
    document.getElementById('screenavailwidth').innerText = receivedObject.screenavailwidth + 'px';
}
Let’s Test This!
To be able to test this plugin, you need to perform some simple steps.Compile and Minify
If you chose TypeScript you will need to use a tool such as the TypeScript compiler available on npm or integrate yourself in the gulp process by modifying the gulpfile.js available in the /Plugins folder. After the compilation from TypeScript to JavaScript is done you need to minify your JS file. It is important that you use this convention:- vorlon.yourPluginName.js (for the maximized version)
- vorlon.yourPluginName.min.js (for the minified version)
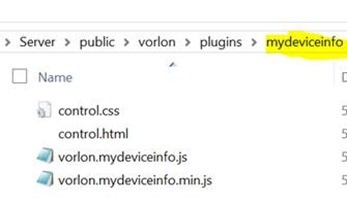
Copy Everything in the Server
The second step is to copy all your files in the /Server/public/vorlon/plugins folder. There you have to create a folder using your plugin name and put everything under it. This include your html, css and js files. Here is how it is done for the plugin we are creating in this article:
Add Your Plugin to the catalog.json File
The next step is to register your plugin in the server. To do this, add a line in the Server/public/catalog.json file:JSON
{
    "IncludeSocketIO": true,
    "plugins": [
        { "id": "CONSOLE", "name": "Interactive Console", "panel": "bottom", "foldername" : "interactiveConsole"},
        { "id": "DOM", "name": "Dom Explorer", "panel": "top", "foldername" : "domExplorer" },
        { "id": "MODERNIZR", "name": "Modernizr","panel": "bottom", "foldername" : "modernizrReport" },
        { "id" : "OBJEXPLORER", "name" : "Obj. Explorer","panel": "top", "foldername" : "objectExplorer" },
        { "id" : "MYDEVICEINFO", "name" : "My Device Info","panel": "top", "foldername" : "mydeviceinfo" }
    ]
}
You can find more information about this here: http://vorlonjs.io/documentation/#vorlonjs-server-advanced-topics
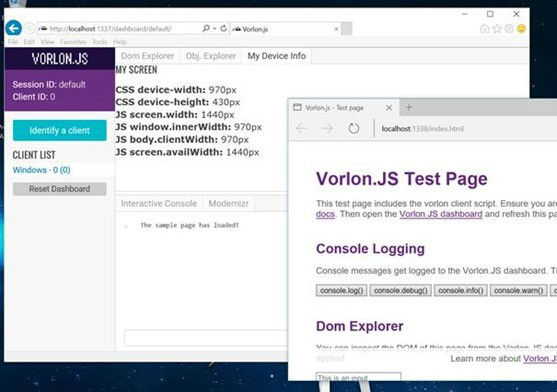
Start the Server
Open a command line on the /Server folder and run the following command: node server.jsLaunch a Client
Finally, launch a client referencing your vorlon.js local instance. You can use the sample provided in the /Plugins/samples folder. Browse the dashboard using http://localhost:1337/dashboard/default And… rock’n’roll ! :-)
You can try to change the size of the browser in which you display your client code, you will see it change live on the dashboard.
Easy, isn’t it? :-)
What to Do Now?
I hope I illustrated how easy we want the plugin creation to be. You really just have to approach it like writing classic web code and just split it in two parts:- The one collecting data on the client
- The one displaying it on the dashboard
If you have any question about this article or Vorlon.js, feel free to contact me on twitter: http://twitter.com/meulta
More Hands-on with JavaScript
Microsoft has a bunch of free learning on many open source JavaScript topics and we’re on a mission to create a lot more with Microsoft Edge. Here are some to check-out:- Microsoft Edge Web Summit 2015 (a complete series of what to expect with the new browser, new web platform features, and guest speakers from the community)
- Build of //BUILD/ and Windows 10 (including the new JavaScript engine for sites and apps)
- Advancing JavaScript without Breaking the Web (Christian Heilmann’s recent keynote)
- Hosted Web Apps and Web Platform Innovations (a deep-dive on topics like manifold.JS)
- Practical Performance Tips to Make your HTML/JavaScript Faster (a 7-part series from responsive design to casual games to performance optimization)
- The Modern Web Platform JumpStart (the fundamentals of HTML, CSS, and JS)
This article is part of the web dev tech series from Microsoft. We’re excited to share Microsoft Edge and the new EdgeHTML rendering engine with you. Get free virtual machines or test remotely on your Mac, iOS, Android, or Windows device @ http://dev.modern.ie/(dpe)
Excellent, I’m off to put this into practise straight away!