Today I’d like to experiment with the
Media Capture and Streams API, developed jointly at the W3C by the
Web Real-Time Communications Working Group and the
Device APIs Working Group. Some developers may know it simply as
getUserMedia, which is the main interface that allows webpages to access media capture devices such as webcams and microphones.
You can find the source code for this project
on my GitHub. In the latest Windows 10 preview release, Microsoft added support for media capture APIs in the
Microsoft Edge browser for the first time. Much of this code was taken from the Photo Capture sample that the Edge dev team produced at
their test drive site.
For those of you who want to dive a bit deeper, Eric Bidelman has a
great article at HTML5 rocks which goes into the storied history of this API.
Getting up to Speed
The
getUserMedia() method is a good starting point to understand the Media Capture APIs. The getUserMedia() call takes
MediaStreamConstraints as an input argument, which defines the preferences and/or requirements for capture devices and captured media streams, such as camera facingMode, microphone volume, and video resolution.
Through MediaStreamConstraints, you can also pick the specific captured device using its deviceId, which can be derived from the enumerateDevices() method. Once the user grants permission, the getUserMedia() call will return a promise with a
MediaSteam object if the specific MediaStreamConstraints can be met.
All of this without needing to download a plugin! In this sample we’ll be diving into the API and creating some neat filters on the video and images we’ll capture. Does your browser support it? Well getUserMedia() has been around since Chrome 21, Opera 18, and Firefox 17, and is
now working in Edge.
Feature Detection
Feature detecting is a simple check for the existence of navigator.getUserMedia. It’s a big project to check in each browser, so I’d suggest simply
using Modernizr to check for it. Here’s how it works:
|
if (Modernizr.getusermedia) {
var getUM = Modernizr.prefixed('getUserMedia', navigator);
getUM({video: true}, function( //...
//...
} |
Without Modernizr, as demonstrated in this sample, you’d have to use:
|
navigator.getUserMedia = navigator.getUserMedia || navigator.webkitGetUserMedia || navigator.mozGetUserMedia;
if (!navigator.getuserMedia) {
Console.log('You are using a browser that does not support the Media Capture API');
} |
The Video Player
In our HTML you can spot the video tag towards the top of the page. You’ll notice that it’s also set to autoplay. Without that, the video would permanently be frozen on the first frame.
|
<div class="view--video">
<video id="videoTag" src="" autoplay muted class="view--video__video"></video>
</div> |
There currently isn’t a source for the media set, but we’re going to inject that source via JavaScript shortly.
Gaining Access to an Input Device
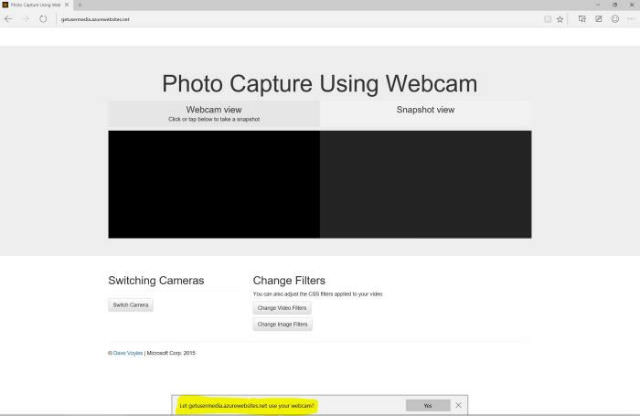
This new functionality can enable a number of new opportunities for developers, but it can also be a security risk for the end user, therefore, the first thing you’ll notice when you launch this web app is that it requests permission to use your webcam. getUserMedia accepts a few parameters.
The first is an object specifying the details and requirements for each type of media you want to access. For access to the webcam, the first parameter should be {video: true}. Additionally, to use both the microphone and camera, pass {video: true, audio: true}.
Supporting Multiple Web Cams
This is where things really get interesting. We are also using the
MediaDevices.enumeratedDevices method in this sample. This collects information about the media input / output devices available on your system, such as microphones, cameras, and speakers. This is a promise which will return several properties, including the kind (type) of device, such as
“videoinput”,
“audioinput”, or
“audiooutput.”
Additionally, it can generate a unique ID in the form of a string with a unique ID
( videoinput: id = csO9c0YpAf274OuCPUA53CNE0YHlIr2yXCi+SqfBZZ8=), and finally a label to describe the device, such as
“FaceTime HD Camera (Built-in)”. This is still an experimental technology though, and
isn’t even listed on CanIUse.com yet.
Setting the Source on the Video Player
In the initalizeVideoStream function, you can see that we are getting the video tag from our page and setting it’s source to the stream we are passing in. The Stream itself is a blob. If the browser doesn’t support the srcObject attribute, it falls back to create a URL out of the media stream and sets that.
|
// initializeVideoStream() - Callback function when getUserMedia() returns successfully with a mediaStream object
// 1. Set the mediaStream on the video tag
// 2. Use 'srcObject' attribute to determine whether to use the standard-based API or the legacy version
var initializeVideoStream = function(stream) {
mediaStream = stream;
var video = document.getElementById('videoTag');
if (typeof (video.srcObject) !== 'undefined') {
video.srcObject = mediaStream;
}
else {
video.src = URL.createObjectURL(mediaStream);
}
if (webcamList.length > 1) {
document.getElementById('switch').disabled = false;
}
}; |
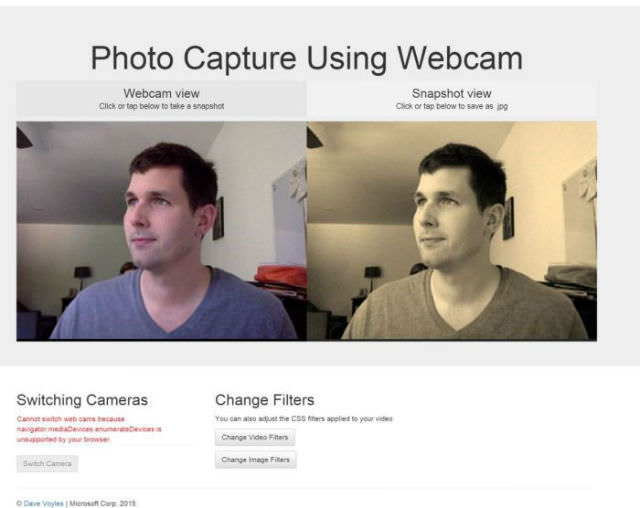
Applying CSS Filters
I’m not very good at taking photos, so I often rely on the filters that Instagram provides for me. But what if you could apply your own filters to your video or static image? Well you can!
I’ve created a simple function for the video feed, which allows me to apply CSS filters in real time. The one for the image is nearly identical.
|
// changeCssFiltersOnVid() - Cycle through CSS filters applied to the video stream
// 1. Grab a reference to the video tag
// 2. Keep the original CSS classes while still adding the filters
// 3. Loop through all of the filters
var changeCssFilterOnVid = function () {
var el = document.getElementById('videoTag');
el.className = 'view--video__video';
var effect = filters[index++ % filters.length]
if (effect) {
el.classList.add(effect);
console.log(el.classList);
}
} |
At the top of the class I have an array of filters to loop through. They are stored as a string, which corresponds to classes with identical names in CSS. // CSS filters var index = 0; var filters = ['grayscale', 'sepia', 'blur', 'invert', 'brightness', 'contrast', '']; And in the CSS:
|
/* image * video filters */
.grayscale {
-webkit-filter: grayscale(1);
-moz-filter: grayscale(1);
-ms-filter: grayscale(1);
filter: grayscale(1);
}
.sepia {
-webkit-filter: sepia(1);
-moz-filter: sepia(1);
-ms-filter: sepia(1);
filter: sepia(1);
}
.blur {
-webkit-filter: blur(3px);
-moz-filter: blur(3px);
-ms-filter: blur(3px);
filter: blur(3px);
} |
You can see more examples of how this works, and change values in real time,
at Edge test drive page.
Saving Images
Digging through the code, you may see some other features that you are not immediately familiar with. The first thing that grabbed my eye was
navigator.msSaveBlob. The
Blob constructor allows you to easily create and manipulate a blob (basically a file) directly on the client. It is supported in IE 10+.
msSaveBlob allows you to save this blob object (in this case, our snapshot image) to disk. It also has a sibling method,
msSaveOrOpenBlob, which also allows you to open the image from within the browser.
|
// savePhoto() - Function invoked when user clicks on the canvas element
// 1. If msSaveBlob is supported, get the photo blob from the canvas and save the image file
// 2. Otherwise, set up the download attribute of the anchor element and download the image file
var savePhoto = function() {
if (photoReady) {
var canvas = document.getElementById('canvasTag');
if (navigator.msSaveBlob) {
var imgData = canvas.msToBlob('image/jpeg');
navigator.msSaveBlob(imgData, 'myPhoto.jpg');
}
else {
var imgData = canvas.toDataURL('image/jpeg');
var link = document.getElementById('saveImg');
link.href = imgData;
link.download = 'myPhoto.jpg';
link.click();
}
canvas.removeEventListener('click', savePhoto);
document.getElementById('photoViewText').innerHTML = '';
photoReady = false;
}
}; |
If the browser supports the method, it will cut down the amount of code we need to write to save an image.
Whereelse Can We Go From Here?
This is only the beginning. We can also utilize WebGL with this, which allows for even morHeye filters to be applied, as well as have a real time video / audio feed built into highly interactive environments. Maybe that will be my next project…
Additionally, you can tie into the Web Audio API to apply frequency modulation to your audio output. This sample from the
Web Audio tuner on illustrates it well. Some folks are more about visual learning,
so check out this Microsoft sample, too.
Finally, as mobile browsers continue to adopt more of this technology, you’ll be able to use these JavaScript APIs to tie into the underlying hardware and have this working on mobile devices, regardless of the platform. It’s a great time to be a web developer, and hopefully after you’ve used this, you’ll understand why I’m so excited to be a part of it.
Source Code: https://github.com/DaveVoyles/GetUserMedia-sampl
More Hands-on with JavaScript
Microsoft has a bunch of free learning on many open source JavaScript topics and we’re on a mission to create a lot more with
Microsoft Edge. Here are some to check-out:
And some free tools to get started:
Visual Studio Code,
Azure Trial, and
cross-browser testing tools – all available for Mac, Linux, or Windows.
This article is part of the web dev tech series from Microsoft. We’re excited to share Microsoft Edge and the new EdgeHTML rendering engine with you. Get free virtual machines or test remotely on your Mac, iOS, Android, or Windows device @ http://dev.modern.ie/