


Today we’re going to show you a detailed step-by-step guide on how to create a glamorous portrait using a stock reference. The final result will be 100% vector; therefore will retain its scalable properties. This walk through is ideal for those an intermediate to advanced knowledge of Illustrator. Illustrator CS5 was used for the tutorial although you can do the majority of the elements in the majority of vector programs. A Wacom Bamboo A5 tablet was also used, however you can achieve the same results with a mouse.
Step 1
When I create my portraits I use a modified stock image as a reference.
The stock I’m going to be using in this tutorial is from Jessica Truscott. The specific image can be found here.
Using the Lasso Tool (L) and the Move Tool (V), I’ve resized the majority of the image to give a more exaggerated image. Ideally I want the eyes to be the focal point of the illustration, so I make sure that the eyes and the irises are the most prominent.
Using the Brush Tool (B) I sketch and draw on the afro and hair band to give me an idea of what the overall composition may look like. I then bring this over to Illustrator to work on.

Step 2
Open up Illustrator and a New Document (Ctrl + N) in with a Print document profile and Color Mode CMKY.
Go to File > Place and locate the modified stock image. Using the Free Transform Tool (E), resize the stock image to the canvas. Double click on the layer folder containing the stock image and rename it “Reference” and click on OK.
Create New Layer and rename it “BG”. Within this layer folder, use the Rectangle Tool (M) to draw a white filled rectangle to cover the canvas and reduce the opacity to 30%. This is a similar method to say using tracing paper on top of a drawing.
Finally Create New Layer and rename it “Bases” and then lock the Reference and BG layer folders.

Step 3
Within the Bases layer folder I’m going to begin adding “base layers”. These are shapes of 100% opacity which I will use later on for shapes for clipping masks for the shading.
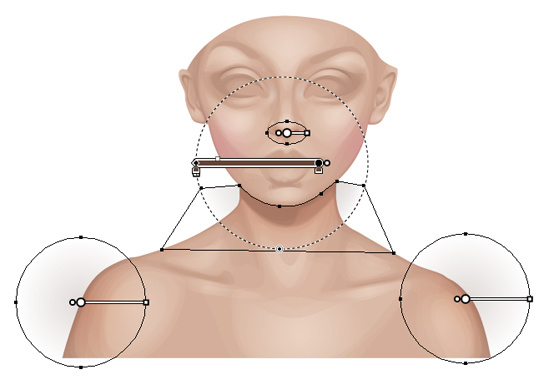
In total, there are four base layers: the back of the afro (C=60, M=65, Y=70, K=70), the skin (C=15, M=30, Y=35, K=0), the hair band (C=20, M=100, Y=90, K=0) and the afro overlapping the hair band (C=60, M=65, Y=70, K=70).

Step 4
Create New Layer and rename it “Skin”.
Copy (Ctrl + C) the skin base layer and Paste in Front (Ctrl + F) the shape into the Skin folder. Hide the Base layer folder and set the Skin folder to preview by Ctrl + Clicking on the hide Toggle of the layer palette. This is so you can see the reference image underneath while you draw the shapes for the shading.

Step 5
I’m going to be adding shading to the portrait. Using the Pen Tool (P) I will create a variety of shapes in the areas where there are shadows cast or there are darker areas in the skin. The fill color will be just a bit darker than the skin color (C=35, M=60, Y=70, K=15) and the Opacity of 5%.
Using the reference image as a guide, I begin adding the shading shapes. Adding larger shading shapes first.

Once the initial shapes have been added, I add further shapes within them to give darker shading. If you overlap areas of low opacity over each other, it will appear darker. With this process of skin shading I can gradually overlap the shapes to build up the contrast in the portrait.

I keep on adding further shapes to give a smoother look to the skin. Typically when viewing a portrait you’re drawn into the eyes, the lips, the hair… if the skin is flawless. If the skin and the shading hasn’t been rendered well, then this will always show.

I keep building up the shading shapes until I’m satisfied with the level of detail. If I can see parts of the portrait clearly, for example detail in the ears, eyelids and nostrils; then I’m happy with the detailing.

Step 6
As you may have noticed in the image Step 15d, the shading is overlapping the skin base layer. I’m going to trim this off using a clipping mask.
Select all the shading shapes, excluding the copy of the skin base layer and Group them (Ctrl + G). Drag the group below the skin base duplicate and then recolor the duplicate to black.
Select the group and the duplicate and go to Object > Clipping Mask > Make (Ctrl + 7).

Step 7
Repeating the same process as Step 15, I’m going to add further depth to the shading by using a darker skin tone (C=45, M=65=, Y=70, K=40) with the Opacity set to 5%.
The key with using the darker color is to create smaller shapes for the darker areas rather. If you feel you’ve missed a section of shading which is a larger area, I would suggest using the color/process in Step 5.
I focus on adding shading to the edges of the skin base layer, around the eyes, nose, centre of the lips and ear details. These almost always have deeper shadows than the rest of the portrait.

Once I’m happy with the shapes added, I group up the shapes and then drag and drop them into the clipping mask group with the other skin shading.

Step 8
As I’ve now added the main shadows in the portrait, I will need to add highlights to the skin. I do this using the same color as the skin base layer (C=15, M=30, Y=35, K=0), but setting the Blending Mode to Screen and the Opacity to 7%.
I no longer use the reference image as a guide as I have the structure of the face. The parts of the illustration which have no shading present are the areas I’ll be looking at building up highlights on. If you don’t feel comfortable with this, then continue using the reference image to guide you – it’s what it’s there for!

As with before, now I’m happy with the highlight shapes I’m going to Group them (Ctrl + G) and add them to the clipping mask group.

Step 9
I create a transparent radial gradient using the skin base layer color (C=15, M=30, Y=35, K=0) with the centre at 100% opacity and the outside at 0%. I’m going to use this to add further highlights to the skin with the Blending Mode of Screen and the Opacity of 30%. The benefits of using gradients in skin shading is that it helps smooth the skin and make it look iridescent.

Then when all the shapes are placed, Group them (Ctrl + G) and add them to the clipping mask group.

Step 10
The skin isn’t all one color and this is especially true for a glamorous woman who loves her make up. I’m going to add blush to her cheeks to give a rosier appearance.
Firstly I create a magenta to magenta transparent radial gradient. Then using the Ellipse Tool (L), I draw a circle on one cheek. Then Copy (Ctrl + C) and Paste (Ctrl + V) the shape and move it to the opposite cheek.
Then reduce the Opacity to 45% and the Blending Mode to Soft Light. Drag and drop the shapes into the clipping mask group when done.

Step 11
In the corner of a person’s eyes, the skin is often a slight shade of grey. So to incorporate this into the portrait I’m going to use a similar method as above, but using a black to black transparent radial gradient. The Blending Mode will be set to Hue and the Opacity at 30%.
Drag and drop the shapes into the clipping mask group once completed.

Step 12
Using the darker skin shade (C=45, M=65=, Y=70, K=40), I’m going to create a transparent radial gradient and add a change in tone to the sides of the arms/shoulders, under the nose and under the chin/neck.
Then setting the Blending Mode to Color Burn and the Opacity to 20%.
Then I’ll Group the shapes (Ctrl + G) and drag and drop them into the clipping mask group.

Step 13
I’m going to create a new art brush using the Ellipse Tool (L), draw a slim black filled ellipse. Using the Convert Anchor Point Tool (Shift + C) to just click once on the end tips of the ellipse to taper the ends.
Drag and drop the shape into the Brush palette and select “Art Brush” then copy the below settings.

Step 14
Create New Layer and rename it “Hair”.
Copy (Ctrl + C) and Paste in Front (Ctrl + F) the skin base layer and the two hair base layers. Using the Pathfinder options, I Minus Front the skin base layer from the larger hair shape.
Then selecting both of the hair base layers and back in Pathfinder again, select the Divide option. This will divide the afro into three shapes. Delete the shape which is overlapping the skin and wont be showing.
Finally, selecting both the remaining shapes, Unite them.

Step 15
I’m going to build up the hair gradually by using the Paintbrush Tool (B) and the new art brush with the stroke color of a dulled brown (C=55, M=60, Y=65, K=40).
First I go around the edges of the base layers for the hair to add C shaped strokes and spiral strokes. It’s ok to go over the edges as it will be resolved later on.

Then I work inwards from the edges to fill in the rest of the afro.
Be patient while drawing the swirls as if they are rushed they may look too messy.

Step 16
Copy (Ctrl + C) and Paste in Front the afro base layer (Ctrl + F).
I’m going to Select All of the strokes (Ctrl + A) and reduce the Opacity to 50%. Then I’ll Group them (Ctrl + G).
Recolor one of the afro base layer and recolor it black then drag and drop it in front of the swirl group.
Then select the swirl group and afro base layer and create a Clipping Mask (Ctrl + 7).

Step 17
With the duplicated afro base layer, fill it with a black transparent radial gradient with the outside set to Opacity 100%.
Then I’ll duplicate this shape and invert the gradient and use the Gradient Tool (G) to reposition and shape the gradient.
Selecting them both, I change the Blending Mode to Color Burn and the Opacity to 80%.

Step 18
I’m going to start adding further detailing to the afro now, first I want to add some texture to it. Using the Paintbrush Tool (B) and a larger stroke weight (I used 8pt), set the Blending Mode to Color Burn and the Opacity to 10%. I used a brown color (C=35, M=60, Y=80, K=25) to draw dashes around the hair area.
Overlap the dashes in areas to create darker areas in some parts to add more texture to the hair.
Then group the strokes (Ctrl + G) and add them to the afro clipping mask group.

Step 19
I’m going to repeat Step 18, but with the stroke color of a lighter brown (C=25, M=40, Y=65, K=0), Blending Mode Soft Light and Opacity 10%.

Step 20
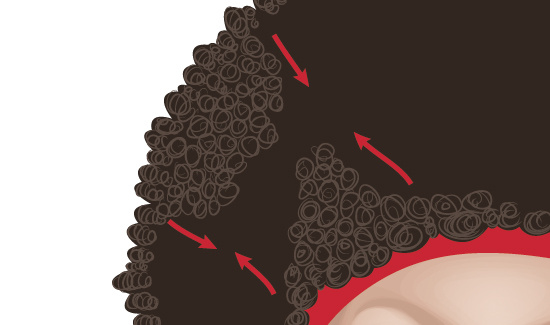
Afro hair doesn’t have a smooth edge, so I’m going to recreate this effect by adding strokes around the edge/outside of the afro.
I’m going to use the Paintbrush Tool (B) with the tapered brush and a small stroke weight, I’ve used 0.5pt here. I’m going to use a dark brown color (C=60, M=65, Y=70, K=90) with a Blending Mode of Multiply and Opacity of 80%.
The strokes I’m going to make are mixture of spirals, C and S shapes. Cross the lines over, make them a bit irregular, as long as a portion of the strokes are within the area of the afro. In other words, the strokes must not appear to look as if they are floating outside of the edge of the afro.
Group the strokes up (Ctrl + G) and drag and drop them below the clipping mask, not within.

Step 21
I’m going to split up the base layers now so I can add elements more easily.
Firstly to Create New Layer below the Hair layer folder and rename it “Afro Front”. In the Bases layer folder, drag and drop the brown long shape into this new folder.
Create New Layer below the Afro Front layer folder and rename it “Hairband”. Drag and drop the red hair band shape into this folder.

Step 22
Within the Hairband layer folder I’m going to add strands of hair which would be shown between the ear and the hair band.
I’m going to use the Paintbrush Tool (B) with the same settings as the spirals on the outside of the afro. So that is the tapered brush and a stroke weight of 0.5pt. I’m going to use a dark brown color (C=60, M=65, Y=70, K=90) with a Blending Mode of Multiply and Opacity of 80%.
Firstly draw a guide of the hairs between the hair band and the ear. Then fill in and layer on top further strokes to thicken the hair.

Step 23
Create New Layer above the Skin layer and rename it “Lips”.
If you noticed while creating the skin shading, I drew elements of the lips. This is because the lips should be considered as part of the skin. If you treat them as unconnected elements in the illustration, it will look like the lips are floating on top of the skin.
I’ll be using a red transparent radial gradient for the initial shading of the lips (C=20, M=100, Y=90, K=0).
Firstly creating an overall shape of the lips and changing the Blending Mode to Multiply and the Opacity to 30%.
Then drawing two shapes for the top and the bottom lip at a 50% opacity. The bottom lip shape will overlap the top lip to give extra shadow for the top lip. When drawing the lips, draw them slightly within the shape of the initial lip shading shape you created first. This will give the lips a softer edge.

Step 24
Using the same gradient, I’m going to add further shapes towards the center of the lips and underneath the bottom lip.
These shapes I’m changing the Blending Mode to Color Burn and the Opacity to 30%.

I’m going to add further shapes in these places and the corners of the mouth to give the lips further depth.
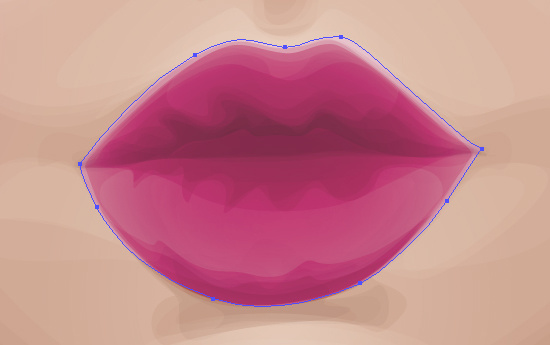
Step 25
I’ve decided I’m not happy with the color of the lips and wish to change it to a shade of pink. A good way of doing is, is to create a shape on top of the area you wish to recolor. Then fill it with the desired color and change the Blending Mode to Color. Play around with the Opacity of the layer to get the intensity you want.
I’ve opted for a fill color of C=20, M=100, Y=0 and K=0 with the Opacity of 60%. If you notice in the image below, I’ve draw the shape just beyond the lips area. This is to help the lips look as if they are part of the face and not floating on top of it.
Step 26
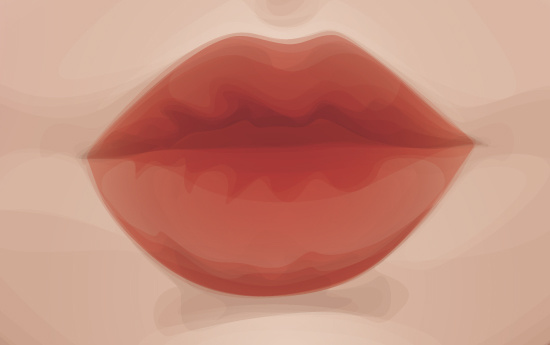
Now that I’m happy with the color of the lips, I’m going to increase the shadow on the underneath of the top and bottom lip.
Throughout this process, I often feel I want to balance the tones and shadow. The shadow is becoming bolder in the lips, therefore I want to balance this off in the nose area.
The below shadows are done with a dark brown (C=45, M=65, Y=70, K=40) with the Blending Mode as Multiply and the Opacity at 7%.

Step 27
The more plump the lips, the more creases there are in them. This is especially true of bottom lips. So to create this texture I’m going to add some spikey shapes around the parting of the lips.
I’m using a pink fill color (C=20, M=100, Y=0, K=0) with the Blending Mode of Color Burn and Opacity of 40%. Some areas will be darker than others, so I’ve overlapped the spikes to reflect this.

Step 28
To emphasis the creases further, I’m going to start adding highlights to the creases and the top of the lips.
Firstly, create a light pink transparent radial gradient (C=5, M=35, Y=0, K=0) and then use this to draw long shapes between the creases previously drawn. Then along the top of the top lip. Then set the Blending Mode for the shapes to Screen and Opacity 30%.

Step 29
Now to add the teeth. Using the light pink transparent radial gradient, draw out the teeth individually and then a smaller shape within. This will give the impression of a slight shadow from all sides. Set the Blending Mode to Screen and the Opacity to 20%.
Then using a black transparent radial gradient with the centre at 0% opacity, draw a shape which covers the entire opening of the mouth. Set the Blending Mode to Multiply and the Opacity to 25%.
Using a solid black color, add further shadows in the corner of the mouth opening and in between the teeth on Mulitply and 25% as before.

Step 30
Finally, using the Ellipse Tool (L) with the light pink transparent radial gradient on the Blending Mode Color Dodge and Opacity 40%, add circles on the bottom lip and along the outside of the lips. This is to give the impression of shine and glitter.

Step 31
Create New Layer above the Hair layer folder and rename it “Eye shadow”.
I’m going to create to transparent radial gradients. A green one for the eyelid (C=85, M=10, Y=100, K=0) and a yellow (C=0, M=0, Y=100, K=0) gradient for above the eyelid. Set the gradients to Blending Mode Color Burn. This will give me a good base for the eyeshadow.

Step 32
Create New Layer above the Eye shadow layer folder and rename it “Eyes”.
Using the Pen Tool (P) and a white fill color, draw around the whole eyeball including the corner. Then draw within the eye ball but excluding where there would be a slight shadow. Finally adding white shapes either side of the iris but within the other shapes.
Then reduce the Opacity of the shapes to 40%. This is because I want to give the eyeball some impression of shadow and eyeballs aren’t white!

Step 33
I’m going to use the Ellipse Tool (L) to draw a circle for one the iris of one eye with a blue fill color (C=85, M=50, Y=0, K=0). Copy (Ctrl + C) and Paste (Ctrl + V) the circle and move it into place for the other eye.
Using the Pen Tool, add anchor points (+) where the circle meets the upper and lower eyelids. Then remove the anchor points (-) which are beyond the eye ball.
Copy (Ctrl + C) and Paste in Front (Ctrl + F) the shapes and using the Free Transform Tool (E) decrease the size of the shape slightly.
Then select all the blue shapes and reduce the Opacity to 75%. Due to duplicating and resizing the shape, it gives the iris a soft outline.

Step 34
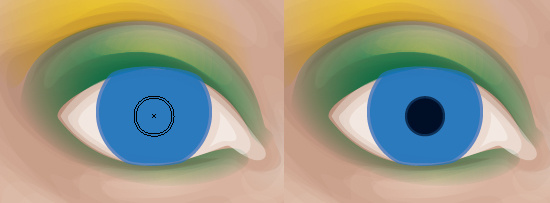
Using the Ellipse Tool (L) and a similar technique, I’m going to create a circle for the pupil filled with black and with the Blending Mode Multiply and Opacity 70%.
Duplicate the circle and decrease it’s size to soften the edge. Then Copy (Ctrl + C) and Paste (Ctrl + V) the two circles and place for the other eye.
Step 35
I’m going to begin adding further shading and detail to the eye. The pupil shapes can be used as a guide to where the detailing is surrounding so I would advise these elements to be below the pupil shapes so it doesn’t distort it. Also worth noting, that whatever I do to one eye, I repeat the process for the other.
I’m going to build up the shading and contrast within the iris. Throughout creating this, you need to consider the main color of the iris, which in this case I want to be blue and the shadow and highlight in the eye. The top eyelid and eyelashes will cast shadow over the eye and the iris, so shading will need to be taken into consideration.
My first step is to add shading around the sides of the eye and towards the top by layering a darker blue (C=100, M=100, Y=25, K=25) at Blending Mode Multiply and Opacity 30%.

Step 36
Create a new transparent radial gradient with a pink color (C=10, M=100, Y=50, K=0) on the outside set at 100% opacity and the centre with a blue (C=100, M=0, Y=0, K=0) at 0% opacity.
Using this gradient, Copy (Ctrl + C) and Paste in Front (Ctrl + F) the smaller shape for the base of the iris twice. With the first gradient, use it to give a soft outline to the whole iris.

Then using the second gradient to give a highlighting area towards the bottom of the iris, but will also give shade towards the top of the iris. Set both of the gradient shapes at a Blending Mode of Color Burn.

Step 37
I’m going to add some detail into the iris. To do this draw a circle using the Ellipse Tool (L) with a yellow fill color (C=0, M=0, Y=100, K=0). Then apply a Zig Zag effect by going to Effects > Distort & Transform > Zig Zag and use the below settings.

Copy (Ctrl + C) and Paste (Ctrl + V) the shape over to the other iris. Then set the Blending Mode to Overlap and the Opacity to 70%.
Copy (Ctrl + C) and Paste in Front (Ctrl + F) the smaller iris base shapes and use them to create a clipping mask for the zig zagged shapes.

Step 38
Using the Ellipse Tool (L) create two circles and Minus Front the smaller circle from the larger. The smaller circle should be the same size as the pupil. Create a yellow transparent radial gradient (C=0, M=0, Y=100, K=0) and fill it circle with it.
Set the Blending Mode to Overlay and the Opacity to 50%.

Step 39
I want to add more contrast around the outside of the iris. So I’m going to add some dark blue shapes (C=100, M=100, Y=25, K=25) set to Blending Mode Multiply around the sides and top.

Step 40
The eyeball has some shading from around the top lip towards the corners. To reflect this I’m going to add two black transparent radial gradients with the center at 0% set to Blending Mode Multiply and Opacity 35%.
Then I’m going to add a black fill shape around the top of the eyeball and corner of the eyes. This is a more solid shadow cast by the eyelid. I’m going to set the Opacity to 25%.
These shapes and further from now on will be above the eye’s pupil.

Step 41
Using the red from the hair band to create a red transparent radial gradient, draw two shapes at the corners of the eyes. Bring the source of the gradients right into the corner.
Set the Blending Mode to Hard Light and Opacity to 25%.

Step 42
Now to start building on the lashes and to do this I’m going to give our girl a nice thick eye line on her top lashes and a slimmer line along her bottom lid.
Using the Pen Tool (P) to draw several black shapes with the Blending Mode Multiply and Opacity of 25%. I layer them in lower opacities to give a soft line to the eyes as it appears more natural. I also add two shapes in the eye lid crease to define it.

Step 43
I’m going to build up the eye shadow further with a shine around the eyelids. Within the Eyes layer folder I’m going to add the same green transparent radial gradient used for the eye shadow on the top and bottom lids. The set the Blending Mode to Color Dodge.
Then adding the yellow transparent radial gradient to the corner of the eyes and set that to Blending Mode Color Dodge and Opacity to 75%.

Step 44
With the fill color of the green transparent radial gradient with the Blending Mode Color Dodge and Opacity of 75%, use the Ellipse Tool (L) to draw circles around the eye shadow areas to give the impression of glitter.
Select the all and then Group them (Ctrl + G).

Step 45
Using the brush I used for the hair, I’m going to use the Paintbrush Tool (B) to create the eyelashes. I’m using 0.25pt stroke weight and stroke color of black. Then setting the top lashes to Blending Mode Multiply and the Opacity to 75%. The lashes are drawn in a slight J shape, so they curve over the lash line and over into the eyeball. Then I Group up the top lashes (Ctrl + G).

The lower lashes aren’t as prominent, so I’m just going to lower the Opacity to 50% for those and then Group them as before (Ctrl + G).

Step 46
To finish off the eyes I’m going to add some white transparent radial gradients to the eyeball to add a shine and light source. These will be set to a 75% Opacity.
I’m going to Copy (Ctrl + C) and Paste (Ctrl + V) the light source so they match, the other elements are drawn individually so they don’t look cloned. In the shines, make the top line of them slightly jagged to give the impression that the eyelashes are casting a shadow.

Step 47
Create New Layer above the Eyes layer folder and rename it “Eyebrows”.
I’m going to use the Paintbrush Tool (B) with a 0.5pt stroke weight. Using the brush used for the hair, I’m going to draw the eyebrows using a medium brown stroke color (C=45, M=65, Y=70, K=40) set on Blending Mode Multiply and Opacity 45%.
Layer the strokes to give the impression of denser eyebrow hairs in parts.

Step 48
Going into the Hairband layer folder, I’m going to change the base layer of the hair band to a dark blue (C=100, M=100, Y=25, K=25) to compliment the eyes.
Copy (Ctrl + C) and Paste in Front (Ctrl + F) the base layer and fill it with a black transparent radial gradient with the center at 0% Opacity. Using the Gradient Tool (G) shift the source and change the shape of the gradient to give the impression of shadow at the sides of the hair band and underneath the afro.
Set the Blending Mode to Multiply.

Step 49
Create a cyan transparent radial gradient with the source being more concerned towards the centre. Then using the Ellipse Tool (L), draw many circles over the hair band, overlapping some and set them to a Blending Mode of Screen and the Opacity of 35%.

Step 50
With a black fill color, using the Pen Tool (P) draw a shape to represent the shadow which would be cast by the afro bangs/fringe onto the hair band. Set this to Blending Mode Multiply and Opacity 65%.

Then changing the Opacity to % to add a slight drop shadow around the bottom of the hair band onto the forehead. The shape should slightly cover the bottom of the hair band also to give it some depth.
Step 51
After you’ve put this level of detail and color into a portrait, you may notice that the skin is lacking the same amount of contrast. It’s usually at this point I add further skin shading.
I’m going to add some extra shadow around the ears, nostrils, under the chin and at the sides of the shoulders using a brown shade (C=45, M=65, Y=70, K=40) set to Blending Mode Multiply and Opacity 10%.

Repeating this process again but for the highlights and the light brown (C=15, M=30, Y=35, K=0) transparent radial gradient I used previously set to Blending Mode Screen and Opacity 25%.

Then once they are drawn, I’ll Group them (Ctrl + G) and drag and drop them to the Skin shading clipping mask group.
Step 52
Create New Layer above all the other layer folders and rename it “Earrings”.
Using the Ellipse Tool (L) with a yellow stroke color and 4pt weight, draw a long ellipse. Copy (Ctrl + C) and Paste (Ctrl + V) it and using the Free Transform Tool (E) make it slightly fatter. Then go to Object > Expand.

Using the Pen Tool (P) and then using Pathfinder Minus Front, remove the section of the hoop which is hidden by the ear lobe.

Step 53
Copy (Ctrl + C) and Paste in Front (Ctrl + F) the hoop bases. Using the green transparent radial gradient I used for the eye shadow to fill the duplicates. I’m going to invert it and then using the Gradient Tool (G), reposition and shape the gradient to appear to be the back of the hoop so it’s yellow in front.
Then set the Opacity to 75%.

Step 54
I’m going to add further shading to the hoops. Firstly by adding two shapes to each of the hoops to give the impression of the inside of them being hollow. This is with a dark green (C=90, M=30, Y=95, K=30) set to Blending Mode Multiply and the Opacity of 60%.
Then Copy (Ctrl + C) and Paste in Front (Ctrl + F) the base of the hoop and use it to create a Clipping Mask (Ctrl + 7).
Duplicate the base hoop again and position a white transparent radial gradient over the yellow portion of the hoop to give the impression of a shine. Set this to Screen, 70%.

Step 55
Using a similar technique as previous, I’m going to use white transparent radial gradients on Blending Mode Color Dodge and Opacity 75% to create a sparkling effect on the hoops.
I’m only going to place these to the yellow portion of the hoop as it can be assumed that a decorative finish would be applied to the outside of the earring.

Step 56
Go into the BG layer folder and using the Free Transform Tool (E), alter the shape of the white rectangle and then change the fill color to a pink shade which was used for the lips (C=20, M=100, Y=0, K=0) and change the Opacity to 100%.
I’m then going to create a vignette effect in the background by duplicating the pink rectangle and then applying a black transparent radial gradient set to Blending Mode Multiply.

Step 57
Create New Layer above the Skin layer folder and rename it “Mole”. I always like to add atleast one mole to the skin, as I feel the flaws in a person give them beauty.
To create a simple mole, offset two brown transparent radial gradients upon each other using the Ellipse Tool (L). Then set the Blending Mode to Multiply and the Opacity to 50%.
I then Group them together (Ctrl + G) and I can duplicate them and place them all over the body where I feel is appropriate. In this piece, I’m going to add a mole above the top lip to bring more focus to the lips and then add a couple to her shoulder.

Step 58
Finally, using the Artboard Tool (Shift + O), set the boundaries of the art board so it gives a large boarder around the image.

Conclusion
The portrait itself took about 6 hours to complete with the majority of the time spent doing the skin shading and the hair curls. If you’re attempting a portrait this complex in vector for the first time, try not to rush it. It’s the finer details which help build an overall beautiful illustration and not to mention 100% scalable.
Photo by Studio Republic on Unsplash


Send Comment:
26 Comments:
More than a year ago
Looks awesome! Thank you for the tutorial.
Great tips of skin shading and creating hair
More than a year ago
WOW. That's a lot of work. I mean, A LOT of work and patience to draw out each single swirly.
Could you please make a tutorial how to QUICKLY draw a pin-up with less detail.
More than a year ago
Great tutorial!!! THANK"S
More than a year ago
mind blowing yaar
More than a year ago
Amazing tutorial! I am about to dive in, it's so impressing!
More than a year ago
hey tank you for your effort doing this tutorial , I`m still a beginner I am interested some videos showing how to work whit this technic thanks
More than a year ago
Amazing..................
More than a year ago
Strange how history of arts works inside an artist mind !!
Queen Nefertiti of Egypt lives again
Fantastic Tutorial
Many Thanks
More than a year ago
Nice tutorial also featured on my website
:)
More than a year ago
Excellent Tutor.
More than a year ago
thakzzzz
More than a year ago
wow im really impressed!!:0
More than a year ago
Hi Shar, Awesome tutorial!
More than a year ago
That's a cool technique to do meet the team cartoons! Thanks.
More than a year ago
Thanks for this, it's certainly given me some inspiration
More than a year ago
I like this trend! a very good masterpiece!!
More than a year ago
Very Helpful
More than a year ago
Nice Work.
High standard Lesson.
More than a year ago
Awesome work.
More than a year ago
Great tutorial, very helpful!
More than a year ago
Awesome work man! The step by step is very useful for me and others.
More than a year ago
step by step learning tips in this creative tutorial. thanks for sharing
More than a year ago
your pursuit of perfection is aweinspiring.
More than a year ago
Awesome work sharon!
More than a year ago
Very cool!!!
More than a year ago
Amazing pen tool abilities!
Seeing round edges and curves.