
Adobe Illustrator Tutorial: Create a Detailed Lifebuoy Illustration
In the following Adobe Illustrator tutorial you will learn how to create a semi-realistic lifebuoy graphic. We'll start with a bunch of concentric circles and some basic vector shape building techniques. Once we create the starting shapes we'll continue with some Pathfinder options, several Warp and Gaussian Blur effects plus some basic masking techniques.
For the highlights we will use some simple blending techniques along with a set of linear gradients. Finally, we'll need a simple, dashed stroke, the Rounded Corners effect and some discrete Drop Shadows. The final illustration is easily editable so it won't be difficult for you to pick different colors for your lifebuoy.
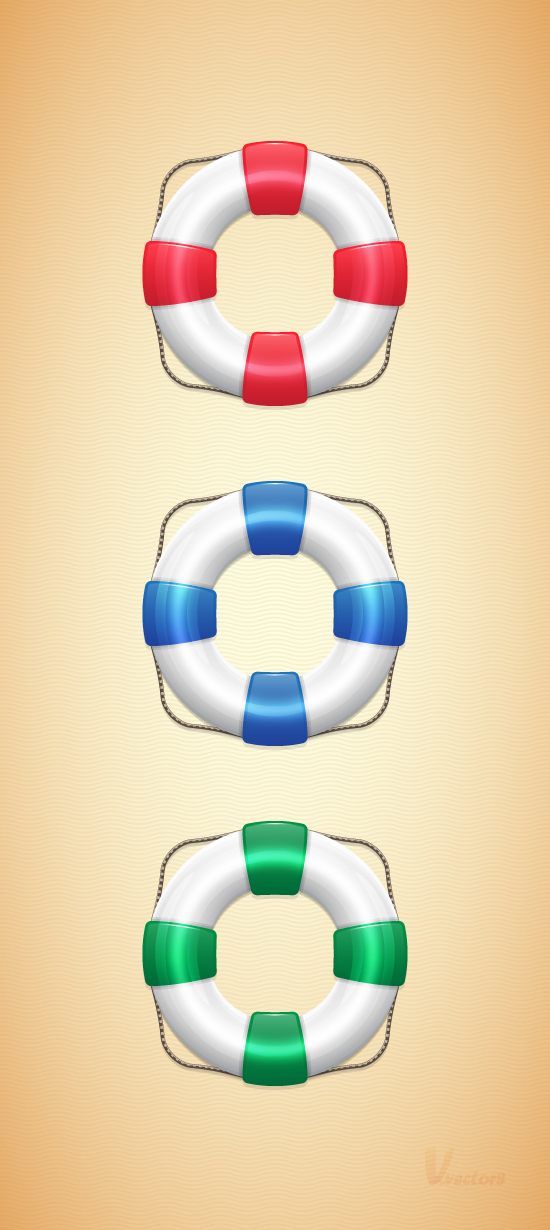
As always, this is the final image that we'll be creating:

Step 1
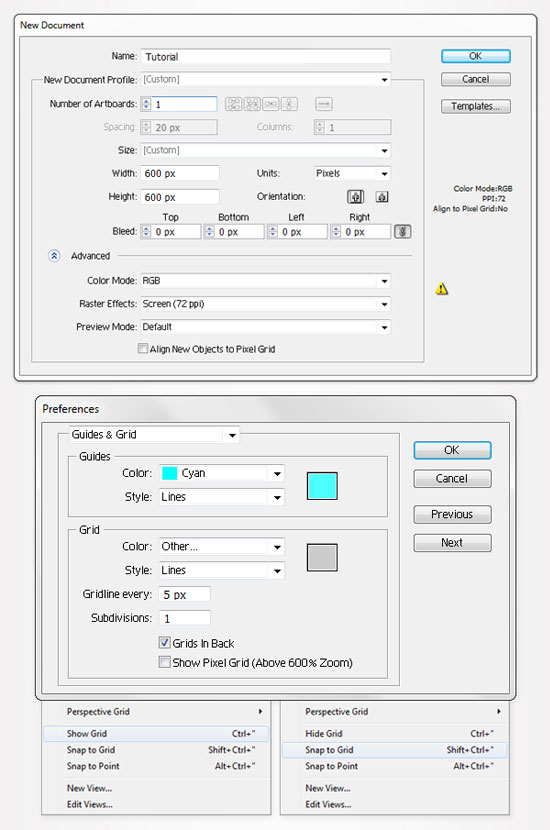
Hit Control + N to create a new document. Enter 600 in the width and height box then click on the Advanced button. Select RGB, Screen (72ppi) and make sure that the "Align New Objects to Pixel Grid" box is unchecked before your click OK. Now, turn on the Grid (View > Grid) and the Snap to Grid (View > Snap to Grid). Next, you'll need a grid every 5px. Go to Edit > Preferences > Guides & Grid, enter 5 in the Gridline every box and 1 in the Subdivisions box. You can also open the Info panel (Window > Info) for a live preview with the size and position of your shapes. Do not forget to set the unit of measurement to pixels from Edit > Preferences > Unit > General. All these options will significantly increase your work speed.
Step 2
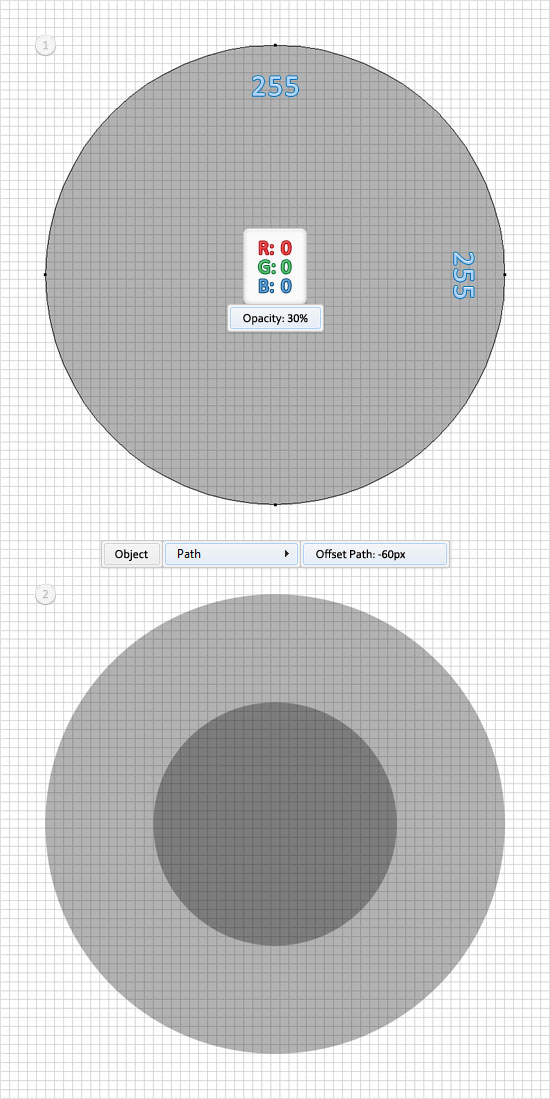
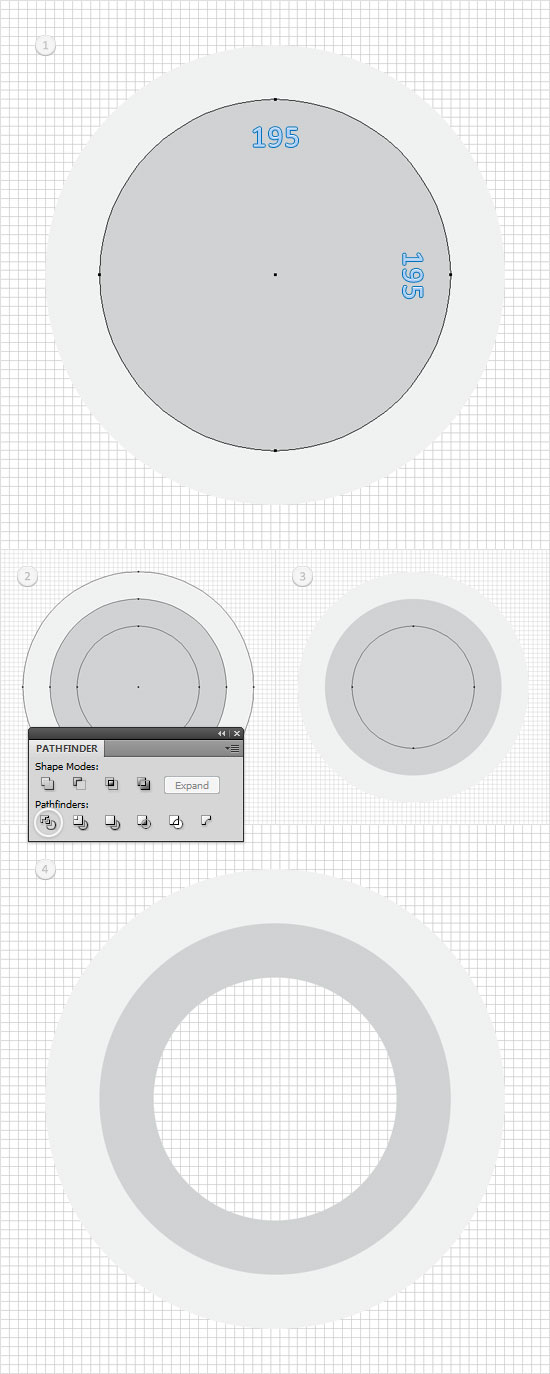
Pick the Ellipse Tool(L) and create a 255px circle. Fill it with black, lower its opacity to 30% and go to Object > Path > Offset Path. Enter a -60px Offset and click OK.
Step 3
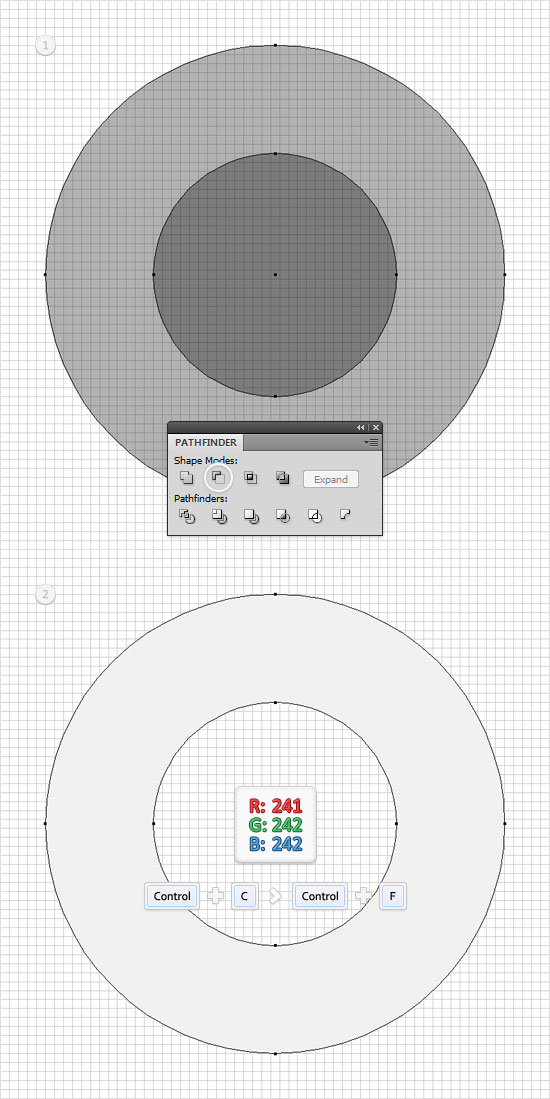
Reselect the two concentric circles created in the previous step, open the Pathfinder panel and click on the Minus Front button. Fill the resulting compound path with R=241 G=242 B=242, increase its opacity to 100% and move to the Layers panel. Double click on it, name it "Body" and make a copy in front (Control + C > Control + F).
Step 4
Pick the Ellipse Tool(L), create a 195px circle and place it as shown in the first image. Select this new circle along with the copy created in the previous step and click on the Divide button from the Pathfinder panel. Move to the Layers panel and you will find a new group with three simple shapes. Open it, delete the small circle then ungroup (Shift + Control + G) the remaining two compound paths.
Step 5
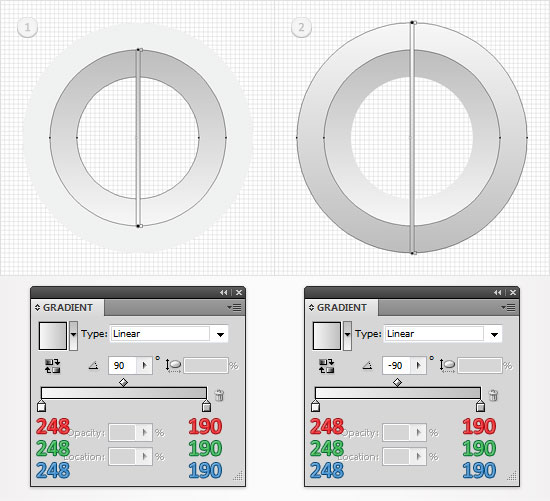
Focus on the two compound paths created in the previous step and fill them with the linear gradient shown below.
Step 6
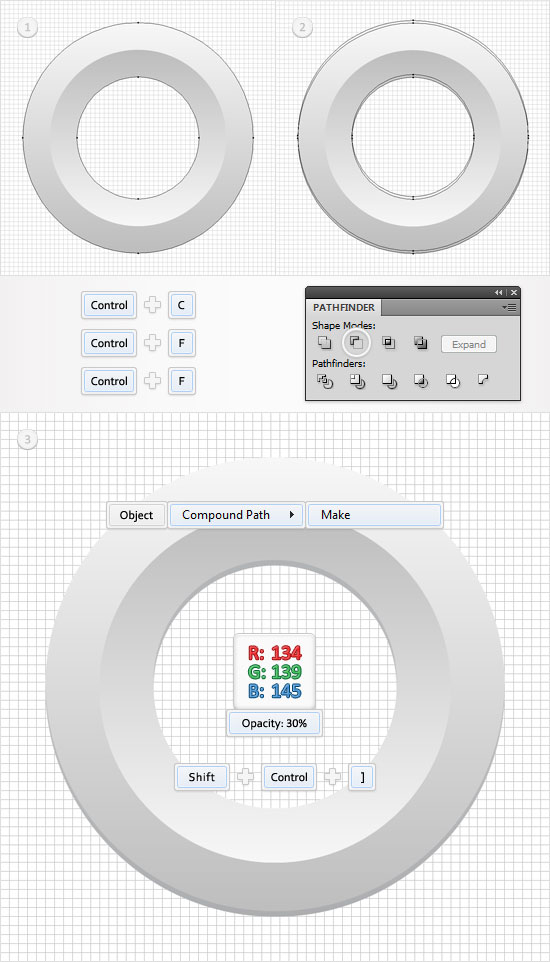
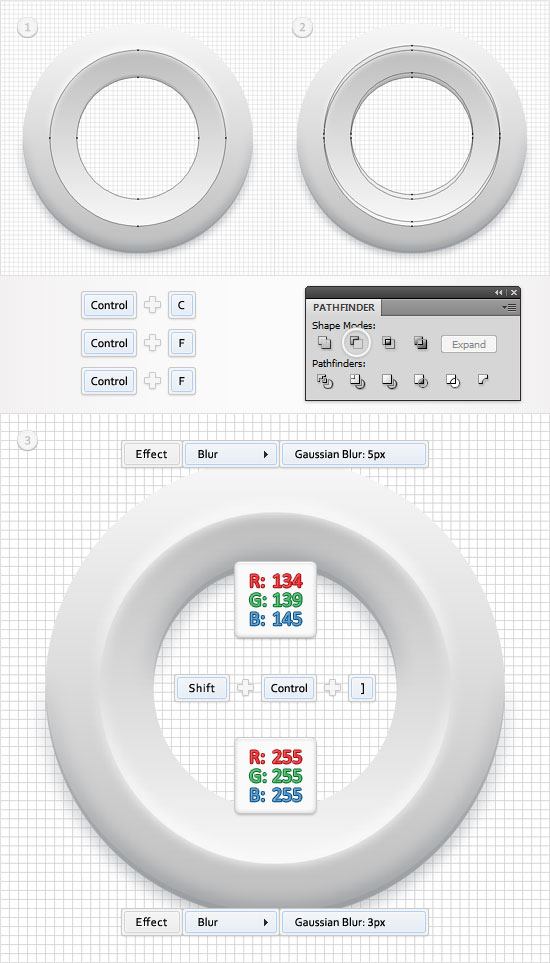
Disable the Snap to Grid (View > Snap to Grid) then go to Edit > Preferences > General and make sure that the Keyboard Increment is set at 1px. Reselect "Body" and make two copies in front (Control + C > Control + F > Control + F). Select the top copy and hit the up arrow three times (to move it 3px up). Reselect both copies and click on the Minus Front button from the Pathfinder panel. Select the resulting group of shapes and turn it into a compound path (Object > Compound Path > Make). Fill it with R=134 G=139 B=145, lower its opacity to 30% and bring it to the front (Shift + Control + ] ).
Step 7
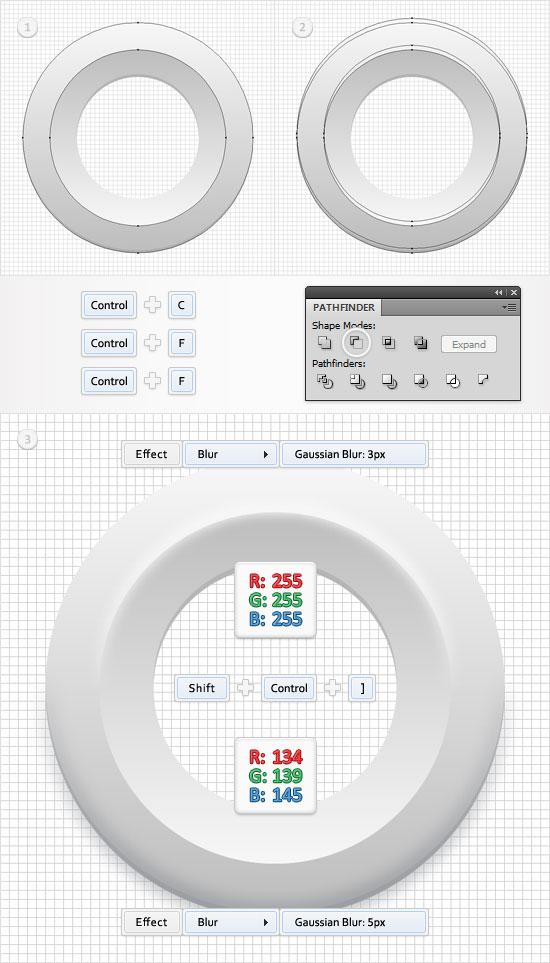
Reselect the second compound path edited in the fifth step (the large one) and make two copies in front (Control + C > Control + F > Control + F). Select the top copy and move it 5px up. Reselect both copies and click on the Minus Front button from the Pathfinder panel. Select the resulting group of shapes and bring it to the front (Shift + Control + ] ). Open it, select the top shape, fill it with white and go to Effect > Blur > Gaussian Blur. Enter a 3px radius and click OK. Keep focusing on this group, select the bottom shape, fill it with R=134 G=139 B=145 and go to Effect > Blur > Gaussian Blur. Enter a 5px radius and click OK.
Step 8
Reselect the first compound path edited in the fifth step (the small one) and make two copies in front (Control + C > Control + F > Control + F). Select the top copy and move it 5px up. Reselect both copies and click on the Minus Front button from the Pathfinder panel. Select the resulting group of shapes and bring it to the front (Shift + Control + ] ). Open it, select the top shape, fill it with R=134 G=139 B=145 and go to Effect > Blur > Gaussian Blur. Enter a 5px radius and click OK. Keep focusing on this group, select the bottom shape, fill it with white and go to Effect > Blur > Gaussian Blur. Enter a 3px radius and click OK.
Step 9
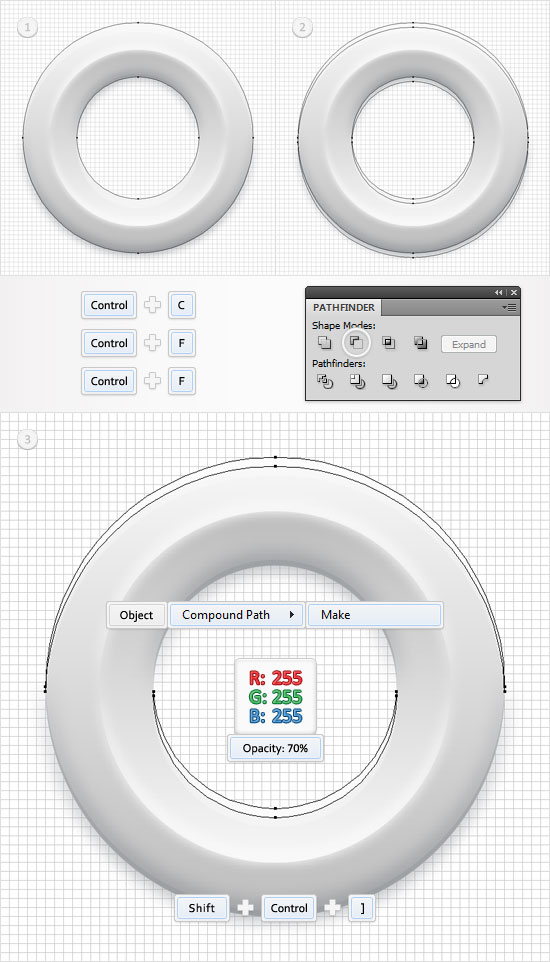
Reselect "Body" and make two copies in front (Control + C > Control + F > Control + F). Select the top copy and move it 10px down. Reselect both copies and click on the Minus Front button from the Pathfinder panel. Select the resulting group of shapes and turn it into a compound path (Object > Compound Path > Make). Fill it with white, lower its opacity to 30% and bring it to front (Shift + Control + ] ).
Step 10
Reselect "Body" and make two new copies in front (Control + C > Control + F > Control + F). Select the top copy and move it 5px down. Reselect both copies and click on the Minus Front button from the Pathfinder panel. Turn the resulting group of shapes into a compound path (Object > Compound Path > Make), fill it with white, lower its opacity to 70% and bring it to front (Shift + Control + ] ).
Step 11
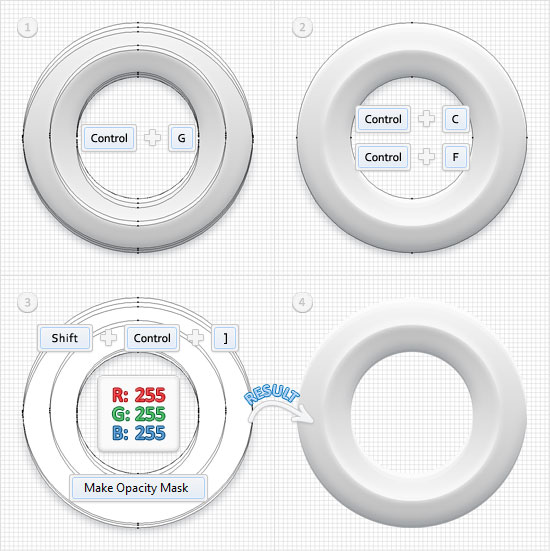
Select all the shapes created in the last five steps and group them (Control + G). Reselect "Body", make a copy in front (Control + C > Control + F) and bring it to the front (Shift + Control + ] ). Fill it with white and open the Transparency panel. Select this white compound path along with the group created in the beginning of the step, open the fly-out menu of the Transparency panel and click on Make Opacity Mask. In the end your masked group should look like in the fourth image.
Step 12
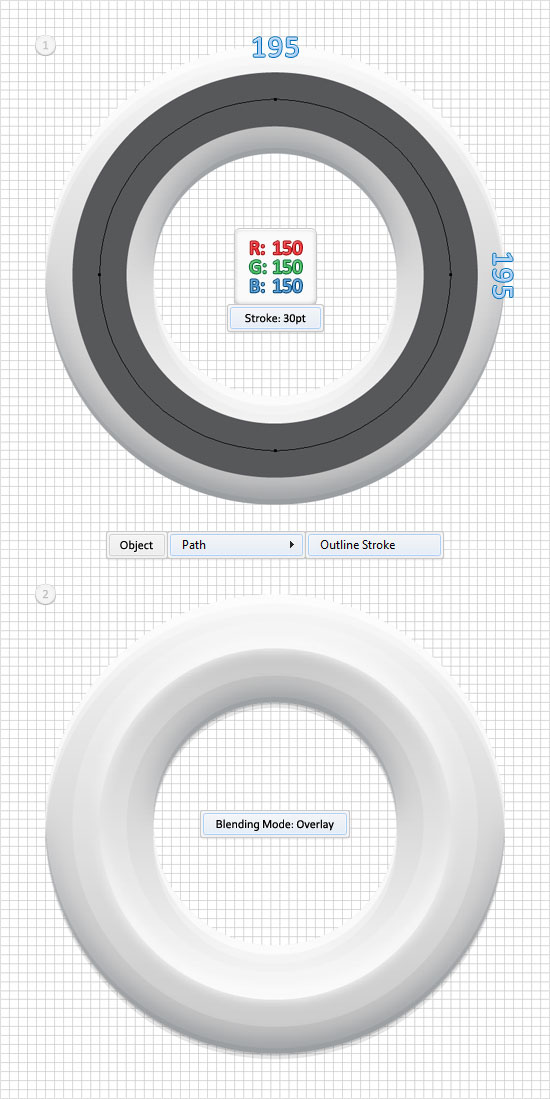
Re-enable the Snap to Grid (View > Snap to Grid), pick the Ellipse Tool(L), create a 195px circle and place it as shown in the first image. Fill it with none but add a 30pt stroke. Set its color at R=150 G=150 B=150 then go to Object > Path > Outline Stroke. Select the resulting path and change its blending mode to Overlay.
Step 13
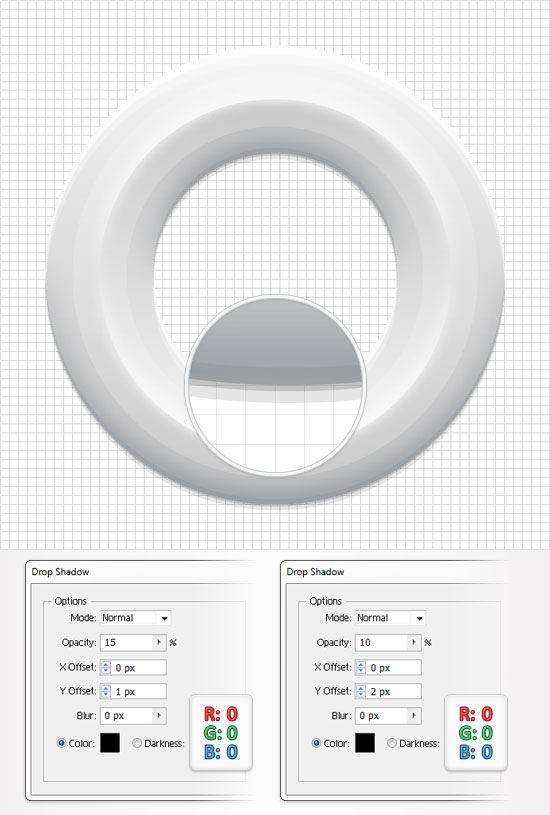
Reselect "Body" and go to Effect > Stylize > Drop Shadow. Enter the data shown in the left window, click OK then go again to Effect > Stylize > Drop Shadow. Enter the data shown in the right window and click OK.
Step 14
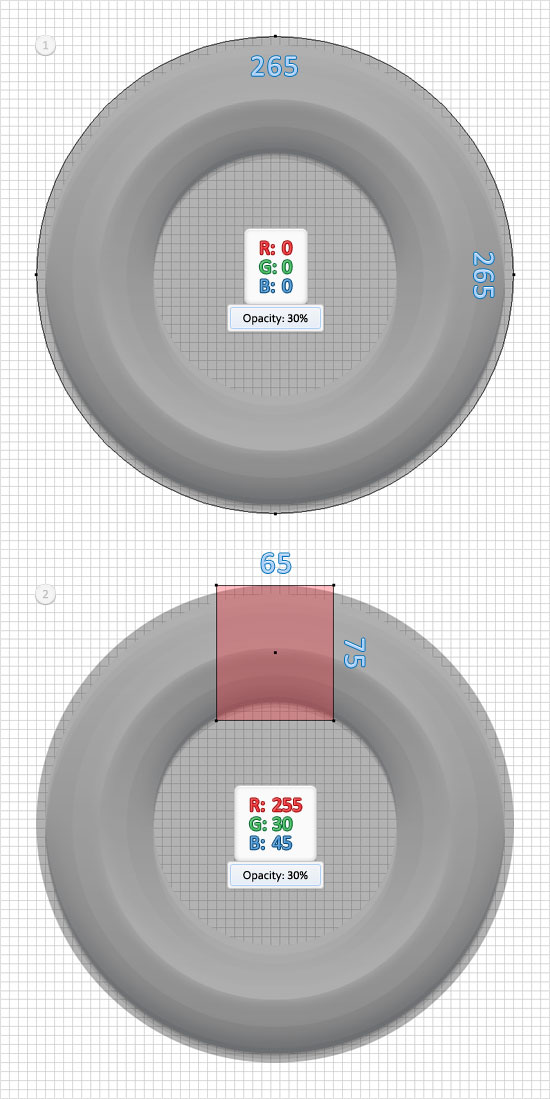
Pick the Ellipse Tool(L) and create a 265px circle. Fill it with black, lower its opacity to 30% and place it as shown in the first image. Pick the Rectangle Tool(M) and create a 65 by 75px shape. Fill it with R=255 G=30 B=45, lower its opacity to 30% and place it as shown in the second image.
Step 15
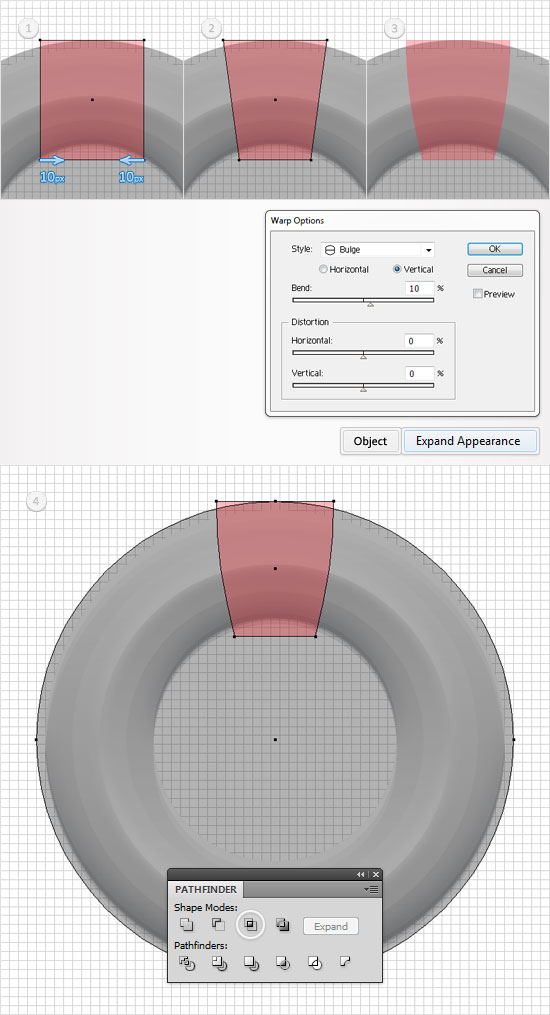
Focus on the red rectangle created in the previous step. Pick the Direct Selection Tool(A), select the bottom, left anchor point and move it 10px to the right then select the bottom, right anchor point and move it 10px to the left. In the end your red shape should look like a trapezoid (image #2). Make sure that it's still selected and go to Effect > Warp > Bulge. Enter the data shown in the following image, click OK and go to Object > Expand Appearance. Select the resulting shape along with the circle created in the previous step and click on the Intersect button from the Pathfinder panel.
Step 16
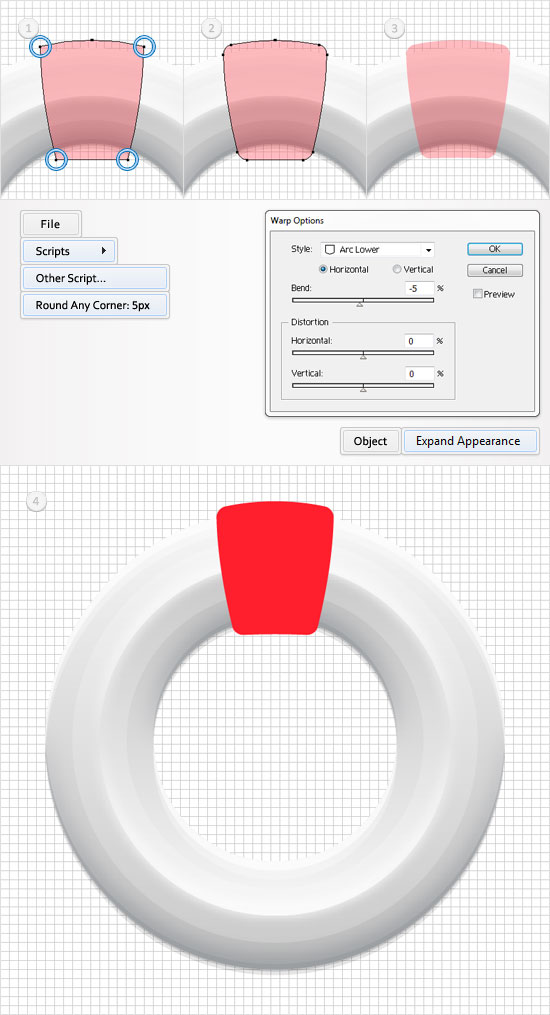
For this step you'll need the Round Any Corner script. You can find it here. Save it to your hard drive then return to Illustrator and grab the Direct Selection Tool (A). Focus on the red shape edited in the previous step, select the four anchor points highlighted in the first image and go to File > Scripts > Other Script. Open the Round Any Corner Script, enter a 5px Radius and click OK. In the end your shape should look like the second image. Reselect it and got Effect > Warp > Arc Lower. Enter the data shown below, click OK and go to Object > Expand Appearance. Finally, select the resulting shape and increase its opacity back to 100%.
Step 17
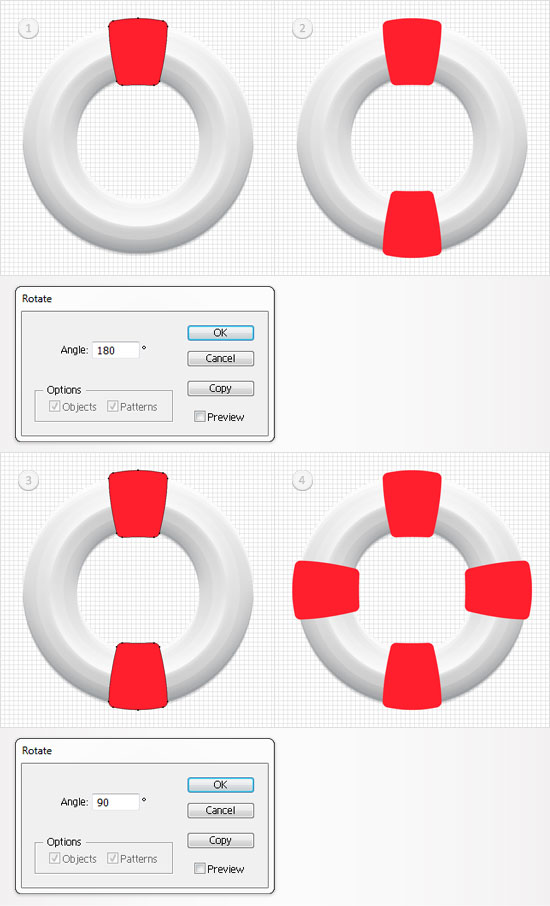
Select the red shape created in the previous step and go to Object > Transform > Rotate. Enter a 180 degrees angle and click on the Copy button. This will create a vertically flipped copy. Select it, drag it down and place it as shown in the second image. The Snap to Grid should ease your work. Reselect both red shapes and go again to Object > Transform > Rotate. This time enter a 90 degree angle and click on the Copy button. In the end you should have four red shapes placed like in the fourth image.
I wonder which program your background is made in. Or is it a background or how do you do? It was atleast the coolest background I’ve ever seen!
Hi Felicia, the background is made in Illustrator.
Here’s how I did it:
Pick the Rectangle Tool, create a shape the size of your artboard and fill it with R=255 G=252 B=221. With this new shape selected move to the Appearance panel and add a second fill using the Add New Fill button. You will need a built in pattern for this new fill. Move to the Swatches panel, open the fly-out menu and go to Open Swatch Library > Patterns > Decorative > Decorative_Classic. This will open a new window with a set of built-in pattern. You will need the “Waves Smooth” pattern. Return to the Appearance panel, select that second fill, add the “Waves Smooth” pattern, lower its opacity to 5% and change the blending mode to Multiply. Keeps focusing on the Appearance panel, make sure that your rectangle is still selected and add a third fill. Select this new fill, lower its opacity to 70% and use a radial gradient from R=255 G=252 B=221 (location 0%, opacity 0%) to R=216 G=127 B=39 (location 100%, opacity 100%).
Let me know if you got it.
Very nice looking “buoy”. Shiny!
We call it a life preserver in the US.
-John
This is absolutely amazing. Expecting to learn more from you mate.
Hi Andrei. Here is my take at the lifebuoy. Do you have the color codes for the other lifebuoy as well?
http://img.photobucket.com/albums/v645/duceduc/themes/life-like-life-perserver-float-vector.png
Hi Andrei- Thanks for your tutorial! In step 4, you write, “delete the small circle then ungroup (Shift + Control + G) the remaining two compound paths.” Don’t you have to ungroup before deleting the small circle?
Thanks again; I’m a noob, but learning a lot from this tutorial.
A great tutorial!
Thank you for adding the steps to add the background.
Hello Andrei.
I am working on a Macbook Pro using CS6, and I have two questions for you;
On step 5 my linear gradient is a lot darker than yours just going with default settings, anything I’ve missed or should do to make it as light as yours?
The command you are using for bringing objects to front (Shift + Control + ] ) uses “]” -where on my keyboard do I find that? :P
Thanks for a great and informative guide, really helpful for a beginner :)
Really nice tutorial. But im stucked at step6. When i useing ctrl+c and ctrl+f , its copying the circle on the same layer. then i cant use minus front. i tryed to continue on those steps , but with those high amount of copy+c copy+f impossible to select and handle them. I tryed it for hours but cant finish:(