
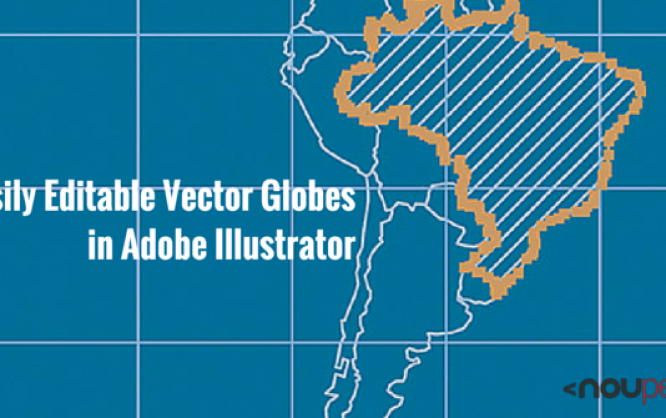
Easily Editable Vector Globes in Adobe Illustrator
There can be a time that you are working on a design that would go well with a globe of the earth. Where to start? Searching for the perfect globe clip art can be a tedious task. Not to mention it would sure need to be in your custom style, with individual line widths, colors and probably rotated to your preferred location. One Stop Map has released a free vector globe that can do exactly that. Let us introduce you to it.
 The PowerGlobe for Illustrator is a free download that can get you up and running in no time with your next project. The globe itself is an Adobe Illustrator CS6 file (compatible up to the latest version of Creative Cloud) that lets you quickly edit the looks and content of your globe. With just one click you can rotate it to the location you need. Three distinct map styles are already included, but nothing is stopping you from altering the content the way you want.
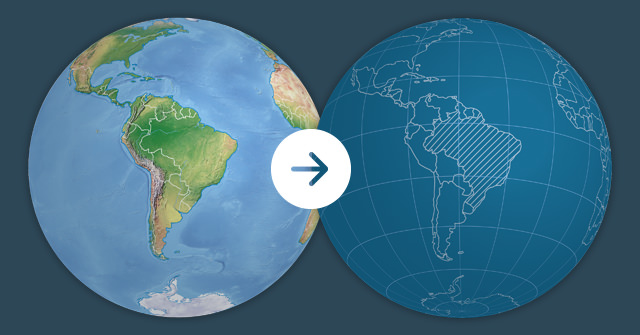 We are going to create a globe with a look inspired by blueprints.
You can read all the details on how to work with the PowerGlobe on the product page itself, or you can follow along as I demonstrate just how easy it is to edit this globe.
We are going to create a globe with a look inspired by blueprints.
You can read all the details on how to work with the PowerGlobe on the product page itself, or you can follow along as I demonstrate just how easy it is to edit this globe.
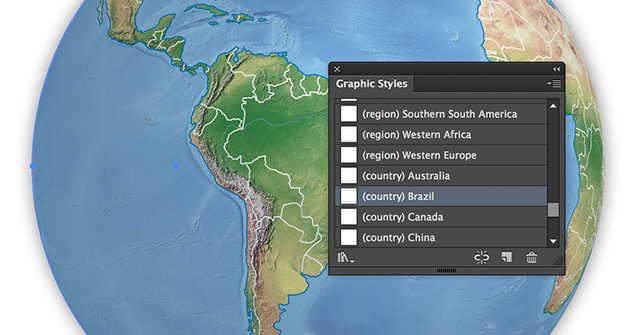 Open up the PowerGlobe in Illustrator. Select everything on the layer 'PowerGlobe' and click once on the graphic style '(country) Brazil'. This will rotate the globe, so Brazil is in the center of it.
You can quickly select all objects on one layer by clicking on the layer name while pressing the ALT-key.
Open up the PowerGlobe in Illustrator. Select everything on the layer 'PowerGlobe' and click once on the graphic style '(country) Brazil'. This will rotate the globe, so Brazil is in the center of it.
You can quickly select all objects on one layer by clicking on the layer name while pressing the ALT-key.
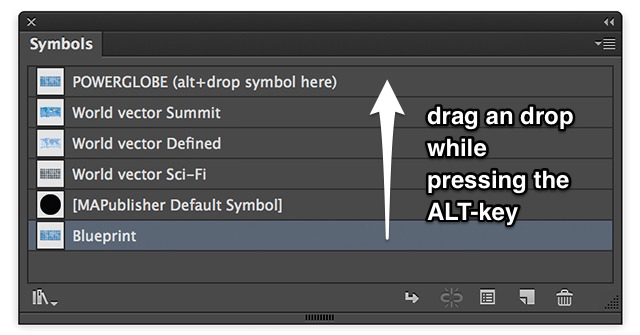
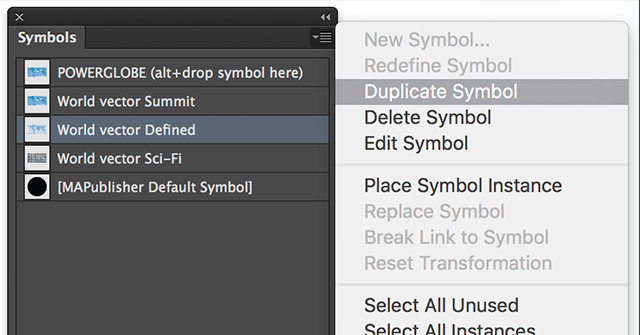 Now go to the Symbols palette and duplicate the symbol 'World vector Defined' by selecting it and choosing 'Duplicate Symbol' from the Symbols palette options menu. Rename the copied symbol to 'Blueprint' by double-clicking its name.
One important thing to know is that you should never alter the primary symbol 'POWERGLOBE' directly. That's the symbol that is used in the actual globe. We always change one of the other symbols and will make it active as soon as our edits are done.
Now go to the Symbols palette and duplicate the symbol 'World vector Defined' by selecting it and choosing 'Duplicate Symbol' from the Symbols palette options menu. Rename the copied symbol to 'Blueprint' by double-clicking its name.
One important thing to know is that you should never alter the primary symbol 'POWERGLOBE' directly. That's the symbol that is used in the actual globe. We always change one of the other symbols and will make it active as soon as our edits are done.
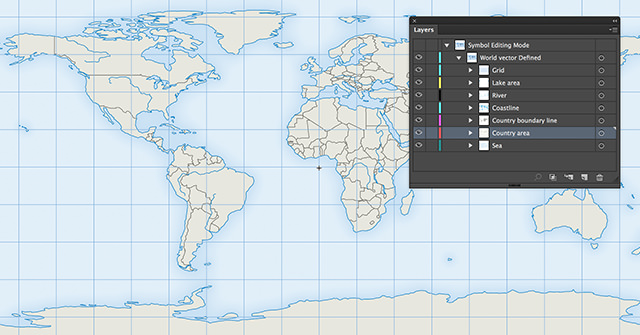 Now it is time to edit our newly created symbol 'Blueprint'. Double-click on the symbol name to open it in editing mode. As you can see the symbol itself contains several map layers like 'Country area,' 'River' and more.
For our purpose, we don't need the layers 'Lake area', 'River' and 'Sea'. So set those layers invisible.
Now it is time to edit our newly created symbol 'Blueprint'. Double-click on the symbol name to open it in editing mode. As you can see the symbol itself contains several map layers like 'Country area,' 'River' and more.
For our purpose, we don't need the layers 'Lake area', 'River' and 'Sea'. So set those layers invisible.
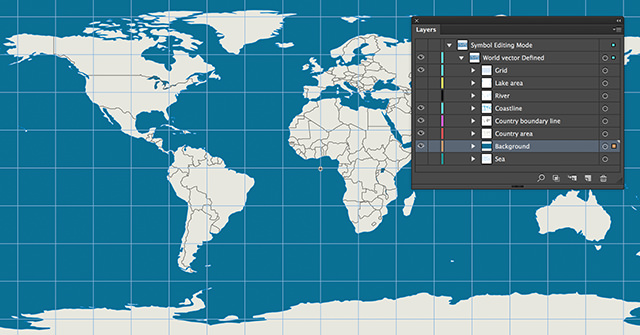 Create a new layer and call it 'Background.' Drag this layer under the layer 'Country area'. Draw a rectangle that precisely fits the grid (if it's not enabled turn on snapping by hitting CTRL+U or CMD+U on a Mac) and give the rectangle a fill of 90/50/25/5 (CMYK) or 7/110/149 (RGB). Set the outline of the rectangle to none.
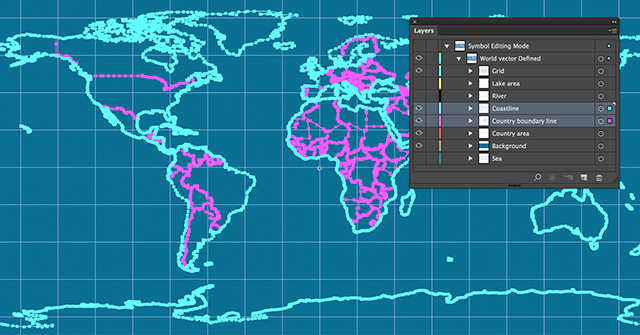 Select all objects on the layers 'Coastline' and 'Country boundary line'. As mentioned before, you can quickly select all objects on one layer by clicking on the layer name while pressing the ALT-key. By pressing SHIFT and ALT together, you can click on subsequent layers to select everything on it.
With everything selected set the stroke width to 0.5 pt, be sure the fill is set to None and set the color of the stroke to 35/15/10/0 (CMYK) or 165/192/211 (RGB).
Next select all objects on the layer 'Country area' and give them no fill.
Select all objects on the layers 'Coastline' and 'Country boundary line'. As mentioned before, you can quickly select all objects on one layer by clicking on the layer name while pressing the ALT-key. By pressing SHIFT and ALT together, you can click on subsequent layers to select everything on it.
With everything selected set the stroke width to 0.5 pt, be sure the fill is set to None and set the color of the stroke to 35/15/10/0 (CMYK) or 165/192/211 (RGB).
Next select all objects on the layer 'Country area' and give them no fill.
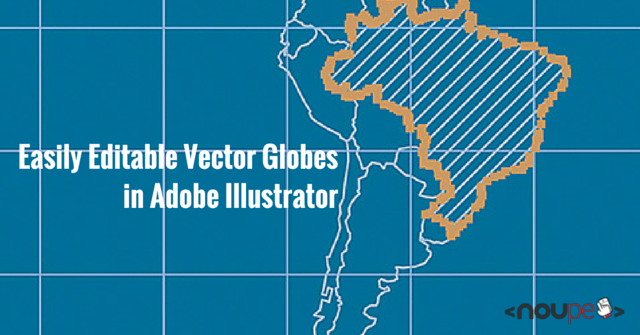
 Now we are going to emphasize Brazil by creating a fill that works well with this Blueprint style.
Make the layer 'Country area' active by selecting it in the Layers palette. Draw a line to the left of Brazil that's 45 degrees rotated by pressing and holding SHIFT as you draw. We want this line to have the same properties as the ones on the layers 'Country boundary line' and 'Coastline'. With the line selected click on the Eyedropper Tool and then click somewhere on the coastline to grab its properties.
Make a copy of this line to the right of Brazil by dragging the line to the left while pressing ALT and SHIFT together.
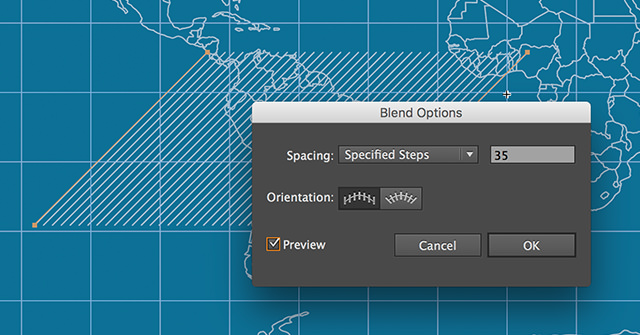
Select both lines and click the Blend Tool. With the Blend Tool selected click once on the left line and click once on the right line. Now double-click on the Blend Tool. This will bring up the 'Blend Options' dialog box. Turn on the Preview checkbox to see what is going on. Set the 'Spacing' to 'Specified Steps' and enter the number 35. Leave the rest as it is and click OK.
Now we are going to emphasize Brazil by creating a fill that works well with this Blueprint style.
Make the layer 'Country area' active by selecting it in the Layers palette. Draw a line to the left of Brazil that's 45 degrees rotated by pressing and holding SHIFT as you draw. We want this line to have the same properties as the ones on the layers 'Country boundary line' and 'Coastline'. With the line selected click on the Eyedropper Tool and then click somewhere on the coastline to grab its properties.
Make a copy of this line to the right of Brazil by dragging the line to the left while pressing ALT and SHIFT together.
Select both lines and click the Blend Tool. With the Blend Tool selected click once on the left line and click once on the right line. Now double-click on the Blend Tool. This will bring up the 'Blend Options' dialog box. Turn on the Preview checkbox to see what is going on. Set the 'Spacing' to 'Specified Steps' and enter the number 35. Leave the rest as it is and click OK.
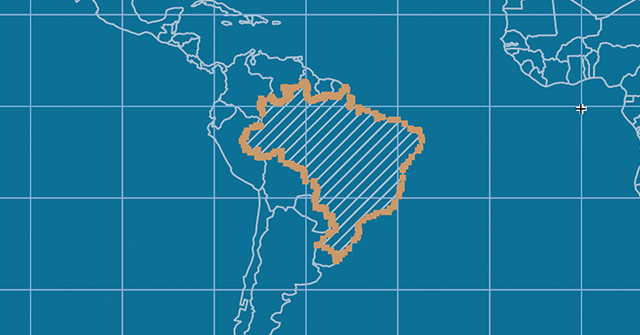 The layer 'Country area' contains shapes of every country. We are going to make a clipping mask of the lines and the shape of Brazil.
Lock all layers except 'Country area' and select the shape of Brazil.
Bring that shape to the top by right-clicking on it and choosing for Arrange / Bring to Front.
Select the lines and the shape of Brazil and go to Object / Clipping Mask / Make.
The layer 'Country area' contains shapes of every country. We are going to make a clipping mask of the lines and the shape of Brazil.
Lock all layers except 'Country area' and select the shape of Brazil.
Bring that shape to the top by right-clicking on it and choosing for Arrange / Bring to Front.
Select the lines and the shape of Brazil and go to Object / Clipping Mask / Make.
 Double-click somewhere in the white area to close the editing mode of the symbol. We are going to make our edited symbol the active one by dragging and dropping the symbol 'Blueprint' onto the main symbol 'POWERGLOBE' while pressing and holding the ALT-key.
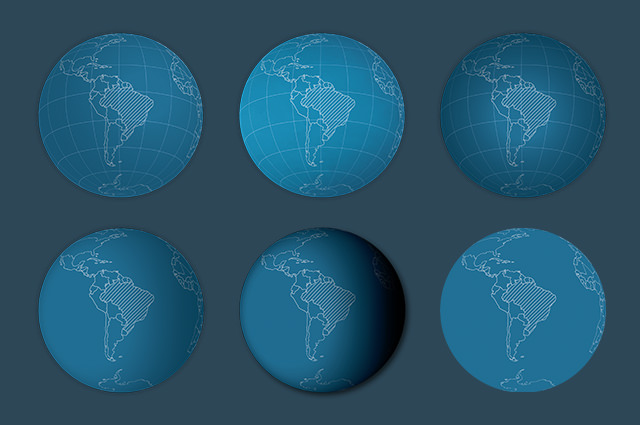
That's it. Your globe should look like a Blueprint globe.
Double-click somewhere in the white area to close the editing mode of the symbol. We are going to make our edited symbol the active one by dragging and dropping the symbol 'Blueprint' onto the main symbol 'POWERGLOBE' while pressing and holding the ALT-key.
That's it. Your globe should look like a Blueprint globe.
The PowerGlobe for Illustrator is a free download that can get you up and running in no time with your next project. The globe itself is an Adobe Illustrator CS6 file (compatible up to the latest version of Creative Cloud) that lets you quickly edit the looks and content of your globe. With just one click you can rotate it to the location you need. Three distinct map styles are already included, but nothing is stopping you from altering the content the way you want.
The Blueprint Globe Project
I am going to show you just how easy it is to change the look of the globe.
We are going to create a globe with a look inspired by blueprints.
You can read all the details on how to work with the PowerGlobe on the product page itself, or you can follow along as I demonstrate just how easy it is to edit this globe.
Open up the PowerGlobe in Illustrator. Select everything on the layer 'PowerGlobe' and click once on the graphic style '(country) Brazil'. This will rotate the globe, so Brazil is in the center of it.
You can quickly select all objects on one layer by clicking on the layer name while pressing the ALT-key.
Now go to the Symbols palette and duplicate the symbol 'World vector Defined' by selecting it and choosing 'Duplicate Symbol' from the Symbols palette options menu. Rename the copied symbol to 'Blueprint' by double-clicking its name.
One important thing to know is that you should never alter the primary symbol 'POWERGLOBE' directly. That's the symbol that is used in the actual globe. We always change one of the other symbols and will make it active as soon as our edits are done.
Now it is time to edit our newly created symbol 'Blueprint'. Double-click on the symbol name to open it in editing mode. As you can see the symbol itself contains several map layers like 'Country area,' 'River' and more.
For our purpose, we don't need the layers 'Lake area', 'River' and 'Sea'. So set those layers invisible.
Create a new layer and call it 'Background.' Drag this layer under the layer 'Country area'. Draw a rectangle that precisely fits the grid (if it's not enabled turn on snapping by hitting CTRL+U or CMD+U on a Mac) and give the rectangle a fill of 90/50/25/5 (CMYK) or 7/110/149 (RGB). Set the outline of the rectangle to none.
Select all objects on the layers 'Coastline' and 'Country boundary line'. As mentioned before, you can quickly select all objects on one layer by clicking on the layer name while pressing the ALT-key. By pressing SHIFT and ALT together, you can click on subsequent layers to select everything on it.
With everything selected set the stroke width to 0.5 pt, be sure the fill is set to None and set the color of the stroke to 35/15/10/0 (CMYK) or 165/192/211 (RGB).
Next select all objects on the layer 'Country area' and give them no fill.
Now we are going to emphasize Brazil by creating a fill that works well with this Blueprint style.
Make the layer 'Country area' active by selecting it in the Layers palette. Draw a line to the left of Brazil that's 45 degrees rotated by pressing and holding SHIFT as you draw. We want this line to have the same properties as the ones on the layers 'Country boundary line' and 'Coastline'. With the line selected click on the Eyedropper Tool and then click somewhere on the coastline to grab its properties.
Make a copy of this line to the right of Brazil by dragging the line to the left while pressing ALT and SHIFT together.
Select both lines and click the Blend Tool. With the Blend Tool selected click once on the left line and click once on the right line. Now double-click on the Blend Tool. This will bring up the 'Blend Options' dialog box. Turn on the Preview checkbox to see what is going on. Set the 'Spacing' to 'Specified Steps' and enter the number 35. Leave the rest as it is and click OK.
The layer 'Country area' contains shapes of every country. We are going to make a clipping mask of the lines and the shape of Brazil.
Lock all layers except 'Country area' and select the shape of Brazil.
Bring that shape to the top by right-clicking on it and choosing for Arrange / Bring to Front.
Select the lines and the shape of Brazil and go to Object / Clipping Mask / Make.
Double-click somewhere in the white area to close the editing mode of the symbol. We are going to make our edited symbol the active one by dragging and dropping the symbol 'Blueprint' onto the main symbol 'POWERGLOBE' while pressing and holding the ALT-key.
That's it. Your globe should look like a Blueprint globe.
The End But Not the End: Edit On
Just by playing along with the 'Lights' layer, editing the drop shadow on the back, making layers in the symbol visible/invisible, you can quickly come up with all sorts of versions of this globe. All this is done in a matter of minutes. It does not stop here. You know this is Adobe Illustrator, so you can edit the artwork any way you want. This was one simple workflow to quickly edit the looks of the globe, but you can do much more by using the tools you know in Illustrator and make this globe stand out.One Stop Map offers free and premium printable and editable vector maps from places all over the world. They have hundreds of free layered maps for you to use in your design: a US state map of every state, country maps and more. All free maps come with a very generous Creative Commons License.(dpe)