
Easy: How to Switch Your WordPress to HTTPS
Switching WordPress to HTTPS, meaning an SSL certificate, is often determined as being difficult on the internet. However, as always when it comes to things said on the web, be careful. The truth is that it is rather easy, and everyone that has at least some experience with WordPress, and can install the CMS can do it. In this article, I'll guide you through each necessary step, one by one.
 In this article, we'll assume that the SSL certificate has already been assigned to your domain by the web host. For over 90 percent, this should be the case. Only your own dedicated server will have you do this work. This shouldn't be a problem, however, as it's pretty easy.
The only more complicated thing is the creation and allocation of a free Let's Encrypt certificate. However, I'll assume that a proper, paid https is used. At my host, this only costs 23.90 EUR a year and is immediately assigned to the domain.
In this article, we'll assume that the SSL certificate has already been assigned to your domain by the web host. For over 90 percent, this should be the case. Only your own dedicated server will have you do this work. This shouldn't be a problem, however, as it's pretty easy.
The only more complicated thing is the creation and allocation of a free Let's Encrypt certificate. However, I'll assume that a proper, paid https is used. At my host, this only costs 23.90 EUR a year and is immediately assigned to the domain.
 If that doesn't work for you, there's another way to shift the WordPress addresses. Log into your web hosting package or server via (S)FTP, and add the following code to the
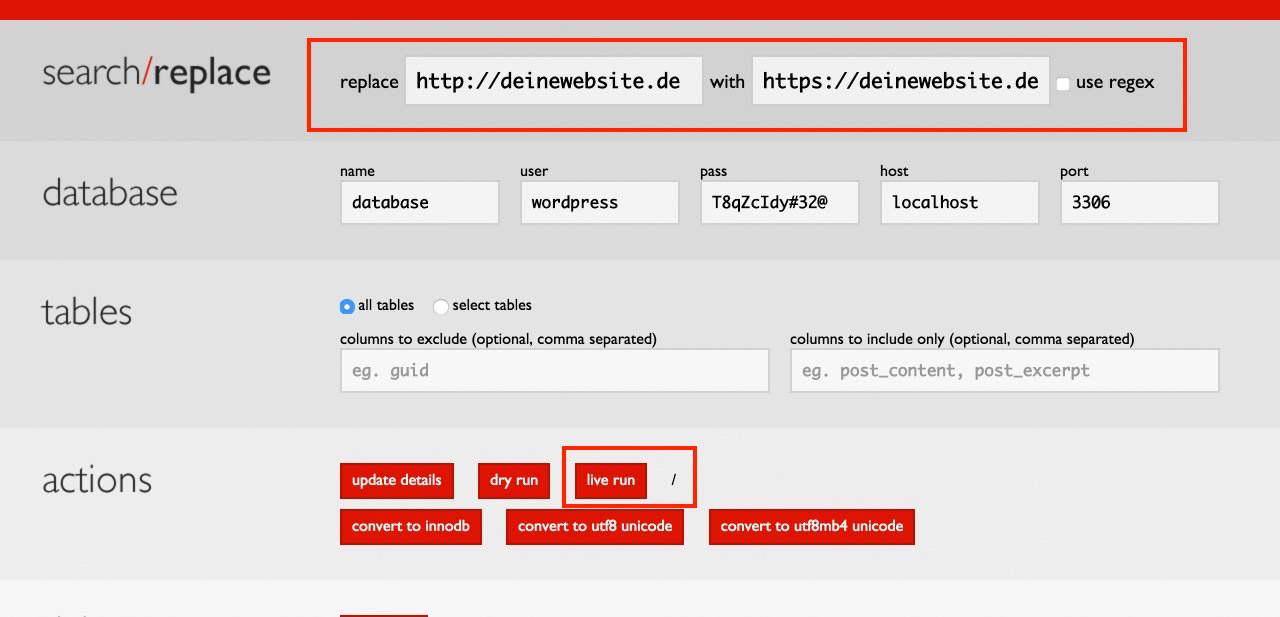
 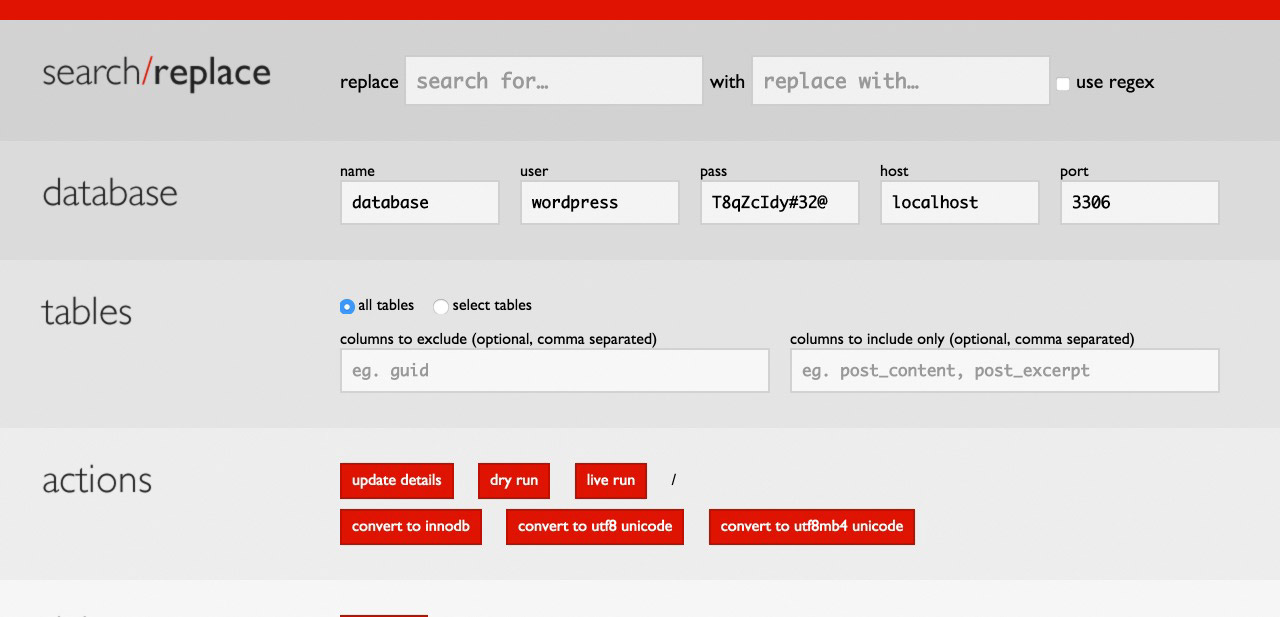 The access information of your database is already entered, you only need to enter your old URL in the upper left input field, and the HTTPS version on the right. Other settings are not required. A click on "live run" then changes the URLs in the database.
 The script will realize the required entries in a rather short amount of time. An error message may pop up, as the script attempts to increase the execution time and the PHP memory limit. Just ignore these notifications.
[caption id="attachment_76984" align="alignnone" width="660"]
The script will realize the required entries in a rather short amount of time. An error message may pop up, as the script attempts to increase the execution time and the PHP memory limit. Just ignore these notifications.
[caption id="attachment_76984" align="alignnone" width="660"]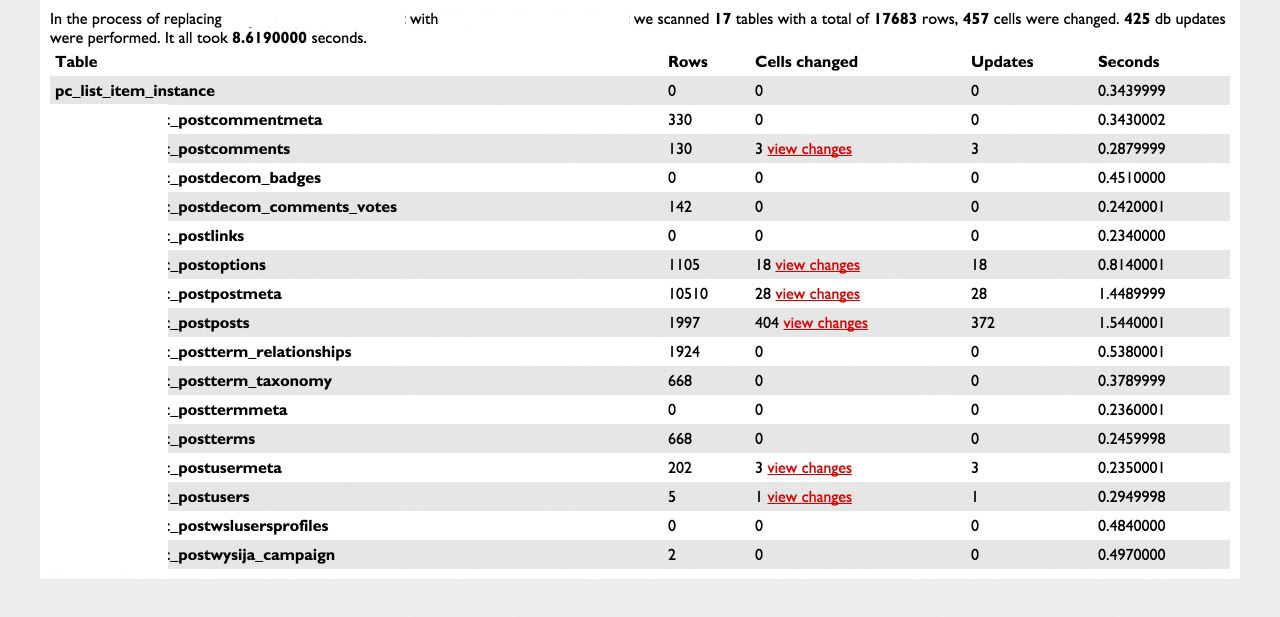 The Success Notifications. All Tables Have Been Altered Successfully.[/caption]
As soon as this step is done, scroll down in the script until the "Delete" button becomes visible, and click it. The folder with the script will then be deleted from the server, as it poses a large security risk.
The Success Notifications. All Tables Have Been Altered Successfully.[/caption]
As soon as this step is done, scroll down in the script until the "Delete" button becomes visible, and click it. The folder with the script will then be deleted from the server, as it poses a large security risk.
 However, it is possible that there are still files coming from HTTP. Then, the lock will either display in gray, or the resources will be blocked by the server. The menu item console in the developer tools of your browser will inform and show you the resources that are not encrypted.
 Most of the time, you have integrated these files yourself, maybe in the theme's header or footer. This can be helped with an integration of the file with
In this article, we'll assume that the SSL certificate has already been assigned to your domain by the web host. For over 90 percent, this should be the case. Only your own dedicated server will have you do this work. This shouldn't be a problem, however, as it's pretty easy.
The only more complicated thing is the creation and allocation of a free Let's Encrypt certificate. However, I'll assume that a proper, paid https is used. At my host, this only costs 23.90 EUR a year and is immediately assigned to the domain.
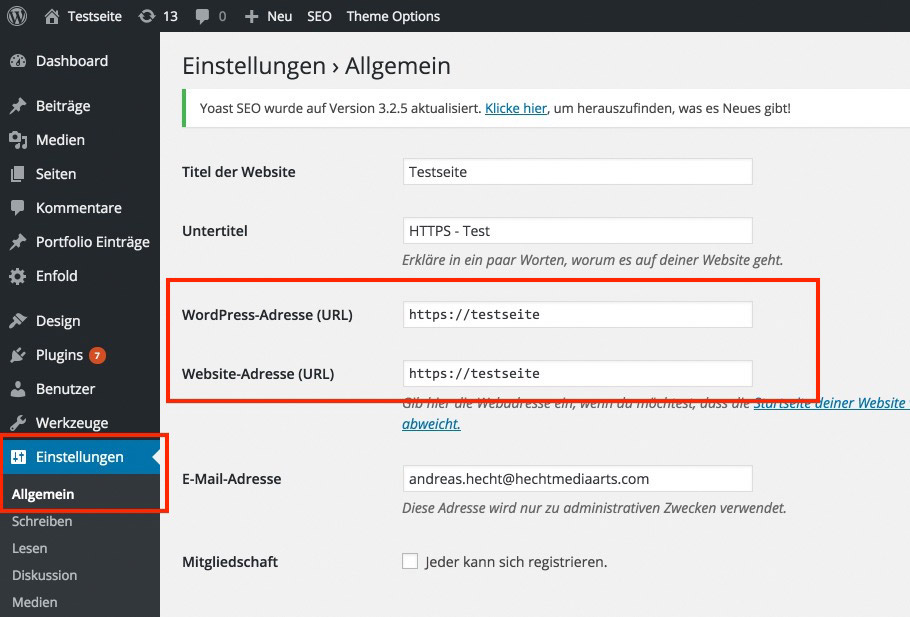
Step 1: Login Into the WordPress Admin Area
After logging in, go to the menu item "Settings => General" and change the two entered addresses to the HTTPS version. You only need to add the lower case "s."
If that doesn't work for you, there's another way to shift the WordPress addresses. Log into your web hosting package or server via (S)FTP, and add the following code to the wp-config.php
https://gist.github.com/anonymous/3cdbb25758ba17c1c48de9ee0137ca9e
Copy and paste the following code below the table prefix, save, and reupload the file. Now, you have gained access to your website via HTTPS.
Schritt 2: Overwriting All URLs in the Database
The dynamic URLs, like the ones of the scripts and files, are already accessible via HTTPS. Now, it's about shifting the static URLs of the images in the articles to SSL as well. For that, you could use a plugin, but it's more comfortable and safer to use the Database Search and Replace Script by interconnect/it. However, before using the script, please create a complete database backup in phpMyAdmin. You never know...Script Download and Call-Up
Download the script folder, unzip it, rename it to "replace", and load the entire folder (not just the files!) into your WordPress installation's root index. Now, call up the script by entering your domain followed by the word replace into your browser's address bar.https://yourwebsite.com/replace
After that, you should be able to see the script.
The access information of your database is already entered, you only need to enter your old URL in the upper left input field, and the HTTPS version on the right. Other settings are not required. A click on "live run" then changes the URLs in the database.
The script will realize the required entries in a rather short amount of time. An error message may pop up, as the script attempts to increase the execution time and the PHP memory limit. Just ignore these notifications.
[caption id="attachment_76984" align="alignnone" width="660"] The Success Notifications. All Tables Have Been Altered Successfully.[/caption]
As soon as this step is done, scroll down in the script until the "Delete" button becomes visible, and click it. The folder with the script will then be deleted from the server, as it poses a large security risk.
Step 3: Changes to the htaccess File and the wp-config.php
.htaccess In this final step, the .htaccess file is extended by an important aspect. The following code will cause a constant 301 redirection of the HTTP to the HTTPS version of your website. The website will only be accessible via HTTPS, and on top of that, the code will notify Google that there is no HTTP version of your website anymore. https://gist.github.com/anonymous/04d2f529d2691c5cffd12e0017d3f977 wp-config.php This code snippet has to be placed in thewp-config.php of your WordPress, below the table prefix.
https://gist.github.com/anonymous/cd55eb429471d59e532a5c00cd6c991e
Then, login is only possible via the HTTPS version.
The Final Result
You should now see a green version on the landing page and all articles.
Most of the time, you have integrated these files yourself, maybe in the theme's header or footer. This can be helped with an integration of the file with //www.your-file.com, without a prefixed HTTP or HTTPS. Now, the HTTPS version will always be loaded, if possible.
Definitely re-tweeting this one. I’m now convincing a lot of my past clients to switch to HTTPS for SEO reasons. I really wish this article was around when I had my first crack at doing it because it wasn’t as simple as changing the URL in the WP dashboard.
If you are getting insecure content (or mixed content) warnings you can use the “SSL Insecure Content Fixer” plugin.
This is very useful article. Very detailed. I wish that after making all needed actions there would not be any errors with SSL certificate connections to internet and Google.
Thanks for the post. It doesn’t seem as difficult as I thought it was. What about any links going to the “http” version, will they still pass juice?