
Blog Checklist: 10 Important Things to Keep in Mind Before Publishing a Post

Professional bloggers can't afford to forget an important aspect before publishing a post. They earn money off the articles they post. Nonetheless, hobby bloggers can also benefit from a professional way of working. The visibility in the Google index search results will rise accordingly. Thus, in this article, I'll show you a list of the truly essential things that you should check before publishing an article. This blog checklist will help you minimize mistakes, and remember critical aspects.

 A poor example. Heading and Description are both cut off.[/caption]
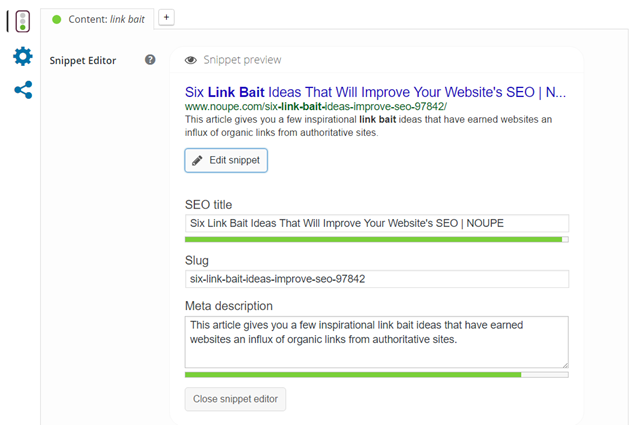
A search result like that is not really inviting, as it lacks crucial information. Thus, the SEO title should never exceed 60 characters. An SEO plugin can certainly help when it comes to choosing a unique article title for the search engine. The required function is offered by wpSEO as well as Yoast SEO.
A poor example. Heading and Description are both cut off.[/caption]
A search result like that is not really inviting, as it lacks crucial information. Thus, the SEO title should never exceed 60 characters. An SEO plugin can certainly help when it comes to choosing a unique article title for the search engine. The required function is offered by wpSEO as well as Yoast SEO.
 The SEO Optimization With the Yoast SEO Content Analysis.[/caption]
The better your post is optimized, the better it will be ranked within the Google search results. Thus, you should put a lot of effort into these tasks.
The SEO Optimization With the Yoast SEO Content Analysis.[/caption]
The better your post is optimized, the better it will be ranked within the Google search results. Thus, you should put a lot of effort into these tasks.
 The Bananacontent Article Optimization Feature.[/caption]
 Here, you have the option to upload a separate post image for Facebook and Twitter.[/caption]
 Always use the preview before publishing an article.[/caption]
When your article looks good and appears to be perfectly readable, you should check if your links in the article work.
Always use the preview before publishing an article.[/caption]
When your article looks good and appears to be perfectly readable, you should check if your links in the article work.
1 - Find a Catchy Headline
An article's heading decides whether your article will be read or not. If you chose a bad title, the chances of your post being opened drop dramatically. It doesn't matter how good your content is, it won't be read. It's like with a book. If it has a weak title, barely anyone will want to buy and read it. People ignore posts with unattractive headings, which is why you should make sure to find a very catchy caption for your post. The most famous American content marketing blog "Copyblogger" offers extensive information on good headlines, and ebooks available for free download. However, a free registration is required.2 - SEO Heading and Placing a Description
Usually, the SEO heading and the post's title aren't different from each other. But sometimes, an error that can cost you visitors will occur. Google automatically cuts the title down to a maximum of 60 characters. Longer headings are simply cut off. [caption id="attachment_76285" align="alignnone" width="640"] A poor example. Heading and Description are both cut off.[/caption]
A search result like that is not really inviting, as it lacks crucial information. Thus, the SEO title should never exceed 60 characters. An SEO plugin can certainly help when it comes to choosing a unique article title for the search engine. The required function is offered by wpSEO as well as Yoast SEO.
The Meta Description
The meta description is very important as well. As you can see in the screenshot above, the description is also cut off when it's too long or generated automatically. For that reason, the meta description should be optimized. For both of these things, Yoast SEO offers an editor with a preview.
3 - Can the Focus Keyword be Found Everywhere?
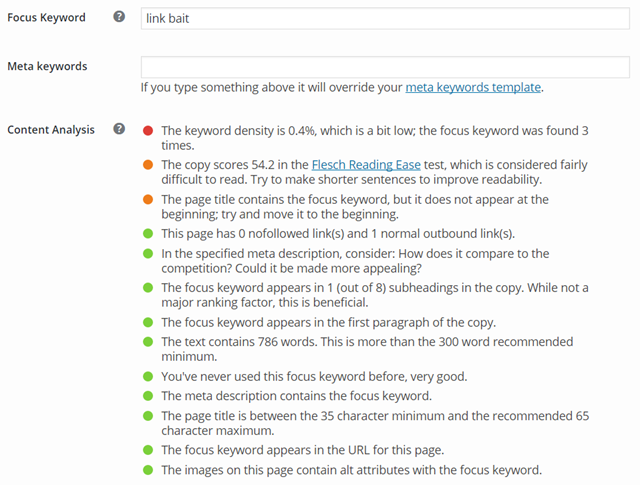
Every article that you write should be optimized for a focus keyword. It's the main topic under which you want your article to be found on Google. That's why you should make sure that the keyword is placed in the heading (SEO and blog), the meta description, the images' alt tags, and in the article's content. For example, when your focus keyword is "blog checklist", you can manually check how often the keyword is used via Ctrl + F (Cmd + F for Mac users), or you could use the Yoast SEO plugin. Yoast SEO comes with a detailed automatic content analysis which shows you how well your article is optimized for the respective keyword. [caption id="attachment_76302" align="alignnone" width="640"] The SEO Optimization With the Yoast SEO Content Analysis.[/caption]
The better your post is optimized, the better it will be ranked within the Google search results. Thus, you should put a lot of effort into these tasks.
Overview: Where You Should be Able to Find the Keyword
- In the heading
- In at least one subheading
- Multiple times in the article's content
- In the SEO heading
- In the meta description
- In an image's alt tag - article image and / or image in the article
The Bananacontent Article Optimization Feature.[/caption]
4 - Adding Related Keywords and Keyword Variations
Back in the day, articles were only optimized for a single keyword under which you wanted the article to be found. However, the modern search engine optimization uses related keywords to further increase the findability. Finding related keywords is rather simple, as all you need to do is enter your keyword in Google search and scroll to the bottom of the page. There, you'll find the related search requests. Also, use these word combinations in your articles.
5 - Paying Attention to Internal Links
Placing internal links is important for search engine optimization. On top of that, it helps to reduce the bounce rate and increases the number of page impressions. Google also benefits from it, as it helps the search engine to better index the website. Thus, try to link at least one or two of your older articles in every new post you write. If you just started your blog, that's a little tricky, but it becomes easier the more articles you write.6 - Add Picture Credits and Sources
This is one of the most important aspects, as it helps you save money. When you don't add sources and credits for the images you use, you can quickly receive an expensive warning and DMCA requests. Additionally, it is important only to use pictures and graphics that can be utilized for free. Here, you can distinguish between images with a license and license-free images. Some images on Flickr can be used freely if you name the creator, and link the license. When it comes to these pictures, make sure the link to the author and the license are clearly visible. However, it is even better to use completely cost-, and license-free images. Then, you're always on the safe side. Further Information: Noupe: Free Photos: 43 Handpicked Services for Entirely Free to Use Images7 - Subheadings and Formatting
Formatting of the Subheadings
Subheadings are imperative. For one, they divide the text into sections, and for another, they are the carriers of keywords. Here, it is important to place the correct subheadings. This is done depending on the relevance of the individual sections. The headings form a hierarchy, with the most important title being the heading of the post, which should always be a <h1> (Heading 1). Heading 2 (<h2>) is used for the most important area of the article as a subheading. After that, heading 3 (<h3>) is next in the hierarchy.Remaining Optimal Article Formatting
Optimize your article for good readability. Keep the following things in mind:- Avoid long sentences, divide your texts into short paragraphs
- Use lists for enumerations
- Format important words or sentences to be bold or italic
- Use quotes where it seems appropriate
- Add suitable media to the article (videos or images)
8 - Add Categories and Tags
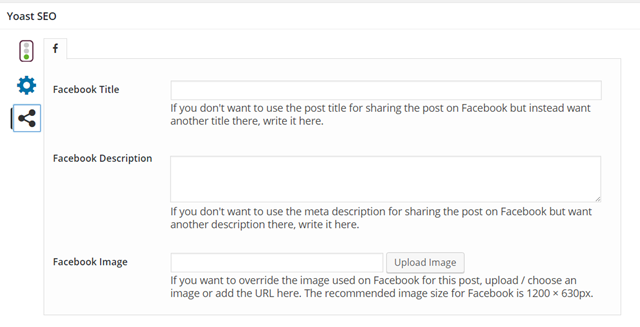
Especially this aspect is often forgotten. You simply don't think about it, and suddenly, the category is displayed as "General." Of course, this doesn't really help your article's findability in the search results, or a user's manual search via categories. Thus, always make sure that your articles are categorized properly. Now and then, an article can also be placed in two categories, like "WordPress" and "Plugins", for example. Also, add a couple of relevant tags, as some users like to use tags to receive the desired information. Here, the rule of thumb is as follow: as many tags as necessary, and as little tags as possible. Further Information: WPBeginner: Categories vs. Tags – SEO Best Practices for Sorting your Content9 - Check for Article Image and the Right Sizes for Social Media
Have you assigned an article image? Check this, and also implement the keywords in the image's alt tag while doing so. Does your image have the proper measurements for Facebook, Twitter, and Google+? This aspect is important, as many people use article pictures that are simply too small for an optimal presentation of your posts in the social networks. When your posts have measurements of at least 500 x 300 pixels, you don't need to change a thing. Your articles will be presented in an optimal way. If your theme happens to use smaller post images, it would be advantageous to create and use separate post images for social networks. Yoast SEO helps you do this in a simple, and understandable way. The screenshot shows where you can upload the picture for Facebook and Twitter. [caption id="attachment_76328" align="alignnone" width="640"] Here, you have the option to upload a separate post image for Facebook and Twitter.[/caption]
10 - Using the Preview Feature and Testing the Article
I always use the WordPress preview feature before publishing an article or planning to post it. I recommend you do that as well. It's an easy way of testing whether your article is optimally formatted, or if it still requires some optimization. [caption id="attachment_76329" align="alignnone" width="640"] Always use the preview before publishing an article.[/caption]
When your article looks good and appears to be perfectly readable, you should check if your links in the article work.