
The ultimate guide to creating online quizzes and assignments

If life is a journey, learning is the vehicle that propels your students forward and helps them decide where they want to go.
With schools now closed because of the COVID-19 pandemic, educators have been forced to reevaluate how they communicate with each other, hold classes from the safety of their homes, and keep students learning while they’re at home.
E-learning provides you with an opportunity to reach students anywhere and keep them engaged whether they’re on the other side of town or halfway around the world. Virtual classrooms — as well as the video conferencing apps that make them possible — transcend traditional barriers that required students and teachers to meet for classes in person.
Incorporating e-learning tools into your curriculum enables students to access an extensive range of written, audio, and visual learning material without having to deal with unwieldy paper assignments or open multiple links to access information.
Since quizzes and assignments are an essential part of the learning process, JotForm offers an all-in-one solution that allows you to
- Prepare questions in a variety of formats
- Assign them to your students
- Collect their answers
- Calculate their grades
The best part is that you don’t have to be a tech whiz to create a shareable online quiz.
To get a better idea of what JotForm can do, check out this online quiz form template that highlights the different types of questions you can ask.
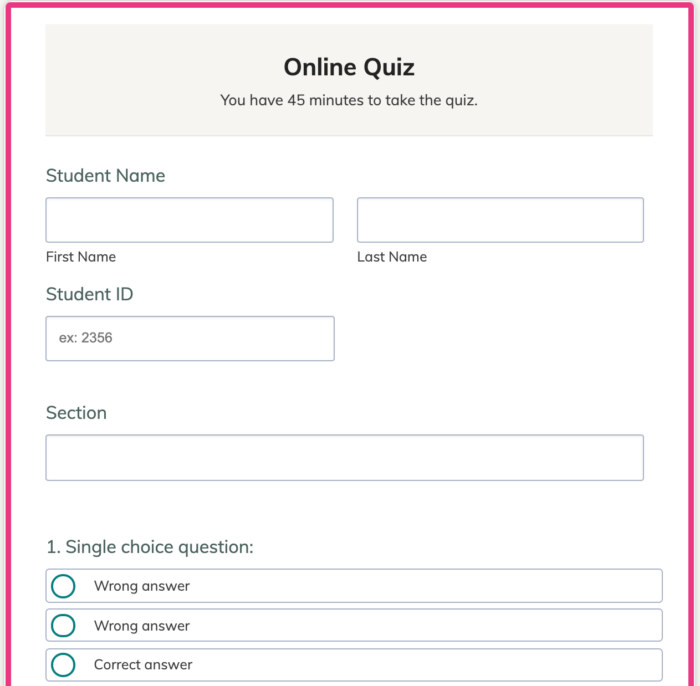
The sample quiz also includes a form calculation widget that automatically calculates grades based on correct and incorrect responses.
Creating a quiz
You can either build your own test or browse through our template gallery, which contains dozens of ready-made templates that can be tailored to match your needs. Regardless of which option you choose, it only takes a matter of minutes to create a wide range of tests, quizzes, and exams.
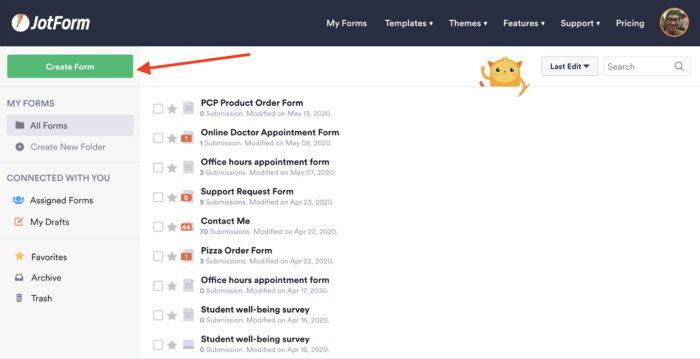
If you’d like to build your form from scratch, just open JotForm’s Form Builder and click on the Create Form button on the left side of the page.
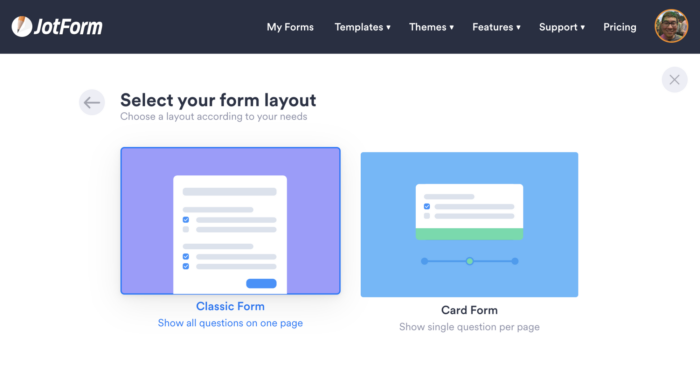
From there, all you have to do is choose your preferred layout.
If you prefer to use one of the dozens of quiz templates in our template gallery, this Online Quiz Form template shows the different types of questions you can create in a matter of minutes.
Types of questions
Once you’ve selected a general layout for your quiz, click on the Add Form Element icon on the left side of the blank form.
Scroll through the Form Elements menu that pops up, and you’ll find a wide variety of fields you can place on your form. If you’re not quite sure where to begin, we’ll demonstrate how these fields can create common types of quiz questions.
Single-choice
Single-choice questions allow students to pick a single answer from a short list of choices.
Either the Single Choice or Dropdown form element will come in handy if you want to test your students’ overall knowledge about a certain subject. After placing one of them on your form, all you need to do is type your question and list all of the possible answers, including the only correct one.
Yes/No and True/False
Yes-no and true-false questions are common on tests and can be advantageous for your students since there’s a 50-percent chance that they’ll select the correct answer. The Single Choice form element is the best choice for these types of questions. Simply add the field to your form, type the question you want to ask, and include two answer options: “yes” and “no,” or “true” and “false.”
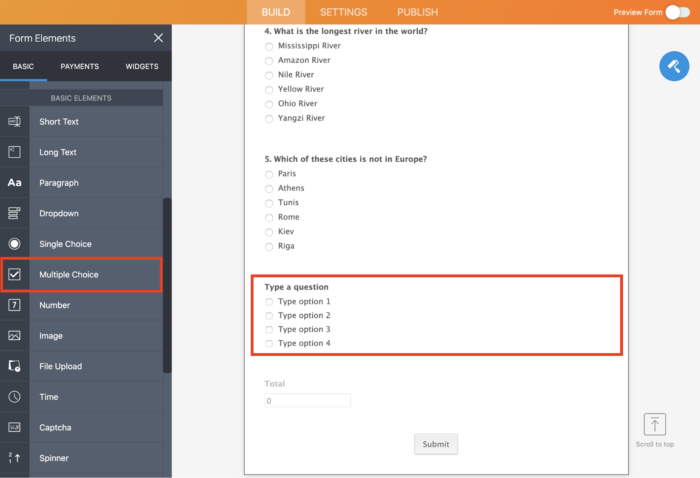
Multiple-choice
The Multiple Choice form element enables you to ask questions with more than one correct answer and lets students select the answers that they think are right.
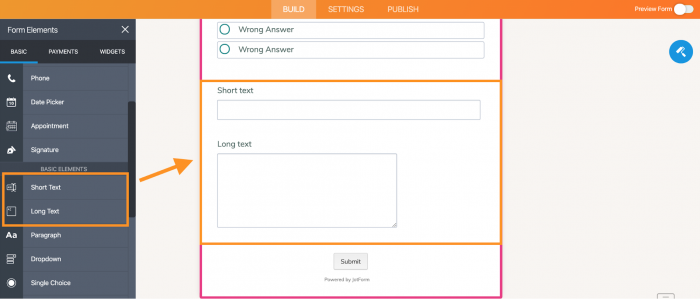
Open-ended questions
If it’s important for you to understand the thought process behind each student’s response, the Short Text or Long Text form elements will allow students to explain why and how they came up with their answer. Once you place either the Short Text or Long Text field on your form, type the question you want to ask or provide an essay prompt for students.
Fill-in-the-blanks
Fill-in-the-blank questions can be particularly useful when you want to gauge how well students understand a specific subject. You can use the Passage Test or Narrative Fields widget to create a sentence, paragraph, or short passage with blank fields that students must fill in.
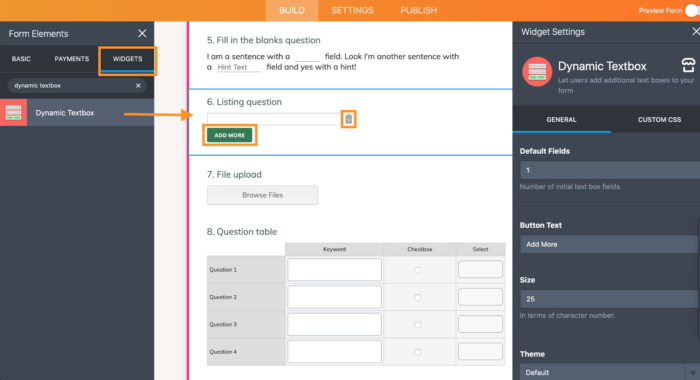
Listings
If you want to build some flexibility into a quiz or test, try the Dynamic Textbox widget. It allows your students to type out any number of answers to a certain question. Unlike traditional test questions that require students to select an answer from a variety of choices, the Dynamic Textbox widget enables your students to get creative, think critically, and provide answers that resonate with them.
Collect documents
With the File Upload form element or Drag-and-Drop Upload widget, you can create a test that allows students to upload files, such as an essay, image, or video. These widgets not only allow your students to upload their work but also enable you to collect answers and multiple documents from a single quiz.
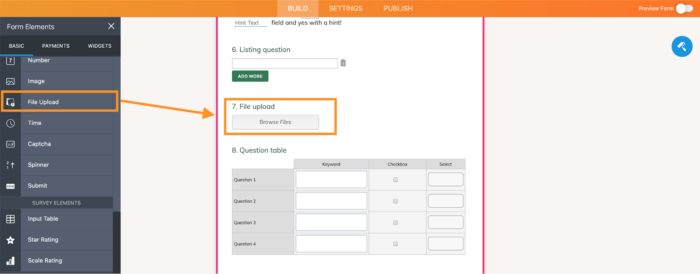
Question tables
Question tables are handy when your class is covering a topic in detail. Our Input Table form element allows you to easily create question tables, as well as add rows and columns in a variety of formats.
For instance, students can type a keyword in one column, mark a checkbox in another one, and select an option from the dropdown menu in an adjacent column.
Once you add your question and type the options in the rows and columns, open the Input Table Properties menu, click on the Fields tab, and set the format for answers in your table using the Input Type section. You can change how responses are formatted and displayed within each column using the Column Types section under the Fields tab in the Input Table Properties menu.
Visual expression
There are times when it’s easier and more effective to ask a question using images, videos, and other graphic elements rather than just text.
JotForm allows you to build a question based on a graph, an image, or even a video by using the Image form element and one of the many video embedding widgets, such as Iframe Embed,Vimeo, or YouTube. After uploading an image or embedding a video, simply add a question beneath it using any format you’d like, such as a single-choice or fill-in-the-blank question.
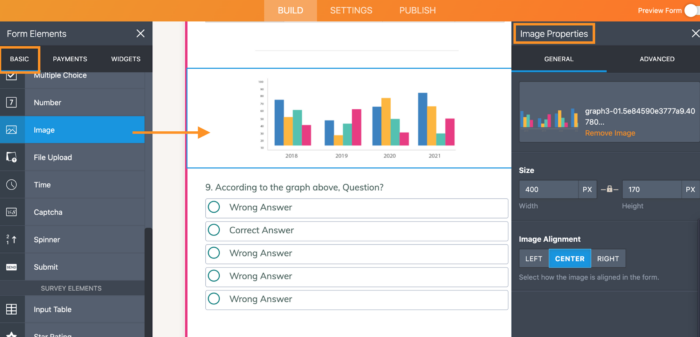
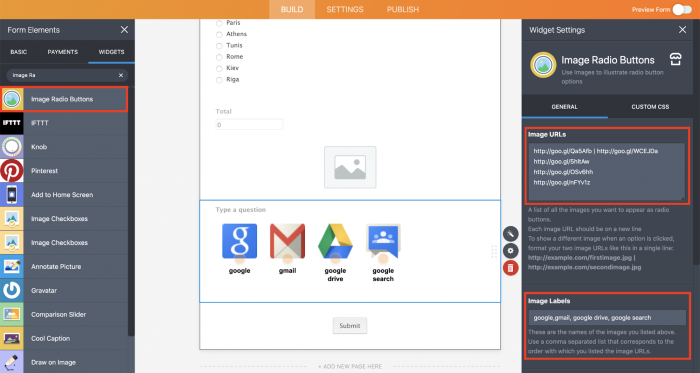
Image options
If you want to get fancy, JotForm’s Image Radio Button widget allows you to create questions and display responses that include images. All you have to do is type your question, list the image URLs, add labels for each one, and set the size for the images.
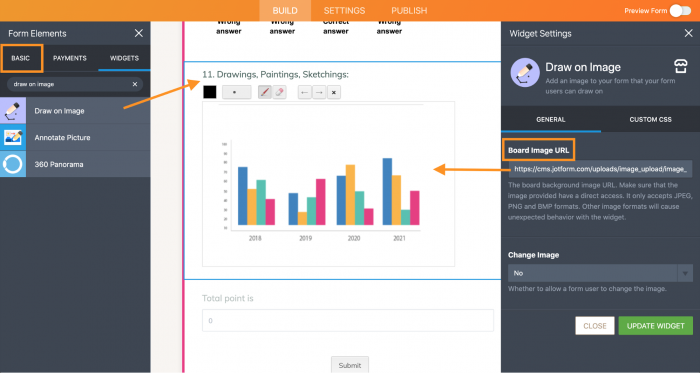
Drawings, paintings, and sketches
If you want to be really creative or give students some room to demonstrate their creativity, JotForm’s Draw on Image widget lets students draw, paint, sketch, and use their own handwriting on tests. You can either provide them a blank space or ask them to draw over a certain image, such as a graph.
Once you place the widget on your form, just type your question and add the image URL.
Connected/correlated questions
JotForm’s flexible features can show certain test questions only if students select specific responses to previous questions. For instance, if you ask a yes-no question, Jotform’s conditional logic capabilities will show specific follow-up questions, based on whether students selected yes or no.

Setting up conditional logic in your form can get a little tricky, so we’ll walk you through the process:
- Create a yes-no question and type the follow-up questions for both yes responses and no responses.
- Click on the Settings tab toward the top of your form, select Conditions from the options menu, and create a new conditional statement.
- Select the Show/Hide Field option and use the panel that appears to set a simple formula that will dictate when certain questions are shown and hidden. You must state what actions will trigger another set of actions to occur.
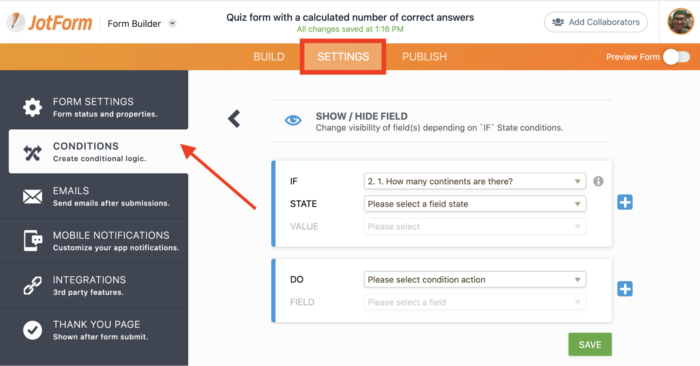
- Select a question in the dropdown menu next to the IF field that will trigger another set of actions. (In this case, select the yes-no question form field.)
- Select the answer a form respondent must give in the dropdown menu beside the STATE field to trigger an action. (In this case, select the Equal to option.)
- Select the specific response to a question in the dropdown menu beside the VALUE field that’s impacted by a form respondent’s answer. (In this case, select yes.)
- Select what action will be taken as a result of the form respondent’s answer by making a selection in the dropdown menu next to the DO field. (In this case, select Show from the available options.)
- Select which form field will be impacted by an action in the dropdown menu next to the FIELD field. (In this case, choose the follow-up question for a yes response to the original question.)
- Create a conditional statement for a no response to your question by repeating these steps.
Score quizzes and assignments
Creating a test and getting it to your students is only half the battle. Once they’ve completed your test and submitted it, you still have to review the responses from each student one by one, right?
False.
JotForm can not only help you create a wide range of quizzes, tests, and assignments but also calculate grades once students complete their work. This prevents you from spending hours on grading or inadvertently miscalculating a student’s grade.
As soon as an assignment, test, or quiz is submitted to you, JotForm can automatically calculate a grade based on how many questions were answered correctly and incorrectly.
JotForm can’t calculate scores for certain questions, such as those where students must upload files or type in their own answers.
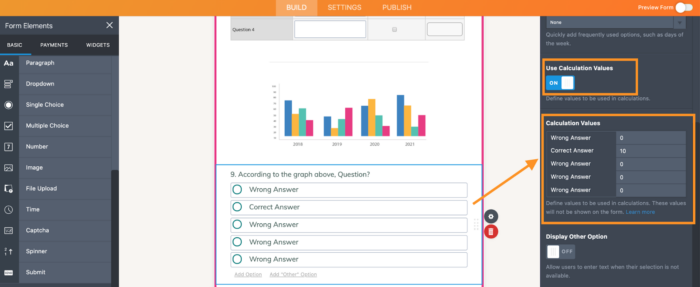
Before you set up the grade calculation process, it’s important to assign values — or points — for correct and incorrect answers to each question. To do this, select a question, click on the Properties icon, and switch on the Calculation Values option. Use the Calculation Values table to assign points for each answer — the number zero should be used to indicate incorrect answers, while values greater than one should be used for any correct answers.
For example, if a multiple-choice question is worth four points on a test, and there are two correct answers, each correct answer should be assigned a value of two points.
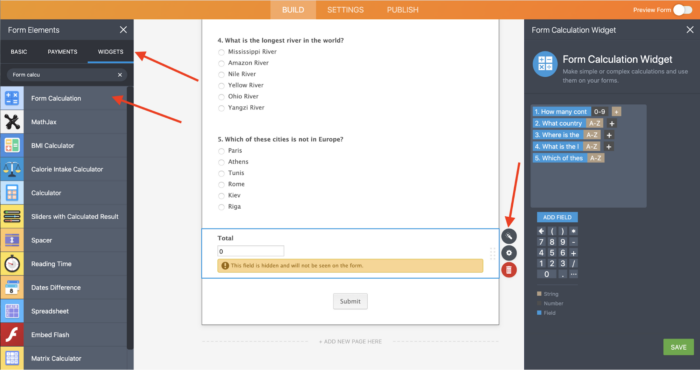
Once you’ve identified the correct and incorrect answers for each question, it’s time to set up the grading process. That may sound daunting, but there’s no need to fret when you have JotForm’s Form Calculation widget.
Once you locate the widget and click on it, go to the Widget Settings menu and use the Add Field button to select all the question fields that now have a designated score. Add a “+” in between each of the form fields and save your settings. When a student fills out and submits your form, this widget will sum up the assigned values for each selected answer.
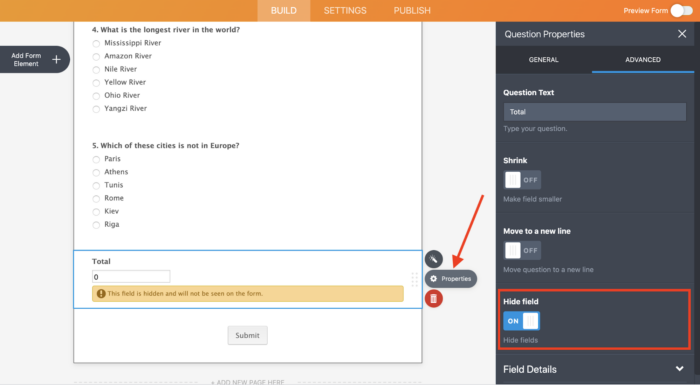
As a quick reminder, don’t forget to hide the widget from students by clicking on the question’s Properties icon and turning on the Hide field toggle switch under the Advanced tab. Doing this prevents students from viewing or changing their score until they submit their quizzes.
Assign quizzes to students and send reminder emails
Now that you’re a pro at making online quizzes, tests, and assignments, why not spring a pop quiz on your students?
If you’re thinking of sending the quiz to each student one by one, stop what you’re doing right now! JotForm’s new Assign Forms feature enables you to share your form with students and control their access to your quiz.
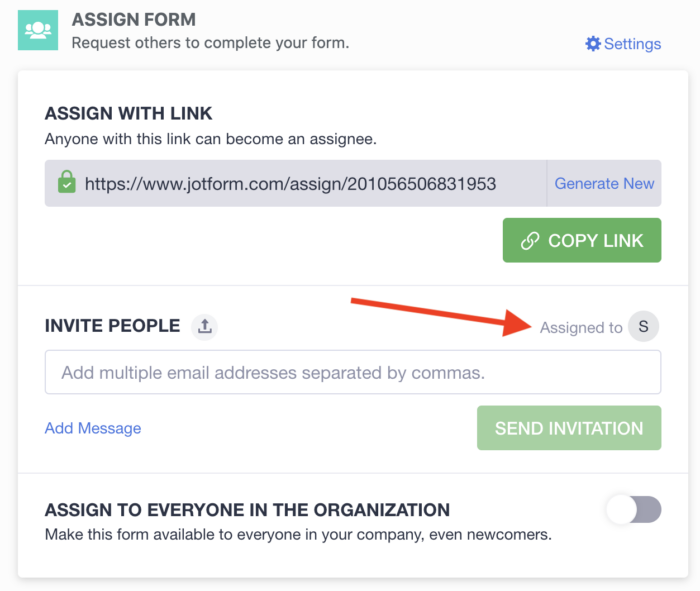
All you need to do is click on the Publish tab at the top of your online form and select Assign Form from the list of menu options. Paste your students’ email addresses into the Invite People field, and invite all of your students to take the quiz at once.
You can save time and eliminate manual data entry by uploading a CSV file that contains a list of email addresses for your students.

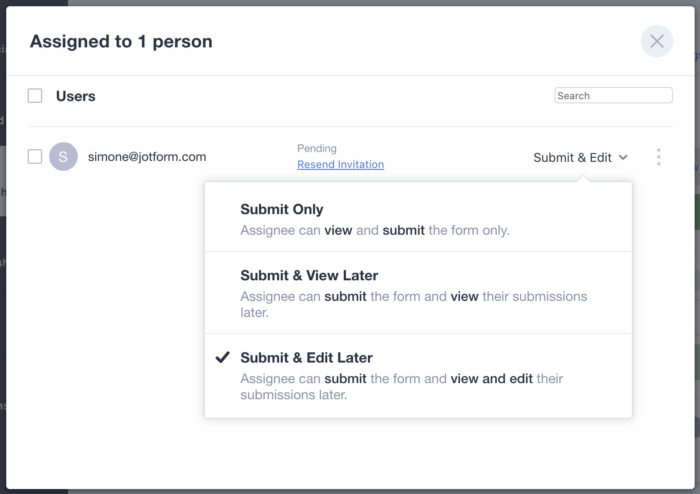
You can then edit their permissions by allowing them to view, edit, or fill in the form. Once you invite your students to take the quiz, you can change their level of access to your quiz by clicking on the Assigned to icon.
Edit their permission settings by using the dropdown menu that appears on the far right side of the row that includes their name.
To ensure that all of your students are notified about the quiz or assignment, schedule automated reminder emails to be sent on a daily, weekly, or monthly basis. Simply go to the Publish tab toward the top of your form, select Email from the list of menu options, and click on Schedule a Reminder Email. From there, you can customize the reminder email and schedule it to be sent out on certain days and at specific times.
View answers
Once students submit their answers to your assignments or quizzes, their form responses will be sent to your JotForm inbox. You can access your inbox by clicking on the form in your My Forms page and selecting Inbox from the list of options.

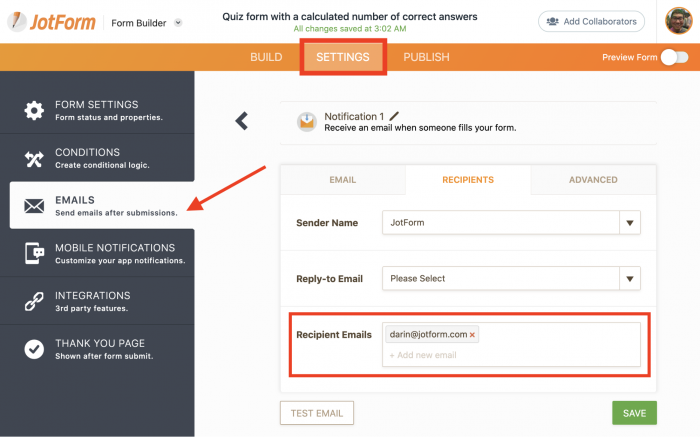
JotForm can send you an email notification once someone fills out and submits your form test. All you need to do is click on the Settings tab toward the top of the screen and select Emails from the list of menu options. Select Notification Email from the list of available email options, and add your email address to the Recipients Emails field.
Announce results and grades
It can be nerve-racking for students to wait for their grades. The good news is that tallying up scores and sending them out doesn’t need to take days or even hours. In fact, JotForm can show students their grades as soon as they complete a test, exam, or assignment and submit it to you. It’s important to note, though, that JotForm can’t calculate scores for certain questions, such as those where students must upload files or type in their own answers.
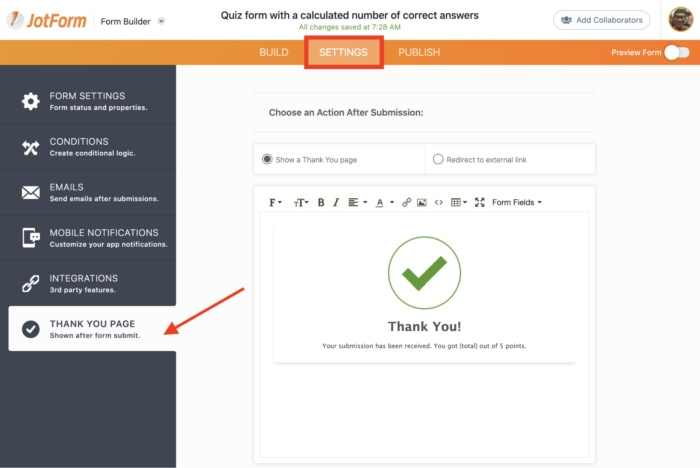
All you need to do is click on the Settings tab near the top of the Form Builder and select Thank You Page from the left sidebar. The Thank You Page appears immediately after a quiz is submitted. You can customize the page, add motivational phrases, and inform your students of their grades. Just select the Form Calculator from the Form Fields dropdown menu to let your students know how they did.
Conclusion
Although nothing beats in-person instruction, online, or distance, learning can not only help you reach students in more places but also develop a flexible curriculum that keeps students engaged when they can’t be in the classroom.
With JotForm, you can create interactive tests that will keep students on their toes and save time for everyone. Students no longer have to write out answers by hand and wait several days for their grades to arrive. More important, JotForm automatically calculates grades for most question types once students complete an online test and submit it, reducing the amount of manual work that teachers need to do.
Stop relying on old-school methods — and paper tests — to keep tech-savvy students engaged in a 21st-century classroom. Give JotForm a try today and surprise them by being the teacher with the coolest online tests on campus.
very interesting. You’re doing a great job. Keep it up