
Affinity Photo Beta: The First REAL Alternative to Photoshop?
On February 10 this year a new creative design software was unveiled: Affinity Photo by Serif debuted in beta and is currently available for free, exclusively for Mac OS X. The app claims to be a pro-level challenger to Adobe Photoshop, the undisputable top dog and standard in the publishing industry. After the beta phase, Affinity Photo will be available at the Mac App Store, at an estimated price tag of £39.99 (€49.99/$49.99). So let´s have a look under the hood of this new software and check it against its overwhelming rival, Adobe Photoshop.

 Affinity Photo explicitly targets designers and photo enthusiasts who rely on such a software product every day. Professional photographers benefit from features like frequency separation editing, live blend modes, inpainting, and advanced retouching. Unlike other alleged Photoshop contenders this app comes with end-to-end CMYK, 16-bits per channel editing, LAB color space, RAW processing, ICC colour management, compatibility with Photoshop PSD files and 64-bit plug-in compatibility.
Affinity Photo is compatible with OS X Lion 10.7.5 and newer on the Intel Mac 64-bit platform and is currently available in US English, German, Spanish, and French. Affinity Designer users will be pleased to know that both pieces of software work together flawlessly and intuitively, almost seamless.
Since the beta version is pretty fresh, it is still too early to tell if it is possible to import all popular Photoshop actions. Anyway, the plug-ins and styles for Photoshop can definitely be used with Affinity Photo.
Affinity Photo explicitly targets designers and photo enthusiasts who rely on such a software product every day. Professional photographers benefit from features like frequency separation editing, live blend modes, inpainting, and advanced retouching. Unlike other alleged Photoshop contenders this app comes with end-to-end CMYK, 16-bits per channel editing, LAB color space, RAW processing, ICC colour management, compatibility with Photoshop PSD files and 64-bit plug-in compatibility.
Affinity Photo is compatible with OS X Lion 10.7.5 and newer on the Intel Mac 64-bit platform and is currently available in US English, German, Spanish, and French. Affinity Designer users will be pleased to know that both pieces of software work together flawlessly and intuitively, almost seamless.
Since the beta version is pretty fresh, it is still too early to tell if it is possible to import all popular Photoshop actions. Anyway, the plug-ins and styles for Photoshop can definitely be used with Affinity Photo.
 Photoshop CS5
Clicking the image opens a high-res screenshot
Photoshop CS5
Clicking the image opens a high-res screenshot
 Using Photoshop CS5, I recognize Affinity Photo´s retina display support instantly. That comes as no surprise since CS5 was made in 2011 and, therefore, could not be developed with such a feature in mind. What is also easy to spot is how similar elements, tools, and functions are arranged. The tool area on the left serves multiple functions at either application. The area on the right is also organized in a similar fashion. However, the real difference sticks out immediately: with Photoshop you will find a lot of action going on at the right-hand area, which does not exactly support better clarity.
Affinity Photo chose a different path, putting much stuff to the top bar, clearing the way for, well, more clarity. The upper bar can be adapted and optimized according to specific requirements. Both applications share a lot, not least the multitude of features. No doubt, though, Photoshop still has way more functions and commands a bigger following, i.e. community. This, of course, comes naturally, since Adobe´s behemoth is alive and kicking for 25 years.
Many of Photoshop´s functions are also part of Affinity Photo. They are placed in the same positions as in the former most of the time. The most commonly used filters reside at the same location in both applications, although Photoshop comes loaded with several more filters than its more affordable rival - if only to justify its price tag.
Using Photoshop CS5, I recognize Affinity Photo´s retina display support instantly. That comes as no surprise since CS5 was made in 2011 and, therefore, could not be developed with such a feature in mind. What is also easy to spot is how similar elements, tools, and functions are arranged. The tool area on the left serves multiple functions at either application. The area on the right is also organized in a similar fashion. However, the real difference sticks out immediately: with Photoshop you will find a lot of action going on at the right-hand area, which does not exactly support better clarity.
Affinity Photo chose a different path, putting much stuff to the top bar, clearing the way for, well, more clarity. The upper bar can be adapted and optimized according to specific requirements. Both applications share a lot, not least the multitude of features. No doubt, though, Photoshop still has way more functions and commands a bigger following, i.e. community. This, of course, comes naturally, since Adobe´s behemoth is alive and kicking for 25 years.
Many of Photoshop´s functions are also part of Affinity Photo. They are placed in the same positions as in the former most of the time. The most commonly used filters reside at the same location in both applications, although Photoshop comes loaded with several more filters than its more affordable rival - if only to justify its price tag.
 Photoshop example image (110 KB):
 The difference in file size is huge. Of course, Photoshop´s version has a better quality, but that also means a significantly higher file size. Keeping SEO and site performance of an image-heavy website in mind, Affinity Photo clearly is a step ahead here. Even with just a handful of images per article this saves you a lot of speed-slowing file data.
 Photoshop´s saving options - "Save as"
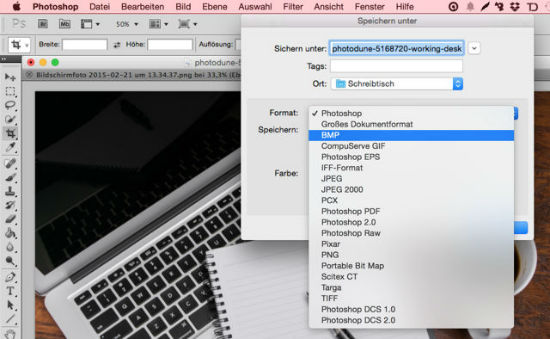 Including Photoshop´s „Save as“ features here, this more pricey software offers a lot more options to save your stuff. Over at Affinity Photo, there are no further file formats available, because „Save as“ only provides the native file format, nothing to choose from there.
Nevertheless, considering the small price of just £39.99 (€49.99/$49.99) Affinity Photo´s saving features are pretty nice and certainly sufficient for most usages.
Including Photoshop´s „Save as“ features here, this more pricey software offers a lot more options to save your stuff. Over at Affinity Photo, there are no further file formats available, because „Save as“ only provides the native file format, nothing to choose from there.
Nevertheless, considering the small price of just £39.99 (€49.99/$49.99) Affinity Photo´s saving features are pretty nice and certainly sufficient for most usages.
 Photoshop offers a lot more filters. Still, the question remains: Do we need all this stuff? Yes, Affinity's filters are less in multitude but they can be used intuitively. Getting familiar with the new app is quite easy, leading to quick and satisfying results.
Unsharp Mask
Photoshop offers a lot more filters. Still, the question remains: Do we need all this stuff? Yes, Affinity's filters are less in multitude but they can be used intuitively. Getting familiar with the new app is quite easy, leading to quick and satisfying results.
Unsharp Mask
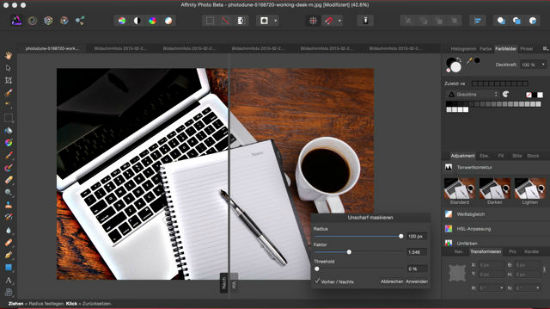 Photoshop offers much more sharpness filters. Although, „Clarity“ and „Unsharp Mask“ should be sufficient.
Working with copy
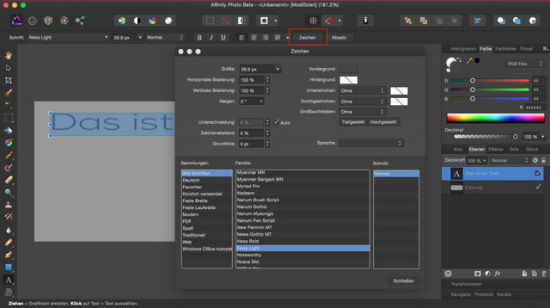
Basically, working with Type tools looks rather simple, even more simple than with Photoshop. Once written, copy can be moved freely, zoomed in, and resized. Angle adjustment is just as easy: take the text frame and move it any angle you want. Again, Photoshop´s options are far more comprehensive, but they are less easy to use.
Photoshop offers much more sharpness filters. Although, „Clarity“ and „Unsharp Mask“ should be sufficient.
Working with copy
Basically, working with Type tools looks rather simple, even more simple than with Photoshop. Once written, copy can be moved freely, zoomed in, and resized. Angle adjustment is just as easy: take the text frame and move it any angle you want. Again, Photoshop´s options are far more comprehensive, but they are less easy to use.
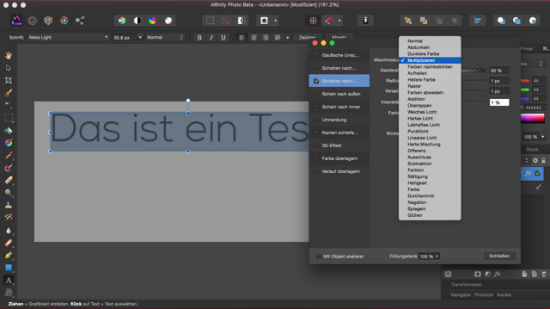 I miss the „Overlay“ feature for text shadows, though. I´d put this on my wishlist for the finished version.
 I like Affinity´s „Sketch“ feature pretty much. This gives their app clearly an edge compared to its big rival.
 Both applications can handle the RAW format, a very important feature for professional photographers.
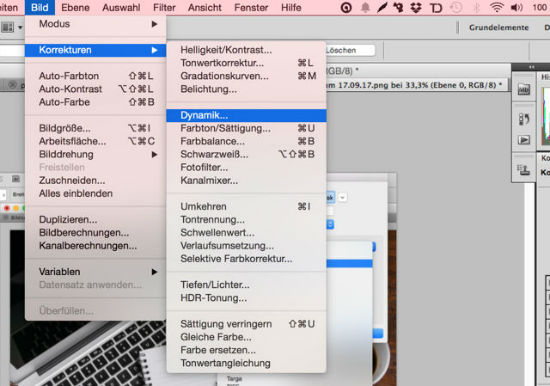
 Photoshop has some more options here, too. The convenient auto corrections can only be accessed via the menu, though. In contrast, at Affinity they can be easily found at the top bar. Some might find this easy access more convenient.
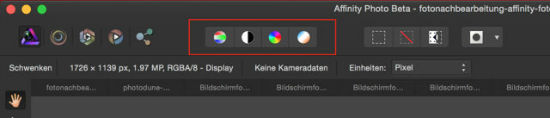
Affinity Photo´s easily accessable auto correction features for photo editing
Photoshop has some more options here, too. The convenient auto corrections can only be accessed via the menu, though. In contrast, at Affinity they can be easily found at the top bar. Some might find this easy access more convenient.
Affinity Photo´s easily accessable auto correction features for photo editing
 Auto Correction with Adobe Photoshop
Clicking the image opens the original file
Auto Correction with Adobe Photoshop
Clicking the image opens the original file
 Auto correction with Affinity Photo
Clicking the image opens the original file
Auto correction with Affinity Photo
Clicking the image opens the original file
 Auto correction with Affinity Photo without Auto Color Correction
Clicking the image opens the original file
Auto correction with Affinity Photo without Auto Color Correction
Clicking the image opens the original file
 To be sure, both contestants come up with good results. It´s up to the viewer to decide who wins.
 Using the Liquify Persona you get surreal distortion and warping effects.
 The Export Persona offers various options to export images, layers or slices to a range of formats, like a threefold file size.

 Affinity Photo: Other than that, when it comes to editing RAW files, Affinity Photo is no doubt on par with Photoshop. I would even say it looks as if its options are more wide-ranging, barring the rotate feature. All those options are bundled up in the Develop Persona.
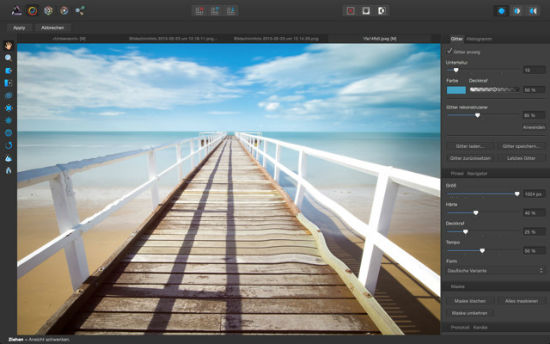
 When working with the Develop Persona, Affinity´s right sidebar is exclusively reserved for RAW editing and offers a wide variety of features.
 The Macro Persona for recording actions is unfortunately not working with my beta version (1.1.2.22821). That´s why I´m not able to make a statement about this feature.
Affinity Photo app: First impressions
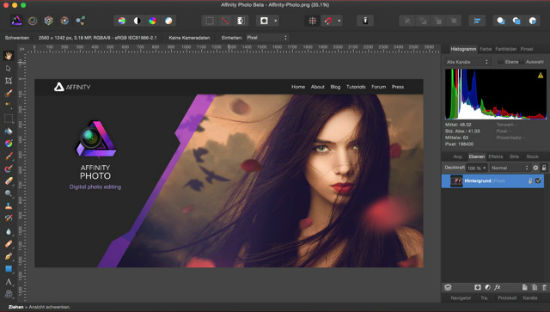
Right now, Affinity Photo is in free beta stage. Everybody can register to use and test the software in-depth without grabbing a credit card. First thing to notice is how really fast the app opens. Affinity Photo needs less than half the time to be ready to operate compared to Photoshop. Is this due to its smaller feature set? The look is modern, clearly organized and comes with a cool, darkish UI. Photoshop users feel right at home, because tools, functions and other essential elements can be found at familiar positions.
Affinity Photo explicitly targets designers and photo enthusiasts who rely on such a software product every day. Professional photographers benefit from features like frequency separation editing, live blend modes, inpainting, and advanced retouching. Unlike other alleged Photoshop contenders this app comes with end-to-end CMYK, 16-bits per channel editing, LAB color space, RAW processing, ICC colour management, compatibility with Photoshop PSD files and 64-bit plug-in compatibility.
Affinity Photo is compatible with OS X Lion 10.7.5 and newer on the Intel Mac 64-bit platform and is currently available in US English, German, Spanish, and French. Affinity Designer users will be pleased to know that both pieces of software work together flawlessly and intuitively, almost seamless.
Since the beta version is pretty fresh, it is still too early to tell if it is possible to import all popular Photoshop actions. Anyway, the plug-ins and styles for Photoshop can definitely be used with Affinity Photo.
For comparing both applications we used Photoshop CS5, although we had the more recent version available. We figured this the most probable scenario for users willing to change their workhorse. Why? Because designers who shell out their bucks for their yearly update obviously do not oppose the subscription model that much in the first place. As the latter actually costs less than the yearly update did before the CC came, they even save money now. That said, why should a content CC subscriber long to switch to Affinity? No, we just can´t imagine that.
Interfaces: Affinity Photo vs. Photoshop
Affinity Photo Clicking the image opens a high-res screenshot Photoshop CS5
Clicking the image opens a high-res screenshot
Photoshop CS5
Clicking the image opens a high-res screenshot
 Using Photoshop CS5, I recognize Affinity Photo´s retina display support instantly. That comes as no surprise since CS5 was made in 2011 and, therefore, could not be developed with such a feature in mind. What is also easy to spot is how similar elements, tools, and functions are arranged. The tool area on the left serves multiple functions at either application. The area on the right is also organized in a similar fashion. However, the real difference sticks out immediately: with Photoshop you will find a lot of action going on at the right-hand area, which does not exactly support better clarity.
Affinity Photo chose a different path, putting much stuff to the top bar, clearing the way for, well, more clarity. The upper bar can be adapted and optimized according to specific requirements. Both applications share a lot, not least the multitude of features. No doubt, though, Photoshop still has way more functions and commands a bigger following, i.e. community. This, of course, comes naturally, since Adobe´s behemoth is alive and kicking for 25 years.
Many of Photoshop´s functions are also part of Affinity Photo. They are placed in the same positions as in the former most of the time. The most commonly used filters reside at the same location in both applications, although Photoshop comes loaded with several more filters than its more affordable rival - if only to justify its price tag.
Using Photoshop CS5, I recognize Affinity Photo´s retina display support instantly. That comes as no surprise since CS5 was made in 2011 and, therefore, could not be developed with such a feature in mind. What is also easy to spot is how similar elements, tools, and functions are arranged. The tool area on the left serves multiple functions at either application. The area on the right is also organized in a similar fashion. However, the real difference sticks out immediately: with Photoshop you will find a lot of action going on at the right-hand area, which does not exactly support better clarity.
Affinity Photo chose a different path, putting much stuff to the top bar, clearing the way for, well, more clarity. The upper bar can be adapted and optimized according to specific requirements. Both applications share a lot, not least the multitude of features. No doubt, though, Photoshop still has way more functions and commands a bigger following, i.e. community. This, of course, comes naturally, since Adobe´s behemoth is alive and kicking for 25 years.
Many of Photoshop´s functions are also part of Affinity Photo. They are placed in the same positions as in the former most of the time. The most commonly used filters reside at the same location in both applications, although Photoshop comes loaded with several more filters than its more affordable rival - if only to justify its price tag.
Saving images for the web: a comparison
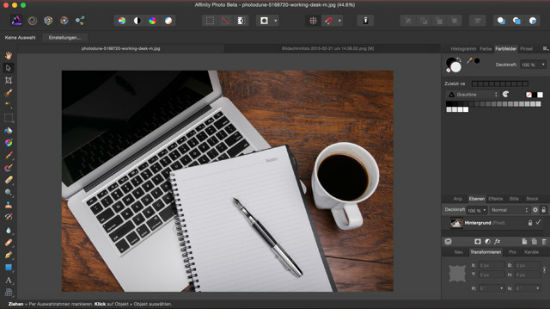
Being an author, the feature I use most is cropping and saving images for web usage. So I think it´s pretty interesting to compare both applications here using the same settings. I can imagine this applies to most of the bloggers out there who often work with imagery. These were my settings: quality 80%, crop to 640 px, and the setting "Bicubic". The original picture had 647 KB and 1,732 x 1,155 pixel. Affinity Photo example image (70 KB):
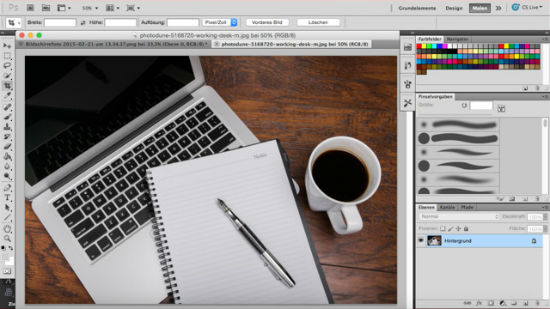
Photoshop example image (110 KB):
The difference in file size is huge. Of course, Photoshop´s version has a better quality, but that also means a significantly higher file size. Keeping SEO and site performance of an image-heavy website in mind, Affinity Photo clearly is a step ahead here. Even with just a handful of images per article this saves you a lot of speed-slowing file data.
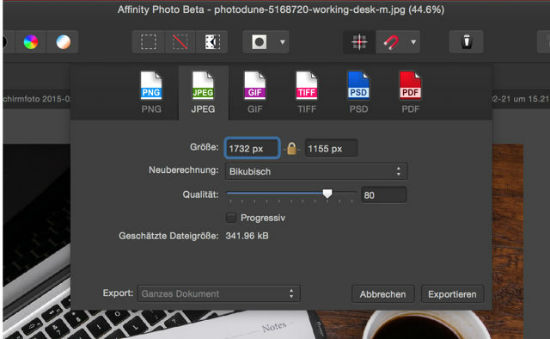
Affinity Photo´s export feature
„Save for web and devices“ is called „Export“ here, right under the „File“ menu item. This functionality is pretty comprehensive. It is possible to not only save as PNG, GIF, or JPG, but also as TIFF, PSD, and PDF. Affinity Photo´s saving options - "Export"
Photoshop´s saving options - "Save as"
Including Photoshop´s „Save as“ features here, this more pricey software offers a lot more options to save your stuff. Over at Affinity Photo, there are no further file formats available, because „Save as“ only provides the native file format, nothing to choose from there.
Nevertheless, considering the small price of just £39.99 (€49.99/$49.99) Affinity Photo´s saving features are pretty nice and certainly sufficient for most usages.
Affinity Photo Beta on video
http://youtu.be/5SJKG_8ZdywAffinity Photo: Testing some features
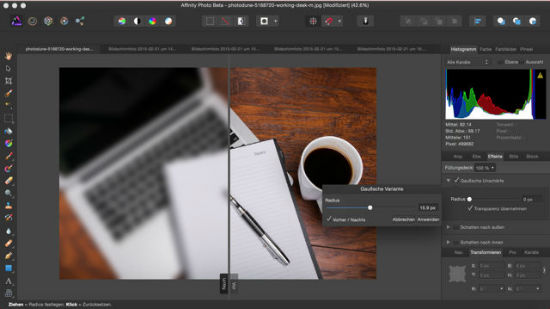
The good thing about Affinity Photo´s UI is its neat clarity. All modules are active by default and displayed. Of course, there are way less than in Photoshop. On the other hand, this makes it so much easier to navigate the menu. Gaussian Blur
Photoshop offers a lot more filters. Still, the question remains: Do we need all this stuff? Yes, Affinity's filters are less in multitude but they can be used intuitively. Getting familiar with the new app is quite easy, leading to quick and satisfying results.
Unsharp Mask
Photoshop offers much more sharpness filters. Although, „Clarity“ and „Unsharp Mask“ should be sufficient.
Working with copy
Basically, working with Type tools looks rather simple, even more simple than with Photoshop. Once written, copy can be moved freely, zoomed in, and resized. Angle adjustment is just as easy: take the text frame and move it any angle you want. Again, Photoshop´s options are far more comprehensive, but they are less easy to use.
I miss the „Overlay“ feature for text shadows, though. I´d put this on my wishlist for the finished version.
I like Affinity´s „Sketch“ feature pretty much. This gives their app clearly an edge compared to its big rival.
Editing images: Affinity Photo vs. Photoshop
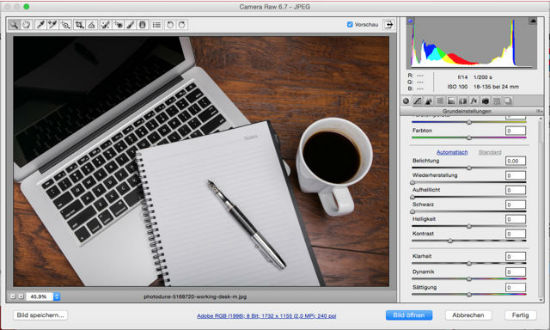
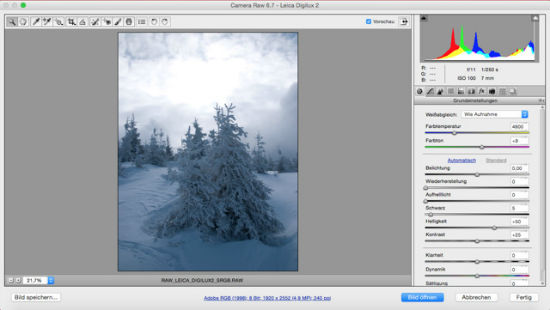
The multitude of photo editing features has certainly been an important reason for photographers to buy Photoshop. At the „Camera Raw“ section, there are so many details you can influence and adjust manually, as long as it is a JPEG-/JPG- oder RAW file. Both applications can handle the RAW format, a very important feature for professional photographers.
Editing with Photoshop
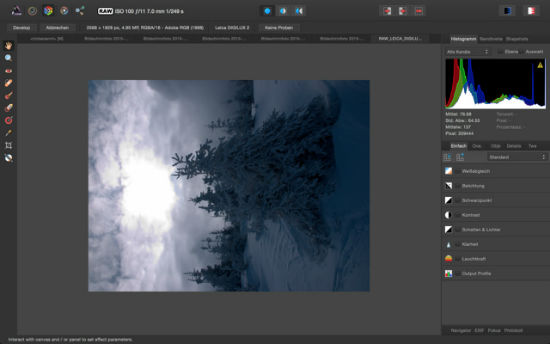
Editing with Affinity Photo
To better show all options, I took a detour via layers. All functions are easy to access at the right sidebar, nevertheless.
Photoshop has some more options here, too. The convenient auto corrections can only be accessed via the menu, though. In contrast, at Affinity they can be easily found at the top bar. Some might find this easy access more convenient.
Affinity Photo´s easily accessable auto correction features for photo editing
Comparing auto corrections side by side
In order to perform a direct comparison between the image auto correction features, I chose a not particularly good picture and let both apps´ auto correction tools work their magic. I provide another link here showing the original image, giving you a better idea of what both applications are capable of. I used „Auto Saturation“, „Auto Contrast“ and „Auto Color“ in Photoshop, and „Auto Levels“, „Auto Contrast Correction“ and „Auto Color Correction“ in Affinity´s software. Original image – The Hamburg Haven Clicking the image opens the original file Auto Correction with Adobe Photoshop
Clicking the image opens the original file
Auto Correction with Adobe Photoshop
Clicking the image opens the original file
 Auto correction with Affinity Photo
Clicking the image opens the original file
Auto correction with Affinity Photo
Clicking the image opens the original file
 Auto correction with Affinity Photo without Auto Color Correction
Clicking the image opens the original file
Auto correction with Affinity Photo without Auto Color Correction
Clicking the image opens the original file
 To be sure, both contestants come up with good results. It´s up to the viewer to decide who wins.
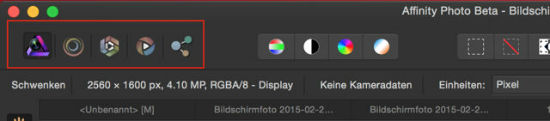
Affinity Photo - Workspaces
Affinity Photo offers several distinct workspaces, called Personas. These are modules that provide different tools for various, specific functions. Currently, they are Photo, Liquify, Develop (for Raw images), Macro (for recording actions) and Export. A close analogy would be Photoshop’s workspaces, but still it´s different. This is how you access the Personas:
Using the Liquify Persona you get surreal distortion and warping effects.
The Export Persona offers various options to export images, layers or slices to a range of formats, like a threefold file size.
Editing RAW files
Photoshop: Photoshop offers a comprehensive set of options for editing RAW files within Camera RAW. One feature that is missing in Affinity Photo´s current beta version is rotating (90 degrees clockwise and contraclockwise), respectively.
Affinity Photo: Other than that, when it comes to editing RAW files, Affinity Photo is no doubt on par with Photoshop. I would even say it looks as if its options are more wide-ranging, barring the rotate feature. All those options are bundled up in the Develop Persona.
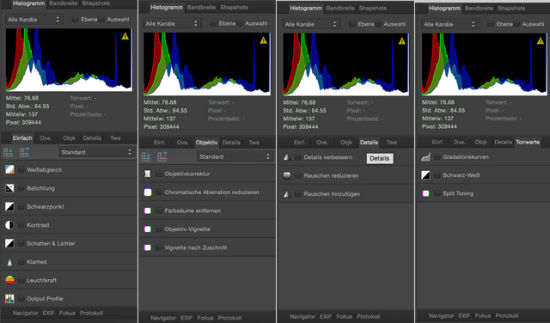
When working with the Develop Persona, Affinity´s right sidebar is exclusively reserved for RAW editing and offers a wide variety of features.
The Macro Persona for recording actions is unfortunately not working with my beta version (1.1.2.22821). That´s why I´m not able to make a statement about this feature.
Can’t wait to try this this weekend…
Adobe is going to have some serious thoughts about the whole subscription model after this is released. And with Sketch and a slew of web designer software packages out there, I can’t really see how they can be sustained. Maybe only video for now.
Thanks for the cool article.
P.S.:
Please please please replace all the wrong accents -> ´ with correct apostrophes -> ‘ (shift-#)
Yepp. Just noticed. Usually we don’t see these things around here. Will do away with them later.
I will take a look if they do a Windows version.
good at last we have PS alternative, but i doubt this feature same as PS, or this is can be replace AI also?? for make vector also?
There is a product to challenge AI also, but it’s not Affinity Photo.
The only viable truly affordable alternative is Photoline. On par with Photoshop minus the video and 3d fluff. Full 16/32bit Lab and CMYK/spot colours support, mostly a non-destructive workflow, and the layer system arguably beats the one in Photoshop (for example: layer masks are regular layers in Photoline!).
HIS colour space workflow is also supported (something missing in Photoshop, and only available in Lightroom). 47 types of adjustment layers, and 18(!) layer styles. Retouching tools include a remove subject tool, full masking and selection tools similar to Photoshop, a stackable(!) non-destructive liquify, non-destructive layer distortion tool, patch tool, healing brush, automasking tools, and so on, and so forth.
And no longer is there any need to switch between image modes: any layer in Photoline’s layer stack can be set to any image mode and bit depth! Mix Lab, RGB, CMYK, 8, 16bit, and 32bit layers as you see fit! And adjustments such as curves and levels can be made to any layer in RGB, Lab, HIS and HSV colour spaces WITHOUT switching image mode! A whole new world of editing possibilities opened up to me when I switched from Photoshop to Photoline. On top of this, any layer, layer group and layer mask (including layer mask groups) can be cloned and used as a virtual copy that updates in realtime when changes are made to the original source – comparable to smart objects, but more efficient in daily use.
Photoshop plugins such as Google NIK and Topaz run flawlessly. Non-destructive RAW developing is also supported, as is full colour management, multiple pages, and full vector layers (true vectors). It loads Photoshop files and will even convert Photoshop’s common colour adjustment layers and layer effects. Photoshop brush libraries can also be loaded. Even multi-layered EXR files are supported out of the box.
It is available for Mac and Windows, and runs in WINE on Linux. It even runs of a usb stick. The interface can be adjusted from black up to light grey seamlessly.
Check it out – it is one of the web’s best kept secrets.
“Using Photoshop CS5, I recognize Affinity Photo´s retina display support instantly. That comes as no surprise since CS5 was made in 2011 and, therefore, could not be developed with such a feature in mind.”
You’re comparing an older version of Photoshop to a new image editing client using the latest technology. This is hardly a fair battle, Photoshop has come along way since CS5. CC supports retina, though I think Adobe could do a much better job at it. I’d be interested to see a comparison between Photoshop CC and Affinity.