
Lining.js: Controlling Text Lines per CSS Selector
The numerous available CSS selectors let us easily access almost each and every HTML element on any given page. The pseudo-element ::first-line even allows us to apply CSS properties to the first line of text in a document, no matter whether the line is automatically or manually wrapped. Unfortunately, besides ::first-line there are no selevtors to manipulate the second, third, last or whichever line. The JavaScript library Lining.js is here to pimp your possibilities.
.line[last] Instead of ::last-line
Similar to the selectors ::last-child and ::nth-child() that allow you to touch the last or any random child element, Lining.js adds behaiviors for lines of text. INstead of using the (non-existing) selectors ::last-line and ::nth-line(n), the library introduces the classes .line[last] and .line[index="n"].
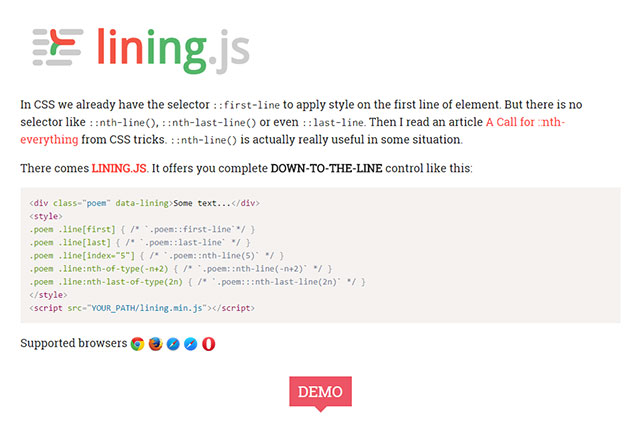
After having embedded the library into your document, start with assigning the data attribute data-lining to every text element you want to manipulate with Lining.js. THe attribute expects no value.
<p data-lining>
  Lorem ipsum …
</p>
Then use these classes to individually markup lines within the text per CSS.
p .line[last] {
  color: red;
}

p .line[index="2"] {
 font-weight: bold;
}
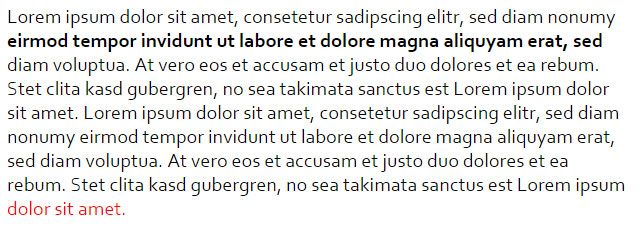
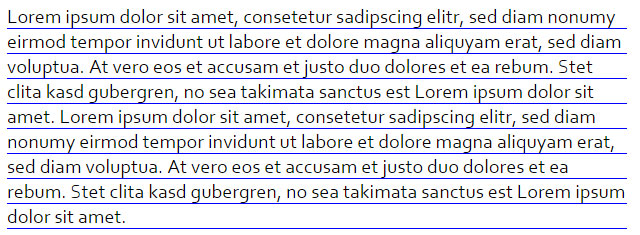
.line[last] and .line[index="2"] active on a text
In our example we color the last line of a <p> element red, while we add a bold font-weight to the second line. Although we have the regular pseudo element ::first-line there is another within the syntax of Lining.js and it's called .line[first]. It's totally up to you which variant you decide to use.
The pseudo elements ::nth-of-type() and ::nth-last-of-type() also see their equivalents in .line:nth-of-type() and .line:nth-last-of-type().
p .line:nth-of-type(2n) {
  color: green;
}
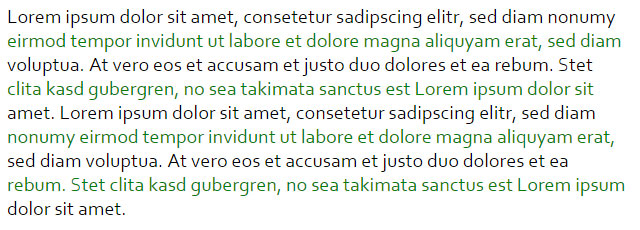
Alternating Lines with .line:nth-of-type(2n)
In this example we alternate lines with .line:nth-of-type(2n) and color every second line green. The selector .line:nth-last-of-type(2n) would also let you access each second line but counting would start from the end of the text instead of the beginning.
It shouldn't go unmentioned that the simple selector .line allows you to attach CSS properties to each line of text. It's the tool of choice if you'd want to draw a line benath each text row, for example.
p .line {
  border-bottom: 1px solid blue;
}
Lines under each - well - line with - well - .line
This markup leads to blue lines being drawn beneath each row of text. Without Lining.js we'd be limited to drawing a line beneath the <p> element as a whole which would lead to one single line being drawn benath the paragraph.
Defining Default Behavior
As not every browser supportsLining.js it might be a good idea to define different default text designs. That way we could have the text look different with and without support for Lining.js.
p {
  font-style: italic;
}

.nolining p {
  font-style: normal;
}
The example code marks up all <p> elements in italic. The class nolining cares for applying a different look should Lining.js not be supported.
Lining.js and Responsive Layout
Lining.js works its magic on page load and adds its elements to the text. That means that on resizing the browser window lines will not be redefined but stay in their initial form. Should you want the lines to be recalculated and arranged on each change of the window size you'll also want to add the additional data attribute data-auto-resize.
<p data-lining data-autoresize>
  Lorem ipsum …
</p>
Afterwards Lining.js will care for proper recalculation of the pseudo elements, e.g. .line[index="3"].
Limit Lining.js to Certain Lines
Technically Lining.js adds the element <text-line> to every line of text to be able to control it. Long texts may see performance lags during this process. Should you only want to manipulate certain areas of text it might be a good idea to explicitly limit Lining.js to these sections and speed things up a little. The data attributes data-from and data-to are used to define this section.
<p data-lining data-from="5">
  Lorem ipsum …
</p>
The example has the library limited to the fifth and all lines to follow. Selectors can now only be applied to that section. The rest will not be handled.
Animated Effects for Fading Lines in and out
Using an additional library by the name oflining.effects.js we can apply several animation effects to our text lines. These effects are controlled using the data attribute data-effect.
<p data-lining data-effect="rolling">
  Lorem ipsum …
</p>

Effect rolling
In this example we go for the effect rolling. The individual lines of text are rolled from the screen, starting with the first line. In all you can choose from seven fader effects. We got the simple ones like fade-in or slide-in but also very complex ones like metroRotateIn, where lines are rotated in a 3D space while fading in.
Conclusion
Lining.js is a very sophisticated tool that allows for the individual design of text lines within a paragraph element. The animation effects are awesome and add to the overall impression. If you are not into using data attributes you can always decide to stick with pure JavaScript..
Lining.js runs flawlessly in all versions of Chrome, Safari and Opera, while the Internet Explorer is completely unsupported. The library can be used free of charge under the terms of the very liberal MIT license. Getting up to speed is fairly easy, as there is a thorough documentation in place and several good examples at hand.
(dpe)