
HowTo: Build (Sort of) an Instagram Clone with HTML5
When I started out on this app I was only really just interested in seeing if the web platform had really evolved to a point where an app like the hugely popular Instagram app could be built using just HTML, JavaScript and CSS. As it turns out we can in fact do exactly that. This article walks you through the technologies that make this possible and shows how it is entirely feasible today to build interoperable web applications that provide a great user experience no matter what brand of browser the user is running.
 If you happen to be one of the two or so people who have not heard about Instagram then you might be pleased to hear that it is a hugely popular photo sharing and social networking service that allows you to take pictures, apply interesting digital filters on them and share them with the world to see. The service got so popular that it was acquired by Facebook for a bag full of cash and stock in April of 2012.
InstaFuzz is the name of the app I put together and while I don’t expect to be acquired by Facebook or anybody else for a billion green it does however make the case that an app such as this one can be built using only standards compliant web technologies such as Canvas, File API, Drag/Drop, Web Workers, ES5 and CSS3 and still manage to run well on modern browsers such as Internet Explorer 10, Google Chrome and Firefox. And you could easily use the code to build a Windows Store app too.
If you happen to be one of the two or so people who have not heard about Instagram then you might be pleased to hear that it is a hugely popular photo sharing and social networking service that allows you to take pictures, apply interesting digital filters on them and share them with the world to see. The service got so popular that it was acquired by Facebook for a bag full of cash and stock in April of 2012.
InstaFuzz is the name of the app I put together and while I don’t expect to be acquired by Facebook or anybody else for a billion green it does however make the case that an app such as this one can be built using only standards compliant web technologies such as Canvas, File API, Drag/Drop, Web Workers, ES5 and CSS3 and still manage to run well on modern browsers such as Internet Explorer 10, Google Chrome and Firefox. And you could easily use the code to build a Windows Store app too.
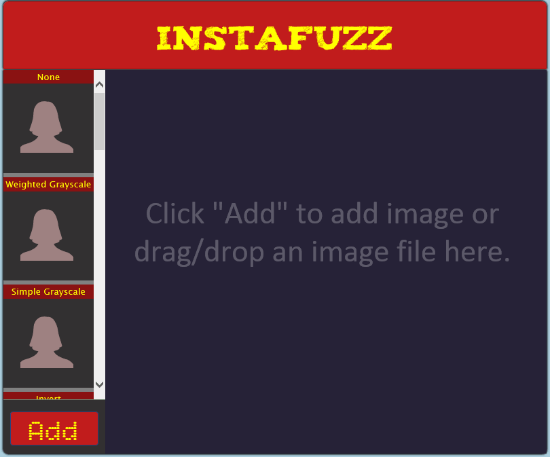 The idea is that you can load up a photograph into the app either by clicking on the big red “Add” button on the bottom left hand corner or drag and drop an image file into the blackish/blue area on the right. Once you do that you get something that looks like this:
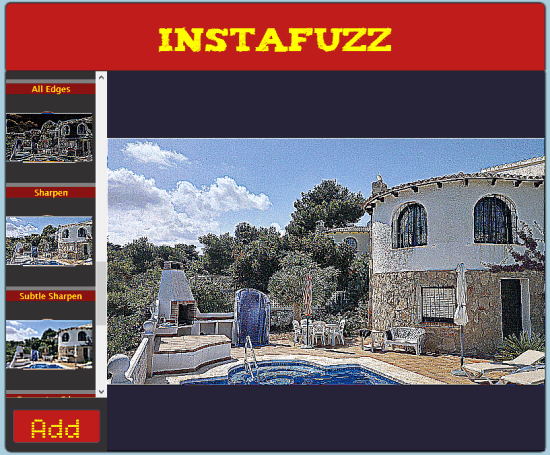
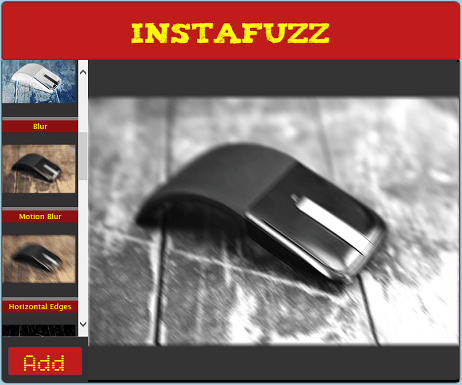
 You’ll note that a list of digital filters are listed on the left of the screen showing a preview of what the image would look like if you were to apply the said filter. Applying a filter is a simple matter of clicking on one of the filter previews on the left. Here’s what it looks like after applying the “Weighted Grayscale” filter followed by a “Motion Blur”. As you can tell filters are additive – as you keep clicking on filters, they are applied on top of what was applied earlier:
 Let’s next take a look at how the UI layout has been put together.
 This is made possible using the CSS3 box-shadow rule and here’s how it’s used in InstaFuzz.
If you happen to be one of the two or so people who have not heard about Instagram then you might be pleased to hear that it is a hugely popular photo sharing and social networking service that allows you to take pictures, apply interesting digital filters on them and share them with the world to see. The service got so popular that it was acquired by Facebook for a bag full of cash and stock in April of 2012.
InstaFuzz is the name of the app I put together and while I don’t expect to be acquired by Facebook or anybody else for a billion green it does however make the case that an app such as this one can be built using only standards compliant web technologies such as Canvas, File API, Drag/Drop, Web Workers, ES5 and CSS3 and still manage to run well on modern browsers such as Internet Explorer 10, Google Chrome and Firefox. And you could easily use the code to build a Windows Store app too.
About the app
If you’d like to take a look at the app, then here’s where it is hosted at: http://blogorama.nerdworks.in/arbit/InstaFuzz/ As soon as you load it up, you’re presented with a screen that looks like this:
The idea is that you can load up a photograph into the app either by clicking on the big red “Add” button on the bottom left hand corner or drag and drop an image file into the blackish/blue area on the right. Once you do that you get something that looks like this:
You’ll note that a list of digital filters are listed on the left of the screen showing a preview of what the image would look like if you were to apply the said filter. Applying a filter is a simple matter of clicking on one of the filter previews on the left. Here’s what it looks like after applying the “Weighted Grayscale” filter followed by a “Motion Blur”. As you can tell filters are additive – as you keep clicking on filters, they are applied on top of what was applied earlier:
Let’s next take a look at how the UI layout has been put together.
UI Layout
The HTML markup is actually so little that I can actually reproduce the contents of the BODY tag in its entirety here (excluding the SCRIPT includes):<header>
<div id="title">InstaFuzz</div>
</header>
<section id="container">
<canvas id="picture" width="650" height="565"></canvas>
<div id="controls">
<div id="filters-list"></div>
<button id="loadImage">Add</button>
<input type="file" id="fileUpload"
style="display: none;"
accept="image/gif, image/jpeg, image/png" />
</div>
</section>
<!-- Handlebar template for a filter UI button -->
<script id="filter-template" type="text/x-handlebars-template">
<div class="filter-container" data-filter-id="{{filterId}}">
<div class="filter-name">{{filterName}}</div>
<canvas class="filter-preview" width="128" height="128"></canvas>
</div>
</script
There’s nothing much going on here. Pretty much everything should be standard fare. I will however draw attention to the fact that I am using the Handlebars JavaScript templating system here for rendering the markup for the list of filters on the left of the screen. The template markup is declared in the HTML file (the SCRIPT tag in the snippet shown above) and then used from JavaScript. The template markup is then bound to a JavaScript object that supplies the values for handlebars expressions such as {{filterId}} and {{filterName}}. Here’s the relevant piece of JS from the app with a bit of DOM manipulation help from jQuery:
var templHtml = $("#filter-template").html(),
	template = Handlebars.compile(templHtml),
	filtersList = $("#filters-list");
var context = {
	filterName: filter.name,
	filterId: index
};
filtersList.append(template(context));
As you can tell from the HTML markup all the filter preview boxes feature a CANVAS tag as does the big box on the right where the final output is rendered. We’ll go into a bit more detail later on in the article as to how canvas technology is used to achieve these effects.
The app also uses CSS3 @font-face fonts to render the text in the header and the “Add” button. The fonts have been taken from the excellent Font Squirrel site and here’s what the declaration looks like:
@font-face {
	font-family: 'TizaRegular';
		src: url('fonts/tiza/tiza-webfont.eot');
		src: url('fonts/tiza/tiza-webfont.eot?#iefix')
				format('embedded-opentype'),
			url('fonts/tiza/tiza-webfont.woff') format('woff'),
			url('fonts/tiza/tiza-webfont.ttf') format('truetype'),
			url('fonts/tiza/tiza-webfont.svg#TizaRegular') format('svg');
		font-weight: normal;
		font-style: normal;
	}
This directive causes the user agent to embed the font in the page and make it available under the name assigned to the font-family rule which in this case is “TizaRegular”. After this we can assign this font to any CSS font-family rule like how we normally do. In InstaFuzz I use the following rule to assign the font to the header element:
font-family: TizaRegular, Cambria, Cochin, Georgia, Times,
"Times New Roman", serif;
You might also have noticed that there is a subtle shadow being dropped on the page by the container element.
This is made possible using the CSS3 box-shadow rule and here’s how it’s used in InstaFuzz.
-moz-box-shadow: 1px 0px 4px #000000, -1px -1px 4px #000000;
-webkit-box-shadow: 1px 0px 4px #000000, -1px -1px 4px #000000;
box-shadow: 1px 0px 4px #000000, -1px -1px 4px #000000;
This causes the browser to render a shadow around the relevant element. Each comma separated section in the value specifies the following attributes of the shadow:
- Horizontal offset
- Vertical offset
- Spread distance – positive values have the effect of softening the shadow
- Shadow color
- Use vendor prefixed versions of CSS rules by all means but remember to specify the rule for all supported browsers and not just the one that you happen to be testing the page in (if you’re using Visual Studio to edit your CSS then you might be interested in the supremely excellent extension for Visual Studio called Web Essentials that makes the job of managing vendor prefixes about as simple as it can possibly get).
- Remember to specify the W3C version of the rule as well.
- Remember to order the occurrence of the rules so that the W3C version shows up last. This is to allow clients that support both the vendor prefixed version and the W3C version to use the W3C specified semantics for the rule.
Drag/Drop
One of the things that InstaFuzz supports is the ability to drag and drop image files directly on to the big blackish/blue box. Support for this is enabled by handling the “drop” event on the CANVAS element. When a file is dropped onto an HTML element the browser fires the “drop” event on that element and passes in a dataTransfer object which contains a files property that contains a reference to the list of files that were dropped. Here’s how this is handled in the app (“picture” is the ID of the CANVAS element on the page):var pic = $("#picture");
pic.bind("drop", function (e) {
suppressEvent(e);
var files = e.originalEvent.dataTransfer.files;
// more code here to open the file
});
pic.bind("dragover", suppressEvent).bind("dragenter", suppressEvent);
function suppressEvent(e) {
e.stopPropagation();
e.preventDefault();
}
The files property is a collection of File objects that can then subsequently be used with the File API to access the file contents (covered in the next section). We also handle the dragover and dragenter events and basically prevent those events from propagating to the browser thereby preventing the browser from handling the file drop. IE for instance might unload the current page and attempt to open the file directly otherwise.
File API
Once the file has been dropped, the app attempts to open the image and render it in the canvas. It does this by using the File API. The File API is a W3C specification that allows web apps to programmatically access files from the local file system in a secure fashion. In InstaFuzz we use the FileReader object to read the file contents as a data URL string like so using the readAsDataURL method:var reader = new FileReader();
reader.onloadend = function (e2) {
drawImageToCanvas(e2.target.result);
};
reader.readAsDataURL(files[0]);
Here, files is the collection of File objects retrieved from the function handling the “drop” event on the CANVAS element. Since we are interested only in a single file we simply pick the first file from the collection and ignore the rest if there are any. The actual file contents are loaded asynchronously and once the load completes, the onloadend event is fired where we get the file contents as a data URL which we then subsequently draw on to the canvas.
Rendering the filters
Now the core functionality here is of course the application of the filters. In order to be able to apply the filter to the image we need a way to access the individual pixels from the image. And before we can access the pixels we need to have actually rendered the image on to our canvas. So let’s first take a look at the code that renders the image that the user picked on to the canvas element.Rendering images on to the canvas
The canvas element supports the rendering of Image objects via the drawImage method. To load up the image file in an Image instance, InstaFuzz uses the following utility routine:App.Namespace.define("InstaFuzz.Utils", {
loadImage: function (url, complete) {
var img = new Image();
img.src = url;
img.onload = function () {
complete(img);
};
}
});
This allows the app to load up image objects from a URL using code such as the following:
function drawImageToCanvas(url) {
	InstaFuzz.Utils.loadImage(url, function (img) {
		// save reference to source image
		sourceImage = img;

		mainRenderer.clearCanvas();
		mainRenderer.renderImage(img);

		// load image filter previews
		loadPreviews(img);
		});
	}
Here, mainRenderer is an instance created from the FilterRenderer constructor function defined in filter-renderer.js. The app uses FilterRenderer objects to manage canvas elements – both in the preview pane as well as the main canvas element on the right. The renderImage method on the FilterRenderer has been defined like so:
FilterRenderer.prototype.renderImage = function (img) {
	var imageWidth = img.width;
	var imageHeight = img.height;
	var canvasWidth = this.size.width;
	var canvasHeight = this.size.height;
	var width, height;

if ((imageWidth / imageHeight) >= (canvasWidth / canvasHeight)) {
	width = canvasWidth;
	height = (imageHeight * canvasWidth / imageWidth);
	} else {
	width = (imageWidth * canvasHeight / imageHeight);
	height = canvasHeight;
	}

	var x = (canvasWidth - width) / 2;
	var y = (canvasHeight - height) / 2;
	this.context.drawImage(img, x, y, width, height);
	};
That might seem like a lot of code but all it does ultimately is to figure out the best way to render the image in the available screen area considering the aspect ratio of the image. The key piece of code that actually renders the image on the canvas occurs on the last line of the method. The context member refers to the 2D context acquired from the canvas object by calling its getContext method.
Fetching pixels from the canvas
Now that the image has been rendered we will need access to the individual pixels in order to apply all the different filters that are available. This is easily acquired by calling getImageData on the canvas’s context object. Here’s how InstaFuzz calls this from instafuzz.js.var imageData = renderer.context.getImageData(0, 0,
renderer.size.width,
renderer.size.height);
The object returned by getImageData provides access to the individual pixels via its data property which in turn is an array like object that contains a collection of byte values where each value represents the color rendered for a single channel of a single pixel. Each pixel is represented using 4 bytes that specify values for the red, green, blue and alpha channels. It also has a length property that returns the length of the buffer. If you have a 2D co-ordinate you can easily transform that into an index into this array using code such as the following. The color intensity values of each channel ranges from 0 through 255. Here’s the utility function from filters.js that accepts as input an image data object along with 2D coordinates for the pixel the caller is interested in and returns an object containing the color values:
function getPixel(imageData, x, y) {
	var data = imageData.data, index = 0;

	// normalize x and y and compute index
	x = (x < 0) ? (imageData.width + x) : x;
	y = (y < 0) ? (imageData.height + y) : y;
	index = (x + y * imageData.width) * 4;

	return {
		r: data[index],
		g: data[index + 1],
		b: data[index + 2]
		};
	}
Applying the filters
Now that we have access to the individual pixels, applying the filter is fairly straightforward. Here, for instance is the function that applies a weighted grayscale filter on the image. It simply picks intensities from the red, green and blue channels and sums them up after applying a multiplication factor on each channel and then assigns the result for all 3 channels.// "Weighted Grayscale" filter
Filters.addFilter({
name: "Weighted Grayscale",
apply: function (imageData) {
var w = imageData.width, h = imageData.height;
var data = imageData.data;
var index;
for (var y = 0; y < h; ++y) {
for (var x = 0; x < w; ++x) {
index = (x + y * imageData.width) * 4;
var luminance = parseInt((data[index + 0] * 0.3) +
(data[index + 1] + 0.59) +
(data[index + 2] * 0.11));
data[index + 0] = data[index + 1] =
data[index + 2] = luminance;
}
Filters.notifyProgress(imageData, x, y, this);
}
Filters.notifyProgress(imageData, w, h, this);
}
});
Once the filter has been applied we can have that reflected on the canvas by calling the putImageData method passing in the modified image data object. While the weighted grayscale filter is fairly simple most of the other filters use an image processing technique known as convolution. The code for all the filters is available in filters.js and the convolution filters were ported from the C code available here.
Web Workers
As you might imagine doing all this number crunching to apply the filters can potentially take a long time to complete. The motion blur filter for instance uses a 9x9 filter matrix for computing the new value for every single pixel and is in fact the most CPU intensive filter among them all. If we were to do all this computation on the UI thread of the browser then the app would essentially freeze every time a filter was being applied. To provide a responsive user experience the app delegates the core image processing tasks to a background script using the support for W3C Web Workers in modern browsers. Web workers allow web applications to have scripts run in a background task that executes in parallel along with the UI thread. Communication between the worker and the UI thread is accomplished by passing messages using the postMessage API. On both ends (i.e. the UI thread and the worker) this manifests as an event notification that you can handle. You can only pass “data” between workers and the UI thread, i.e., you cannot pass anything that has to do with the user interface – you cannot for instance, pass DOM elements to the worker from the UI thread. In InstaFuzz the worker is implemented in the file filter-worker.js. All it does in the worker is handle the onmessage event and apply a filter and then pass the results back via postMessage. As it turns out, even though we cannot pass DOM elements (which means we cannot just hand a CANVAS element to the worker to have the filter applied) we can in fact pass the image data object as returned by the getImageData method that we discussed earlier. Here’s the filter processing code from filter-worker.js:importScripts("ns.js", "filters.js");
var tag = null;
onmessage = function (e) {
var opt = e.data;
var imageData = opt.imageData;
var filter;
tag = opt.tag;
filter = InstaFuzz.Filters.getFilter(opt.filterKey);
var start = Date.now();
filter.apply(imageData);
var end = Date.now();
postMessage({
type: "image",
imageData: imageData,
filterId: filter.id,
tag: tag,
timeTaken: end - start
});
}
The first line pulls in some script files that the worker depends on by calling importScripts. This is similar to including a JavaScript file in a HTML document using the SCRIPT tag. Then we set up a handler for the onmessage event in response to which we simply apply the filter in question and pass the result back to the UI thread by calling postMessage. Simple enough!
The code that initializes the worker is in instafuzz.js and looks like this:
var worker = new Worker("js/filter-worker.js");
Not much is it? When a message is sent by the worker to the UI thread we handle it by specifying a handler for the onmessage event on the worker object. Here’s how this is done in InstaFuzz:
worker.onmessage = function (e) {
	var isPreview = e.data.tag;
	switch (e.data.type) {
		case "image":
			if (isPreview) {
				previewRenderers[e.data.filterId].
					context.putImageData(
						e.data.imageData, 0, 0);
			} else {
				mainRenderer.context.putImageData(
					e.data.imageData, 0, 0);
			}

			break;
		// more code here
	}
};
The code should be fairly self-explanatory. It simply picks the image data object sent by the worker and applies it to the relevant canvas’s context object causing the modified image to be rendered on screen. Scheduling a filter for conversion with the worker is equally simple. Here’s the routine that performs this function in InstaFuzz:
function scheduleFilter(filterId,
						renderer,
						img, isPreview,
						resetRender) {
	if (resetRender) {
		renderer.clearCanvas();
		renderer.renderImage(img);
	}

	var imageData = renderer.context.getImageData(
		0, 0,
		renderer.size.width,
		renderer.size.height);

	worker.postMessage({
		imageData: imageData,
		width: imageData.width,
		height: imageData.height,
		filterKey: filterId,
		tag: isPreview
	});
}
Wrapping it up
The source for InstaFuzz is available for download here. We saw that fairly intricate user experiences are possible today with HTML5 technologies such as Canvas, Drag/Drop, File API and Web Workers. Support for all of these technologies is quite good in pretty much all modern browsers. One thing that we did not address here is the question of making the app compatible with older browsers. That, truth be told, is a non-trivial but necessary task that I will hopefully be able to talk about in a future article.About the Author
(dpe)Rajasekharan Vengalil is a self-proclaimed nerd working for a company called Microsoft. He is part of their Development and Platform Evangelism team which basically means that he gets to learn all about interesting new nerdy stuff that comes out of Microsoft and then talk about it with people (like building an app in HTML5. He thinks he's really lucky to be paid for doing what he'd anyway be doing for free!
Well explained article! Thanks a lot :)