Adobe Illustrator Tutorial: Create a Christmas Greeting Card
Today's Adobe Illustrator tutorial will walk you through creating a nice greeting card for the upcoming Christmas holiday. In order to create nice, colorful presents to stuff a Christmas sock we will combine different kinds of tools, such as; the Pen Tool, Mesh Tool, Ellipse Tool and the Rectangle Tool.
Besides that we will have the opportunity to mix and match some vivid colors and gradients in order to create a catchy illustration to suit our needs. We will have a great fun exploring some nice techniques during the creation process. So, get ready to create a nice Christmas illustration.
This is how the final product will look.

 To achieve the look of a distorted Christmas sock full of presents we will be using a Mesh Tool. It will allow us to play around with the shape of the sock by creating interesting shadows and highlights.
Grab the Mesh Tool (
 After adding all the anchor points grab the Direct Selection Tool (



 The animation below is showing the rest of the coloring process.
 Feel free to adjust the position of all the anchor points after applying colors, if needed.
 Set the Stroke color to white
  Place the fluffy part we have just created on the top of the sock.

 Let’s apply a nice radial gradient to our circle. Feel free to use any color combination you like. We will use a nice purple gradient.
 Grab the Rectangle Tool (
 We will need to use the Rectangle Tool (
 Now grab the Ellipse Tool (
 In order to create an equal distance between the circles select them all and under the Align Panel hit the Horizontal Distribute Space. You should end up with something like this.
 Select the blue shape and one of the circles and under the Pathfinder Panel hit the Minus Front button. Repeat this step with the rest of the red circles.
 You should end up with something like this.
 Now, grab the Ellipse Tool (
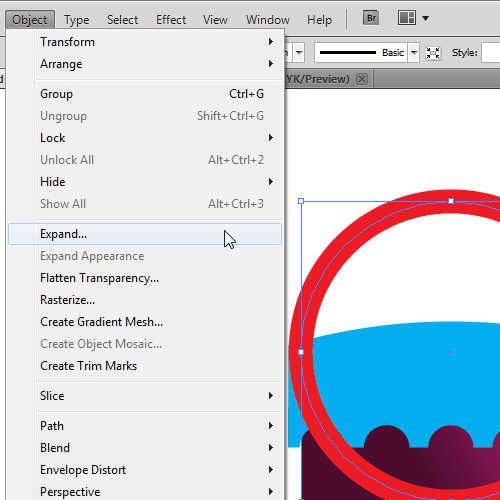
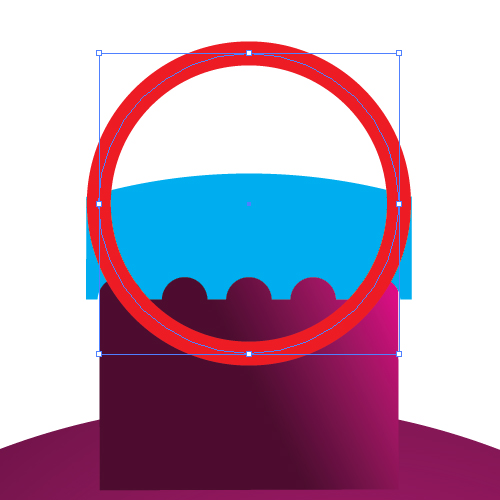 Let’s apply some nice golden gradients to the upper part of the Christmas ball . This will give our ball a fancy look. But first we have to turn the red circle into an editable path. Select the red circle and under Object select Expand and send the ring to the back (
 In the following pictures you will find the information about applying a golden, linear gradient.
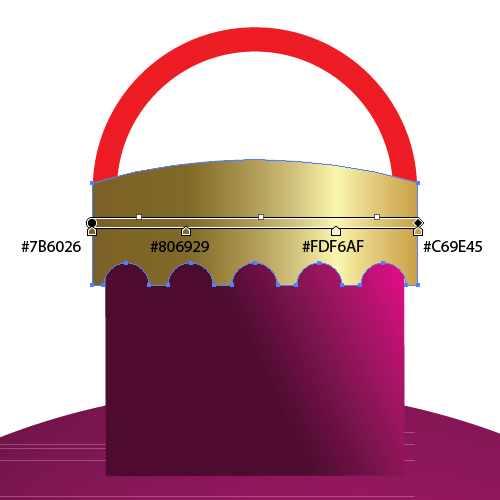 For the handle of the Christmas ball use the same linear gradient, just move gradient more to the left (to do that, select the Gradient Tool (
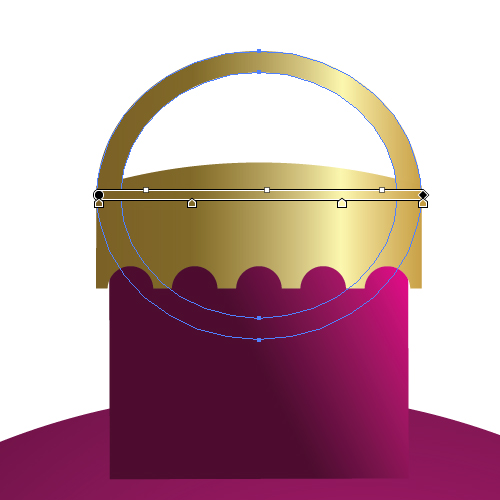
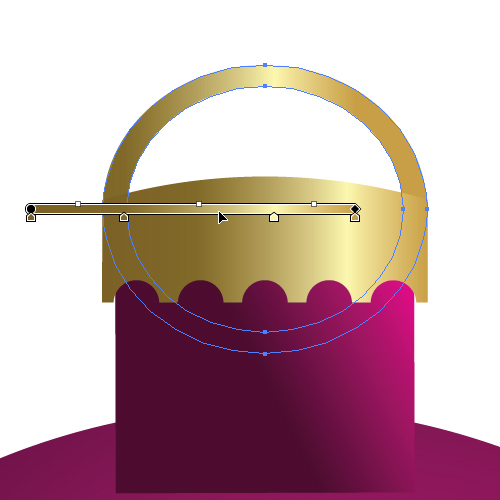 Duplicate (
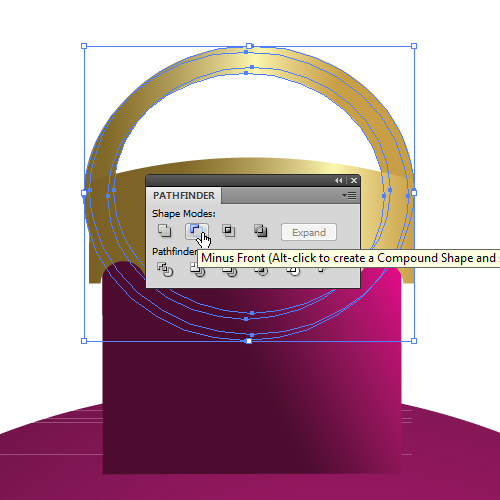 You should end up with something like this.
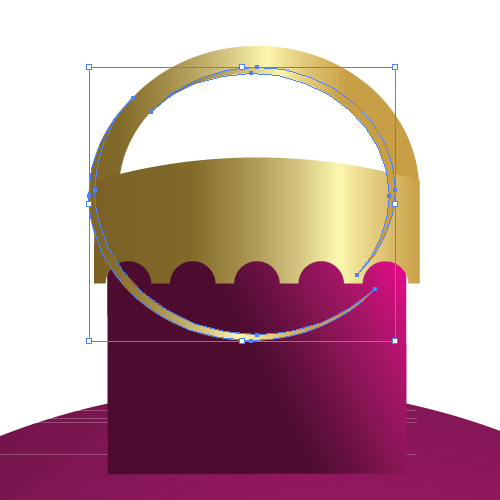 Ungroup (
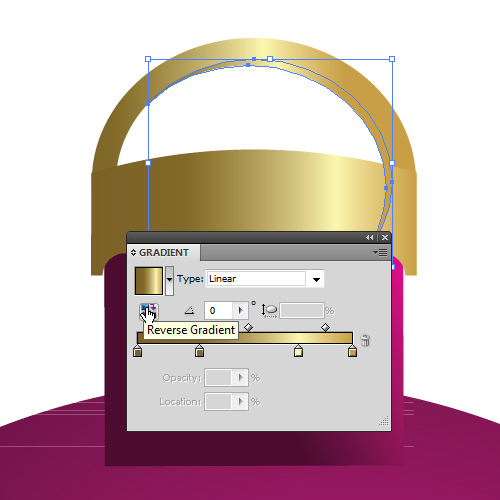 This way we’ve created a depth for the handle. Just make sure to place the new shape behind the golden handle. You should end up with something like this.
 Now we have to do something with the part of the Christmas ball between the actual ball and the upper part. You will all agree that it shouldn’t be left like that.
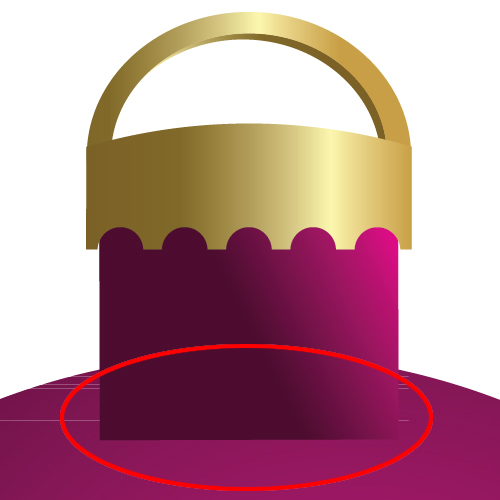 One of the things we might do is to hide it with a nice blue bow. There are many different ways to create a nice bow. Just use your imagination and try to be creative.
Grab the Pen Tool (
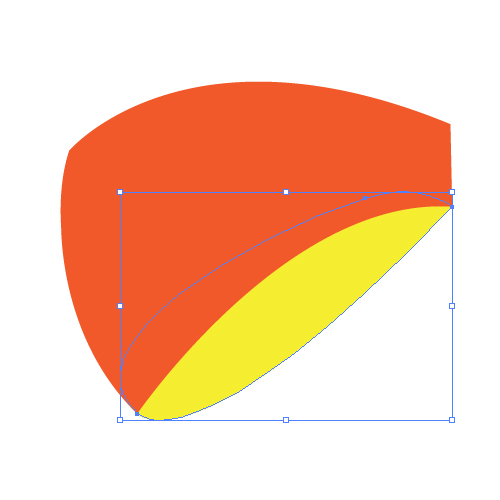
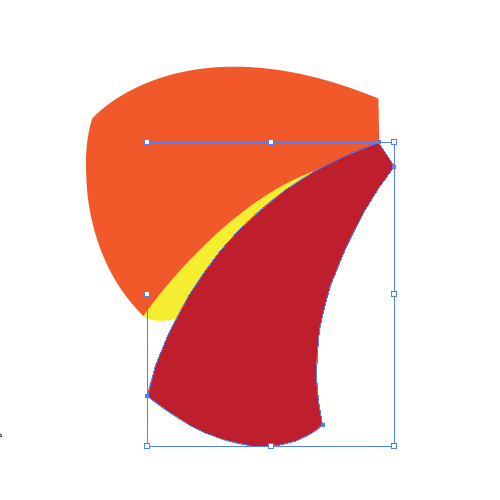
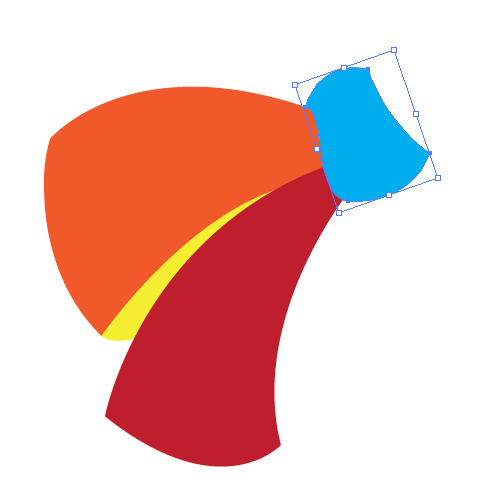 These are the basic shapes we will need. With some nice gradients and additional shapes we will create a nice blue bow that will help us complete our Christmas ball.
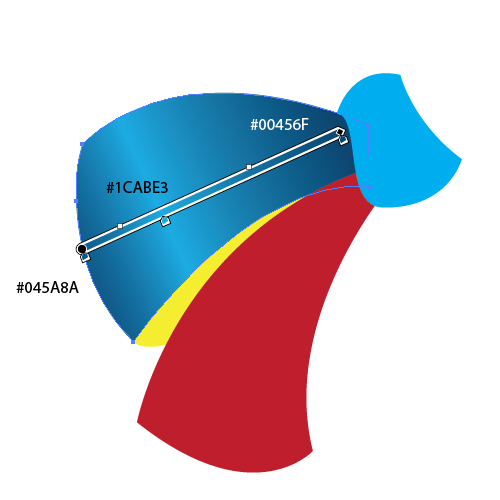
 Use the radial gradient for the knot. We will try to emphasize the upper part of the knot with the light blue color.
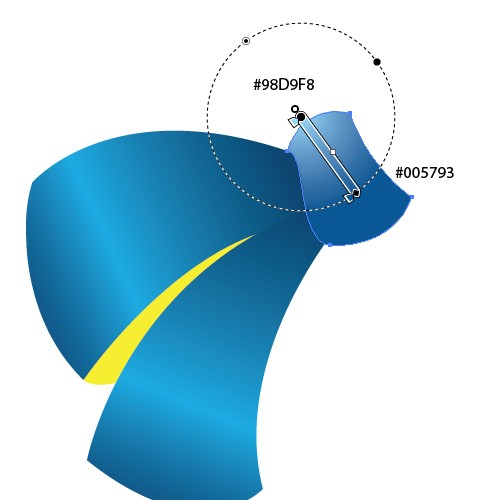 Use the same radial gradient for the inner part of the bow as well.
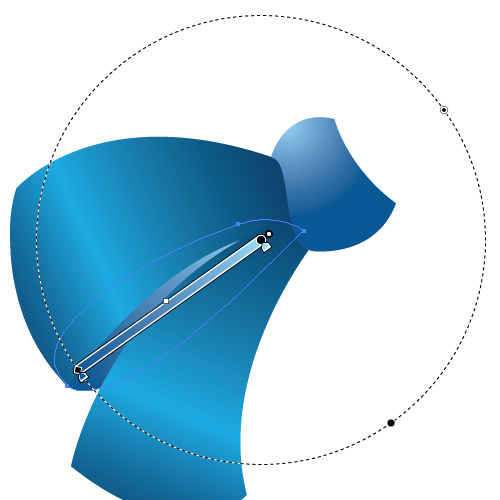 Select all the elements besides the knot, and under Object select Transform > Reflect. Set the Axis to
  Now we have to add some details in order to make the bow more interesting.
First, we will create a thickness for the fabric. For each part of the bow use the same technique.
Duplicate (
 There is one more thing we can do. We can create some nice yellowish stripes which can make our bow even more interesting.
Grab the Pen Tool (
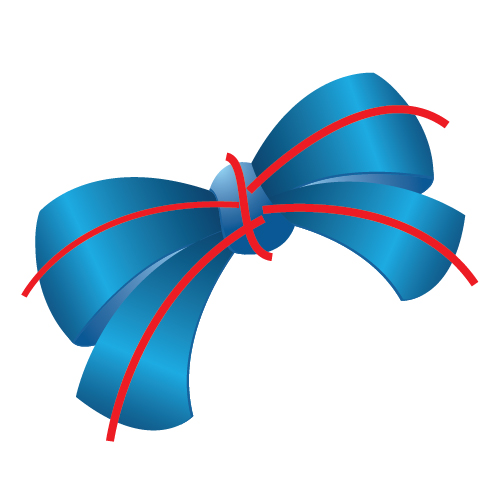 It might look a little bit confusing like this but in the next few steps we will make it more clear.
First we need to turn the paths into editable shapes. To do that, select them all and under Object select Expand.
 Now we need to crop them. Duplicate (
 Repeat this step for the other red stripes as well. You should end up with something like this.
 And now we will apply a nice linear gradient to our stripes.
 Repeat this step to complete the other stripes as well. Use the same gradient, just make sure to match the highlighted part of the stripe with the rest of the bow. Group (
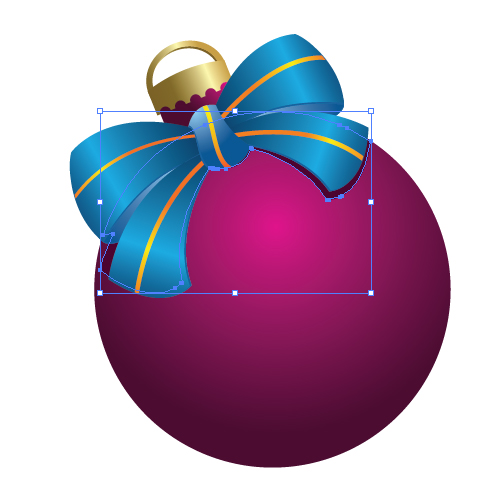
 Place the bow on the Christmas ball, just make sure to hide the flaw the best you can.
 Duplicate (
 Set the Fill color of the new shape to
  Select the basic shape of the Christmas ball and duplicate it (
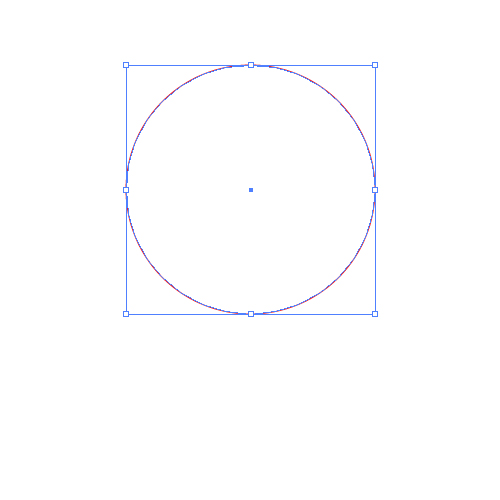 With the Direct Selection Tool (
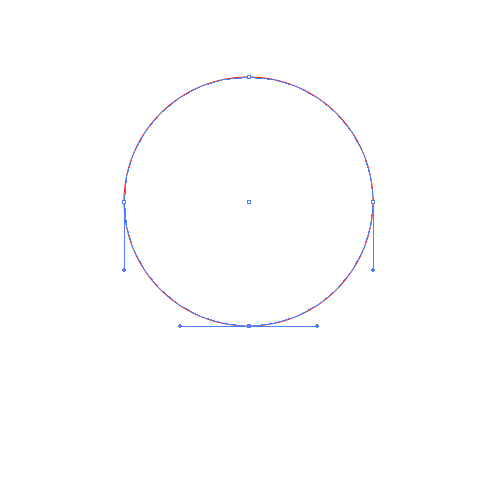
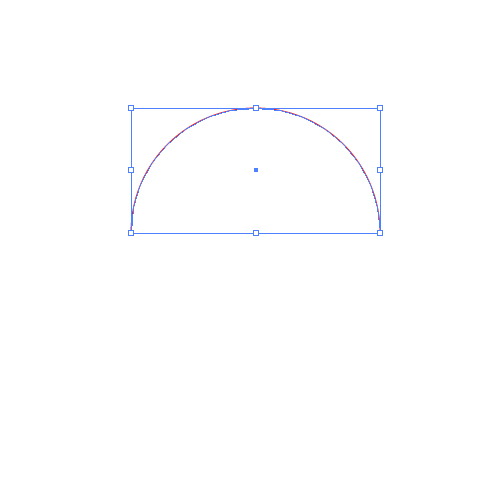 Now select the Line Segment Tool (
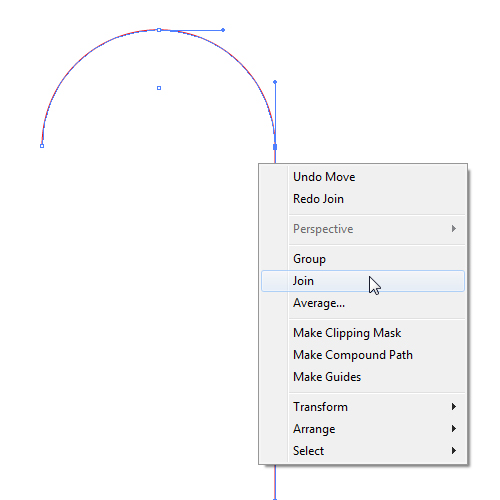
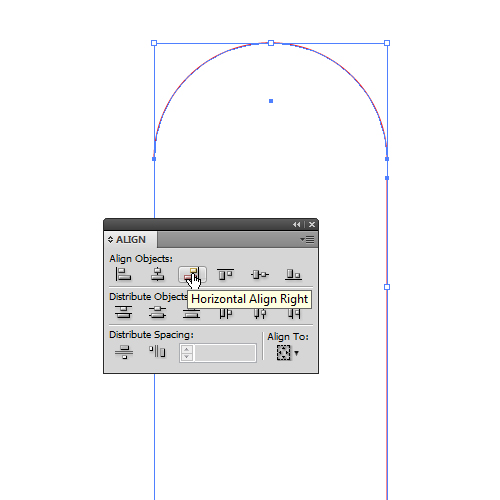 Hit the up arrow on the keyboard until the vertical lines meet the arc. With the Direct Selection Tool (
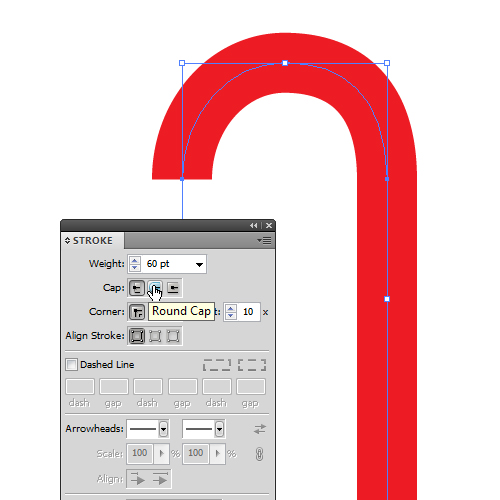
 Now we need to set the thickness of the candy cane. Set the Stroke to
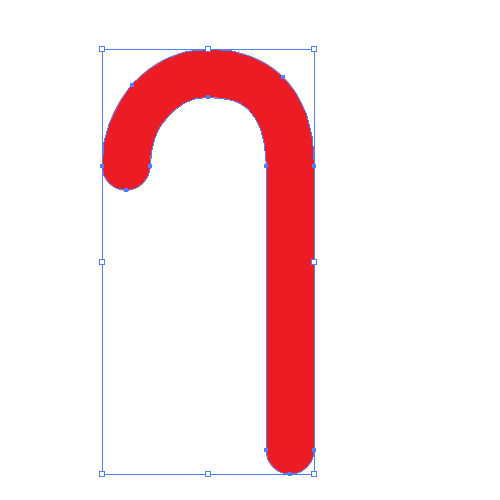
  Under Object select Expand in order to turn the Candy Cane into an editable shape. You should end up with something like this.
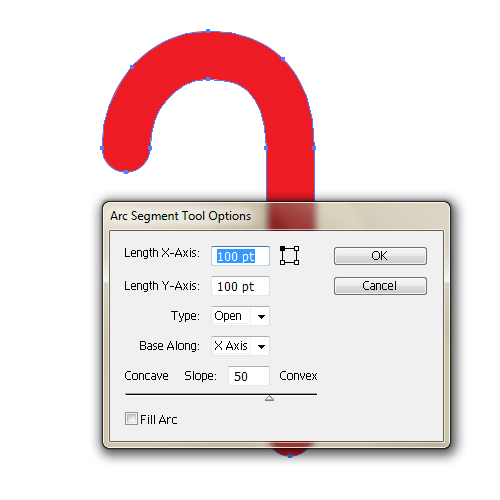 Do not change the settings in the
 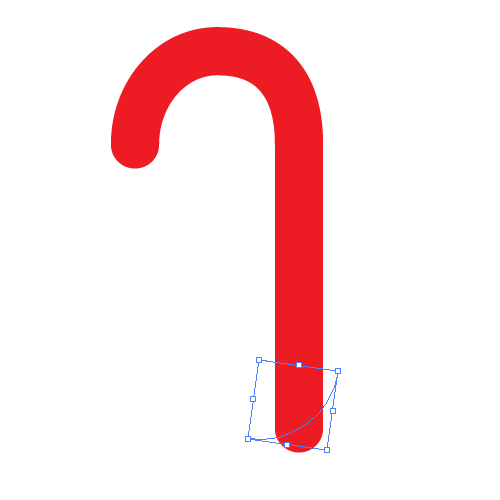 Holding the Alt / Option key on the keyboard click on the arc and drag it upwards (don’t forget to hold the Shift key on the keyboard for the straight dragging). Feel free to rotate some of the arcs if needed. Repeat this step until you get something like this.
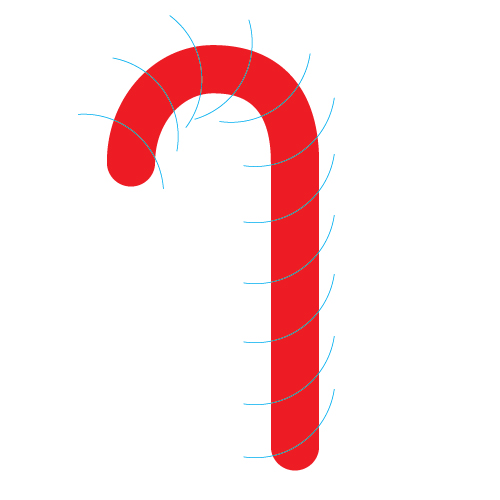 Select all the elements and under the Pathfinder Panel hit the Divide button. It will divide our Candy Cane into the small segments whose colors we'll change to white and red.
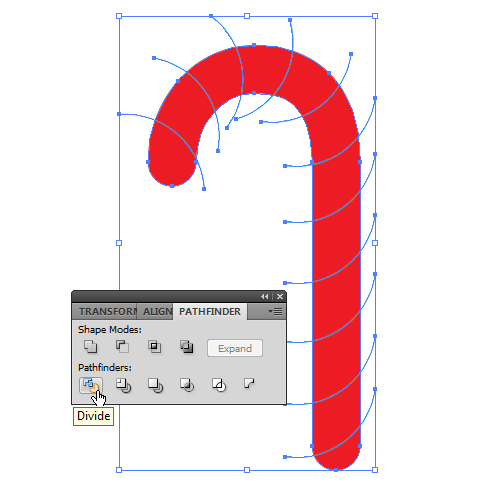 Ungroup (
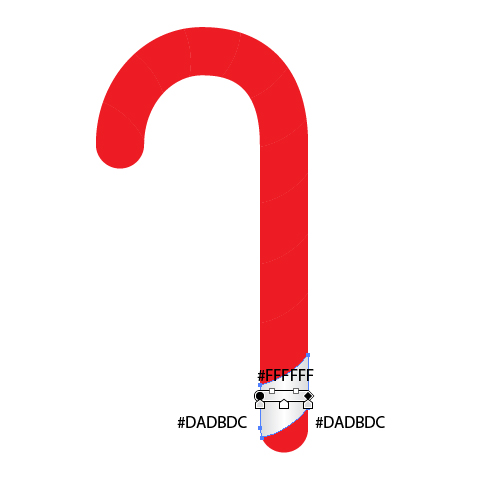 Apply the same gradient to the other white parts of the candy cane as well. For the curved part use a radial gradient with the exact same colors.
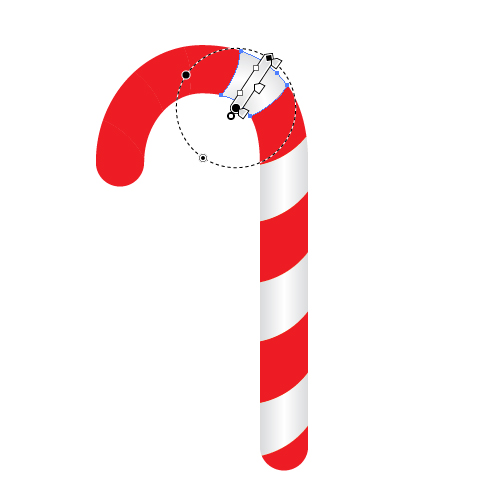 You should end up with something like this.
 Let’s do the same thing for the red parts of the candy cane. Apply a red linear gradient for the straight parts of the candy cane, and a red radial gradient for the curved parts.
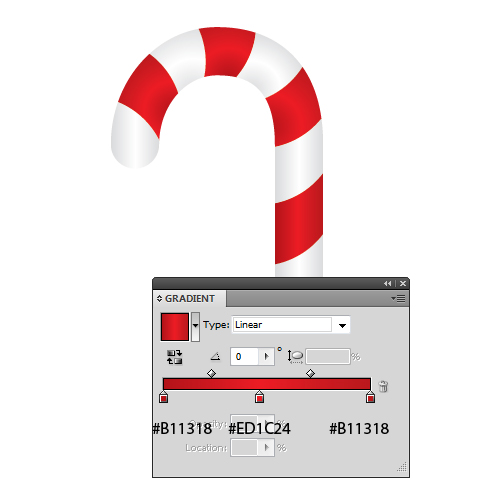 Our candy cane is done. We can add a small detail like a colorful bow to make it look more interesting.

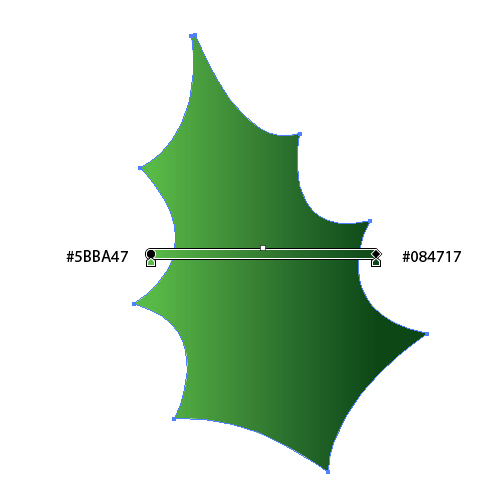
 Remove the Stroke color and apply a nice green linear gradient.
 Let’s “divide” the leaf. Grab the Ellipse Tool (
 Grab the shape we have just created and drag it to the Brush Panel. In the New Brush dialog box select Art Brush and hit
  Make sure to set the Colorization Method to Tints. This way we'll be able to change the color of the brush without expanding the brush.
 Now we have created a brush that we’ll apply to some paths. Grab the Pen Tool (
 Now apply the brush, that we have created in the previous step, to each individual path. Adjust the position of the anchor points, adjust the stroke if needed and set the Stroke color to
  Select the shape of the mistletoe and under Object select Path > Offset Path. Set the value for Offset to
  Select the middle path we created in the previous step and duplicate it (
 Select the new path and the smaller shape of the mistletoe and under the Pathfinder Panel hit the Divide button. It will divide our shape in half.
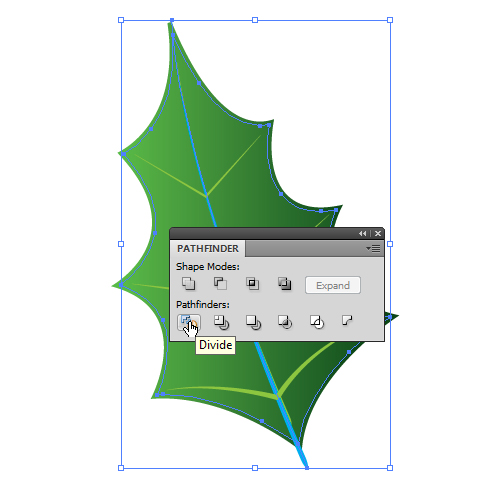 Ungroup (
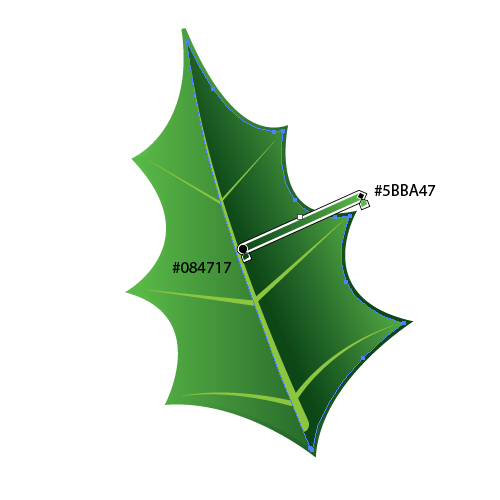 We will use the left part to create a smaller shape. Select it and under Object hit Path > Offset Path. Set the value for Offset to
 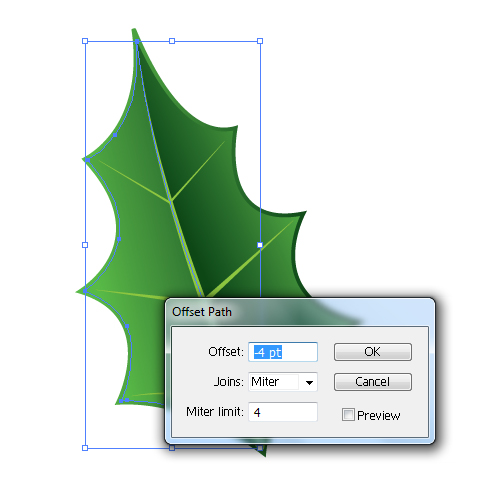 Delete the larger part of the left side and apply the color gradient.
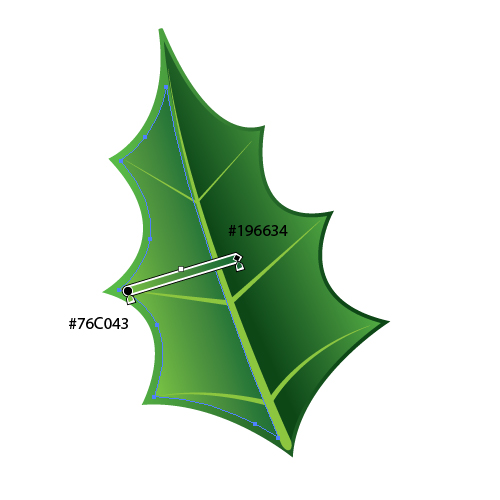 Select all elements of the mistletoe leaf and Group them (
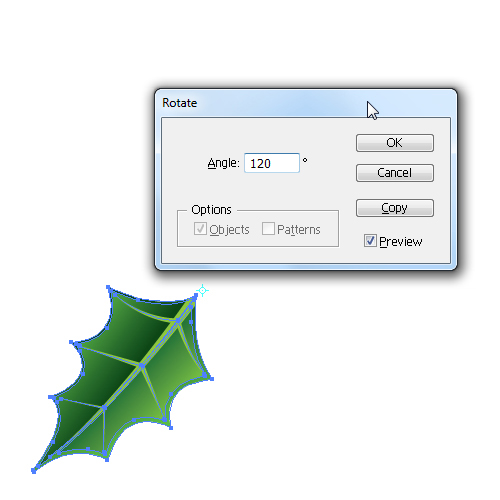 To create another leaf rotated for another
 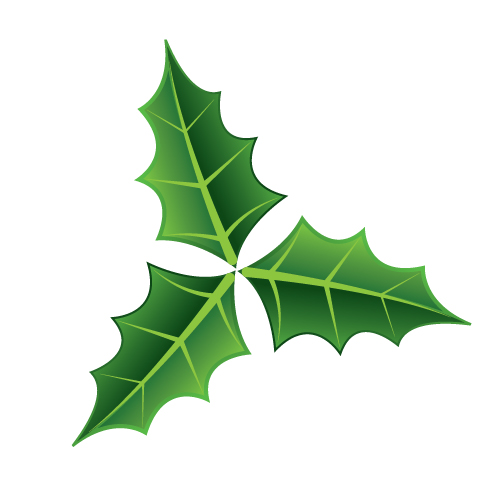 As far as the mistletoe leaves are concerned we are done. Now we have to create some berries.
Grab the Ellipse Tool (
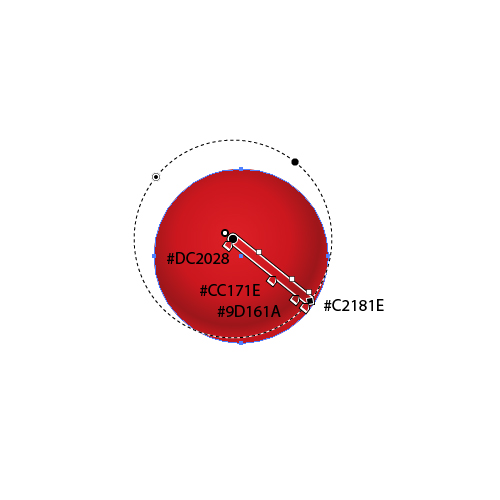 With the Ellipse Tool (
 Group (
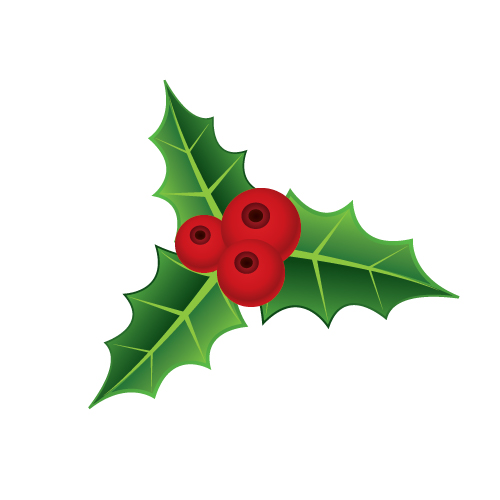 Now Group (
 With a nice floral background and some additional details and shadows you can turn your illustration into a nice Christmas greeting card. Voila!
 Conclusion
As you can see, the creation of the Christmas greeting card can be great fun. Christmas is an amazing holiday characterized by many wonderful motives and elements. There are numerous things you may create; snowflakes, gingerbread, presents, snowmen, etc. The creation of these elements require the use of different kinds of techniques, but all together you are making a catchy illustration which can be used for many different purposes.
This time we've had the opportunity to practice again with the Mesh Tool. For more practice feel free to visit the Halloween ghost tutorial where you can find some additional information regarding this useful technique. It may seem that the Mesh Tool is complicated to use, but actually it's not. Even when the illustration is finished it is possible to make minor or major changes in order to make improvements.
If you happen to have any questions feel free to post them in the comment section below. Hope you like the tutorial. Thank you for following along.
(rb)

Creating the Sock
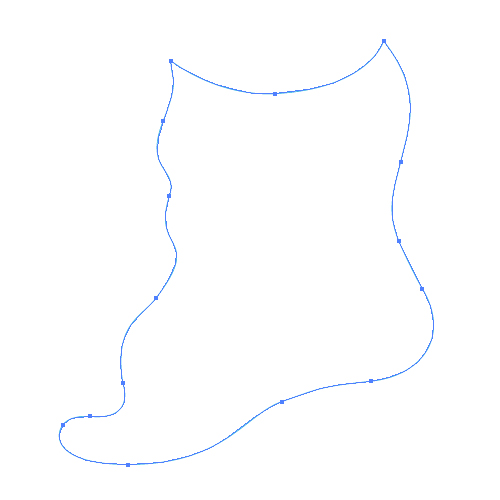
For the basic shape of the Christmas sock we will be using a Pen Tool (P). Grab it from the Tool Panel and try to draw the shape of a distorted sock. Don’t forget, the sock looks little bit distorted because it is full of presents. Feel free to experiment with the shape, trying to achieve the look like there is actually something inside the sock.
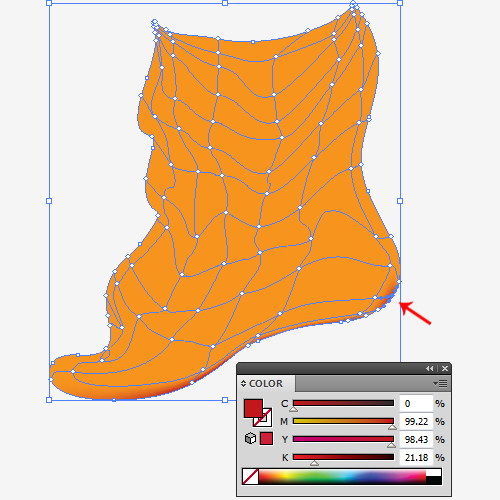
 To achieve the look of a distorted Christmas sock full of presents we will be using a Mesh Tool. It will allow us to play around with the shape of the sock by creating interesting shadows and highlights.
Grab the Mesh Tool (
To achieve the look of a distorted Christmas sock full of presents we will be using a Mesh Tool. It will allow us to play around with the shape of the sock by creating interesting shadows and highlights.
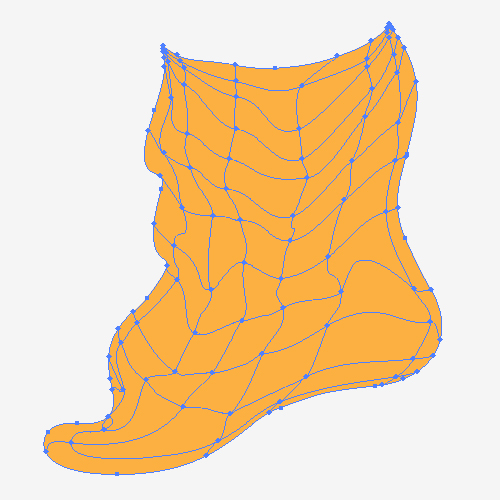
Grab the Mesh Tool (U) and start adding the anchor points. You don’t have to add all anchor points at once. After applying the colors you’ll be able to see the illustration more clearly and to decide whether to add or remove some anchor points. All anchor points are editable. You can change their positions and the length of the paths between anchor points. While you are doing this think about all the fabric wrinkles you are intending to create.
 After adding all the anchor points grab the Direct Selection Tool (
A) from the Tool Panel and adjust the position of the anchor points and the angle of their handles. This way you’ll be able to change the position of the paths, which will affect the spreading of the colors which we've applied to a particular anchor point.
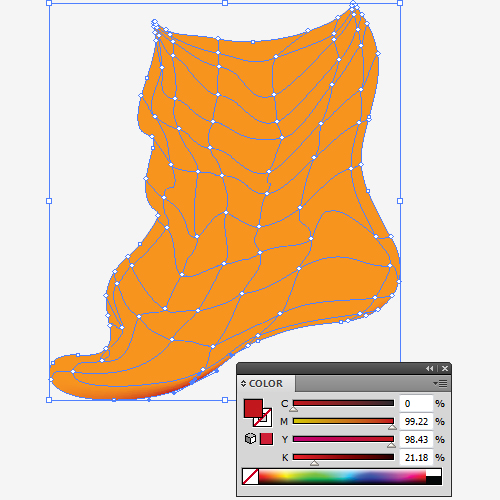
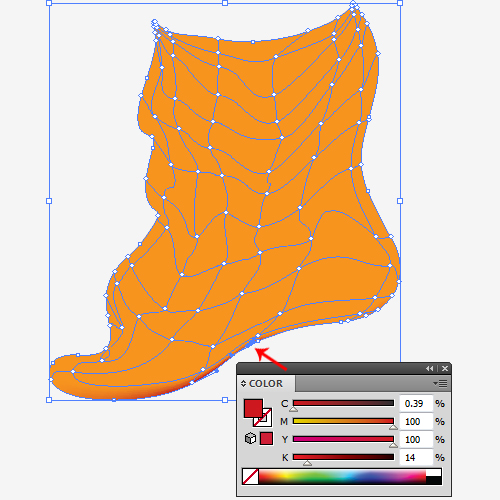
On the following pictures you can monitor applying colors process.


 The animation below is showing the rest of the coloring process.
 Feel free to adjust the position of all the anchor points after applying colors, if needed.
Creating the Upper Part of the Christmas Sock
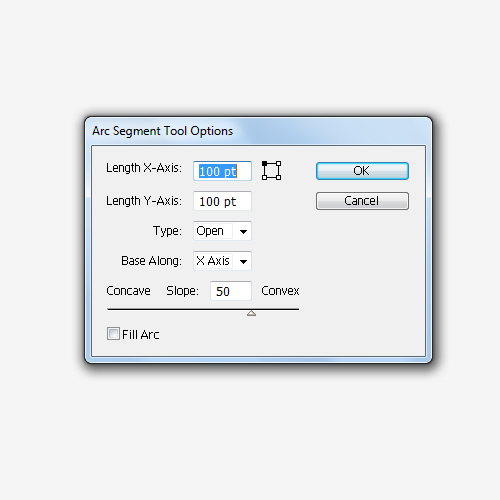
Now we will try to create the fluffy upper part of the Christmas sock. To do that we will use the Arc Tool. Grab the Arc Tool from the Tool Panel and click somewhere on the Artboard. In theArc Segment Tool Options box just hit the Ok button (don’t change anything).
 Set the Stroke color to white
 #FFFFFF and make sure to create many copies of the path. Move them around to form the fluffy part of the sock. You should end up with something like this.
 Place the fluffy part we have just created on the top of the sock.

Creating the Presents
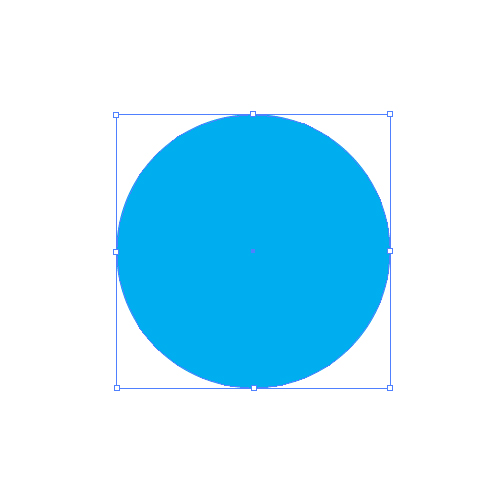
In this part of tutorial we will create the elements to 'fill' the Christmas sock with. First we will create the Christmas ball. For the basic shape of the Christmas ball we will be using the Ellipse Tool (L). Holding the Shift key on the keyboard create a circle.
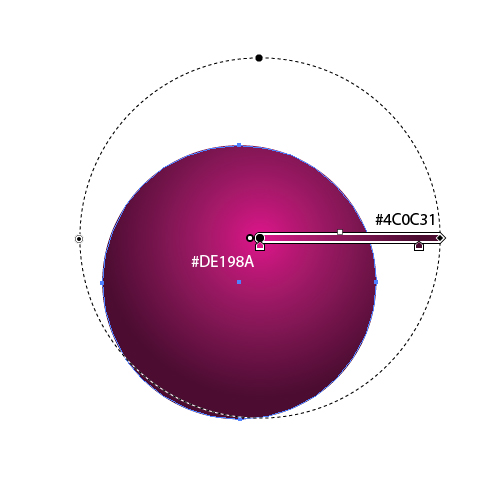
 Let’s apply a nice radial gradient to our circle. Feel free to use any color combination you like. We will use a nice purple gradient.
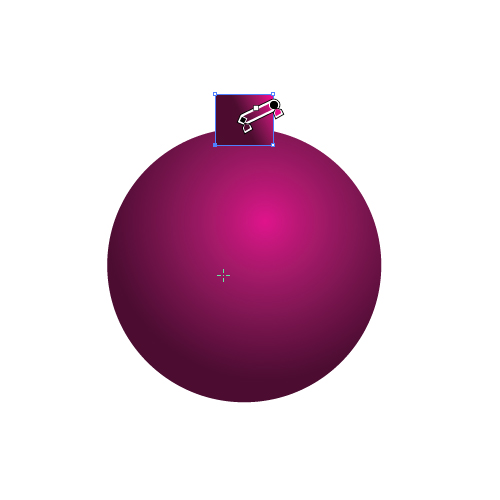
 Grab the Rectangle Tool (
M) from the Tool Panel and create a rectangle as it is shown in the picture below. Use the same radial gradient we have used in the previous step.
 We will need to use the Rectangle Tool (
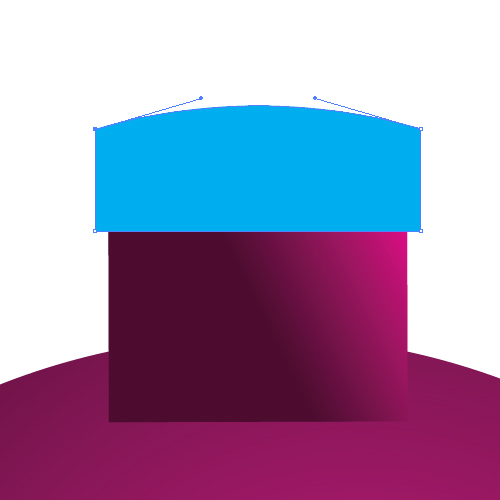
M) one more time for the top of the Christmas ball. Create another rectangle, a bit larger, but make sure to make the upper part of the rectangle a bit curvy. To achieve that just grab the Direct Selection Tool (A) from the Tool Panel and pull the handles of the endpoints upwards, as it is shown in the picture below. This will create a nice curvy side of the rectangle.
 Now grab the Ellipse Tool (
L) again and create a circle. Holding the Alt / Option key on the keyboard click on the circle and drag it to the right. It will create a copy of the circle. Don’t forget to hold the Shift key on the keyboard for the straight dragging. Repeat this step four more times.
 In order to create an equal distance between the circles select them all and under the Align Panel hit the Horizontal Distribute Space. You should end up with something like this.
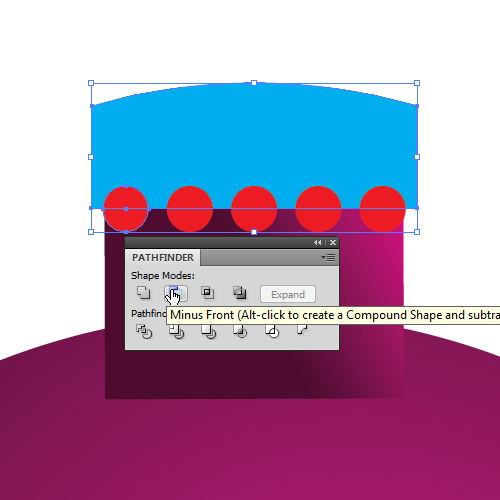
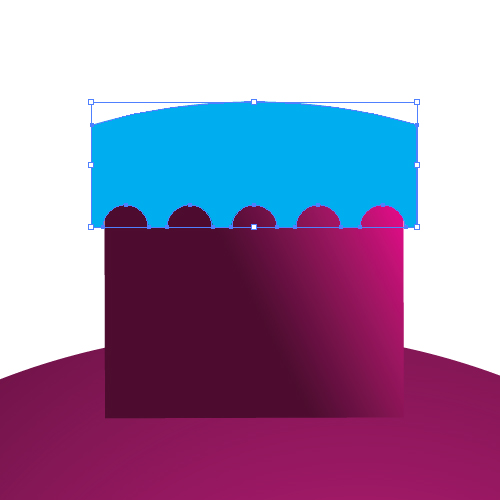
 Select the blue shape and one of the circles and under the Pathfinder Panel hit the Minus Front button. Repeat this step with the rest of the red circles.
 You should end up with something like this.
 Now, grab the Ellipse Tool (
L) from the Tool Panel and create another circle. Remove the Fill color and set the Stroke color to any color you like. Set the stroke to 4pt.
 Let’s apply some nice golden gradients to the upper part of the Christmas ball . This will give our ball a fancy look. But first we have to turn the red circle into an editable path. Select the red circle and under Object select Expand and send the ring to the back (
Shift + Ctrl / Cmd + [). This way we will hide the lower part of the ring we actually don’t need.
 In the following pictures you will find the information about applying a golden, linear gradient.
 For the handle of the Christmas ball use the same linear gradient, just move gradient more to the left (to do that, select the Gradient Tool (
G) from the Tool Panel and after applying the gradient grab the slider and move it to the left).

 Duplicate (
Ctrl / Cmd + C, Ctrl / Cmd + F) the handle twice and nudge one of the copies 1 pixel down and to the left. Select both copies and under the Pathfinder Panel hit the Minus Front button (just make sure that the nudged copy is below the copy we didn’t move).
 You should end up with something like this.
 Ungroup (
Shift + Ctrl / Cmd + G) the new shape and delete the lower part. Under the Gradient Panel make sure to click on the Reverse Gradient in order to change the color order inside the gradient.
 This way we’ve created a depth for the handle. Just make sure to place the new shape behind the golden handle. You should end up with something like this.
 Now we have to do something with the part of the Christmas ball between the actual ball and the upper part. You will all agree that it shouldn’t be left like that.
 One of the things we might do is to hide it with a nice blue bow. There are many different ways to create a nice bow. Just use your imagination and try to be creative.
Grab the Pen Tool (
One of the things we might do is to hide it with a nice blue bow. There are many different ways to create a nice bow. Just use your imagination and try to be creative.
Grab the Pen Tool (P) from the Tool Panel and draw the shapes as shown below.


 These are the basic shapes we will need. With some nice gradients and additional shapes we will create a nice blue bow that will help us complete our Christmas ball.

 Use the radial gradient for the knot. We will try to emphasize the upper part of the knot with the light blue color.
 Use the same radial gradient for the inner part of the bow as well.
 Select all the elements besides the knot, and under Object select Transform > Reflect. Set the Axis to
 Vertical and hit the Copy button. Scale down the copied elements a bit and adjust the angle and the position, just like in the picture below.
 Now we have to add some details in order to make the bow more interesting.
First, we will create a thickness for the fabric. For each part of the bow use the same technique.
Duplicate (
Now we have to add some details in order to make the bow more interesting.
First, we will create a thickness for the fabric. For each part of the bow use the same technique.
Duplicate (Ctrl / Cmd + C, Ctrl / Cmd + F) the shape twice that you want to give some thickness. Nudge one of the copies 1 pixel (downwards, upwards, right or left, depends on the position of the shape). Select both copies and under the Pathfinder Panel hit the Minus Front button. In the picture below you can see the improvement we have achieved with this technique.
 There is one more thing we can do. We can create some nice yellowish stripes which can make our bow even more interesting.
Grab the Pen Tool (
There is one more thing we can do. We can create some nice yellowish stripes which can make our bow even more interesting.
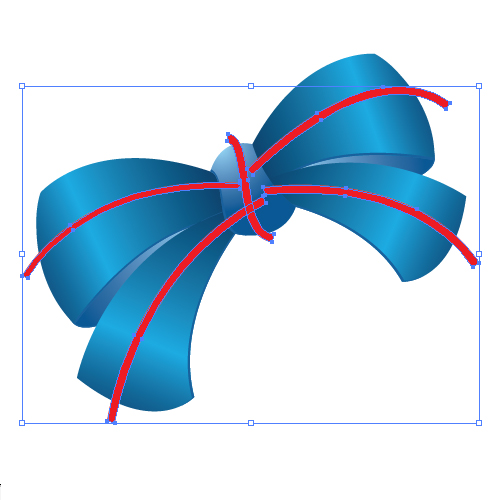
Grab the Pen Tool (P) from the Tool Panel and create a curved paths as is done in the picture below.
 It might look a little bit confusing like this but in the next few steps we will make it more clear.
First we need to turn the paths into editable shapes. To do that, select them all and under Object select Expand.
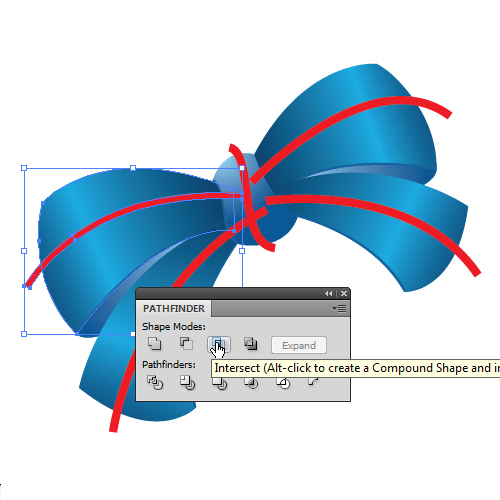
 Now we need to crop them. Duplicate (
Ctrl / Cmd + C, Ctrl / Cmd + F) the blue shape underneath the red stripe. Select the copy we have just made and the red stripe and under the Pathfinder Panel hit the Intersect button.
 Repeat this step for the other red stripes as well. You should end up with something like this.
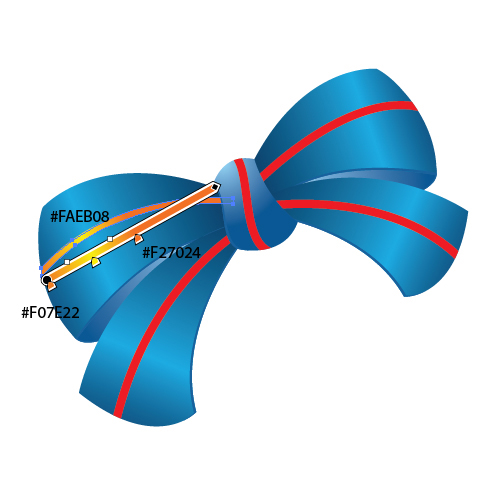
 And now we will apply a nice linear gradient to our stripes.
 Repeat this step to complete the other stripes as well. Use the same gradient, just make sure to match the highlighted part of the stripe with the rest of the bow. Group (
Ctrl / Cmd + G) all elements of the bow.
 Place the bow on the Christmas ball, just make sure to hide the flaw the best you can.
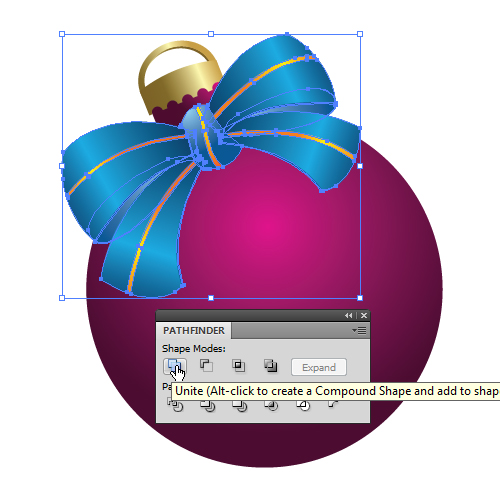
 Duplicate (
Ctrl / Cmd + C, Ctrl / Cmd + F) the bow. Ungroup (Shift + Ctrl / Cmd + G) the copy and under the Pathfinder Panel hit the Unite button.
 Set the Fill color of the new shape to
 #4C0230, rotate a bit, move around and make sure to place it underneath the actual bow.
 Select the basic shape of the Christmas ball and duplicate it (
Ctrl / Cmd + C, Ctrl / Cmd + F). Select the copy we have just made and the purple shape of the bow and under the Pathfinder Panel hit the Intersect button. It will create the shape of a shadow that the bow is casting on the Christmas ball.

Creating a Candy Cane
Grab the Ellipse Tool (L) from the Tool Panel and create a circle. Remove the Fill color and set the Stroke color to any color you like.
 With the Direct Selection Tool (
A), select the bottom Anchor point and hit the delete key on your keyboard. You should end up with something like this.

 Now select the Line Segment Tool (
/) and draw a vertical line. Select both objects and in the Align Panel hit Horizontal Align Right.
 Hit the up arrow on the keyboard until the vertical lines meet the arc. With the Direct Selection Tool (
A) select the end points of both paths and under the right click select Join.
 Now we need to set the thickness of the candy cane. Set the Stroke to
 50 pt and under the Stroke Panel hit the Round Cap button. It will make the endpoints of the Candy Cane round.
 Under Object select Expand in order to turn the Candy Cane into an editable shape. You should end up with something like this.

Creating the Stripes
This part of the creation process is quite simple. All we have to do is to create white and red stripes and to make sure to make them look as though they curve around the Candy Cane. Grab the Arc Tool and click somewhere on the Artboard. It will bring up a dialog box like this. Do not change the settings in the
 Arc Segment Tool Option box and hit the OK button. It will create an arc. Rotate it and place it as it shown in the picture below.
 Holding the Alt / Option key on the keyboard click on the arc and drag it upwards (don’t forget to hold the Shift key on the keyboard for the straight dragging). Feel free to rotate some of the arcs if needed. Repeat this step until you get something like this.
 Select all the elements and under the Pathfinder Panel hit the Divide button. It will divide our Candy Cane into the small segments whose colors we'll change to white and red.
 Ungroup (
Shift + Ctrl / Cmd + G) the candy cane and get ready to apply some nice linear and radial gradients.
Applying Color Gradients to the Candy Cane
We will try to achieve a semi-realistic look by using some very nice color gradients. The most important thing is to highlight the middle part of the Candy cane. This way we will simulate the oval look of the cane. For curved parts of the candy cane we will be using a radial gradient. To the white parts of the candy cane we will apply a gray – white – gray linear gradient. Apply the same gradient to the other white parts of the candy cane as well. For the curved part use a radial gradient with the exact same colors.
 You should end up with something like this.
 Let’s do the same thing for the red parts of the candy cane. Apply a red linear gradient for the straight parts of the candy cane, and a red radial gradient for the curved parts.
 Our candy cane is done. We can add a small detail like a colorful bow to make it look more interesting.

Next Stop: Mistletoe
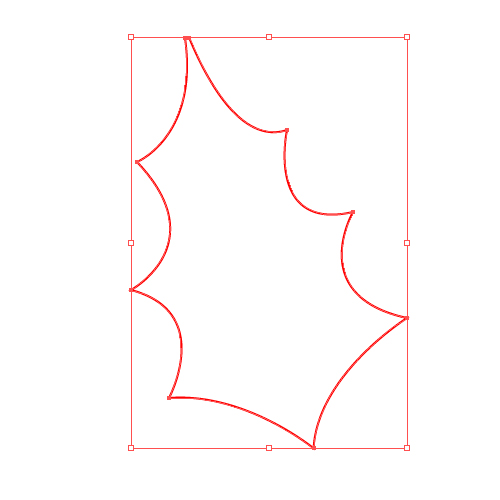
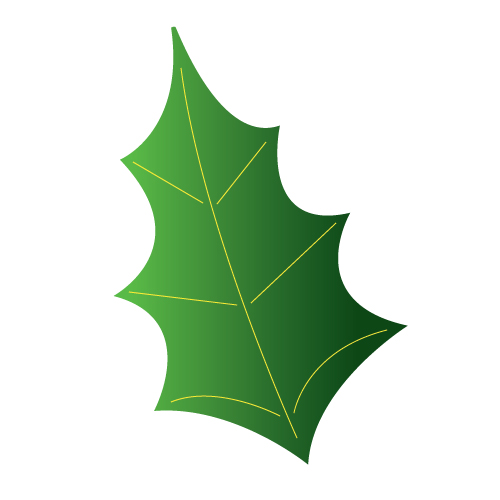
Christmas wouldn’t be Christmas without a little mistletoe. This is the reason why we will include it in our illustration. The creation process is quite simple, all we have to do is create a few berries and some nice green leaves. Let’s start with the leaves. For the shape of the leaf we will be using the Pen Tool (P). Try to draw the shape as shown below.
 Remove the Stroke color and apply a nice green linear gradient.
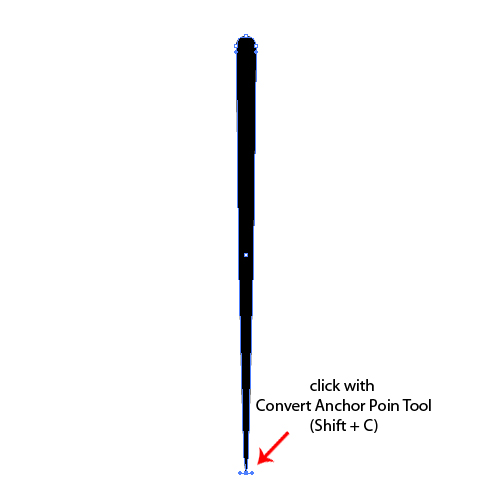
 Let’s “divide” the leaf. Grab the Ellipse Tool (
L) from the Tool Panel and create a small circle. With the Direct Selection Tool (A) select the lower anchor point of the circle, and holding the Shift key on the keyboard drag that anchor point downwards (we are holding the Shift key for the straight dragging). In order to create a sharp corner, grab the Convert Anchor Point Tool (Shift + C) from the Tool Panel and click one the lower anchor point.
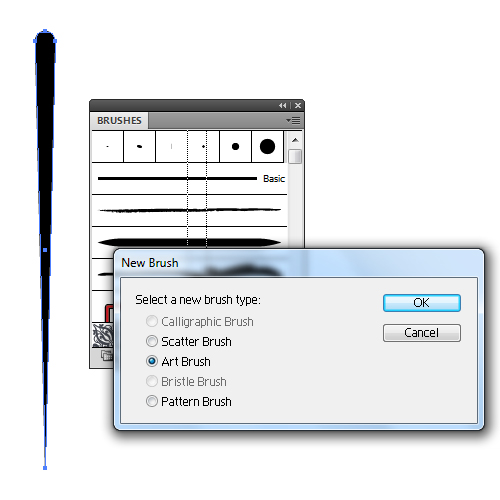
 Grab the shape we have just created and drag it to the Brush Panel. In the New Brush dialog box select Art Brush and hit
 OK.
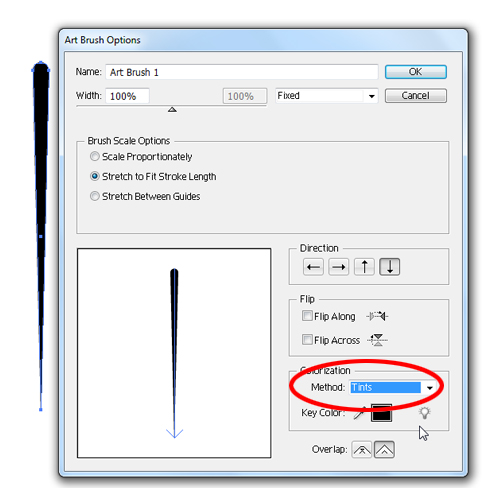
 Make sure to set the Colorization Method to Tints. This way we'll be able to change the color of the brush without expanding the brush.
 Now we have created a brush that we’ll apply to some paths. Grab the Pen Tool (
P) from the Tool Panel and create few paths, just like it's shown in the picture below.
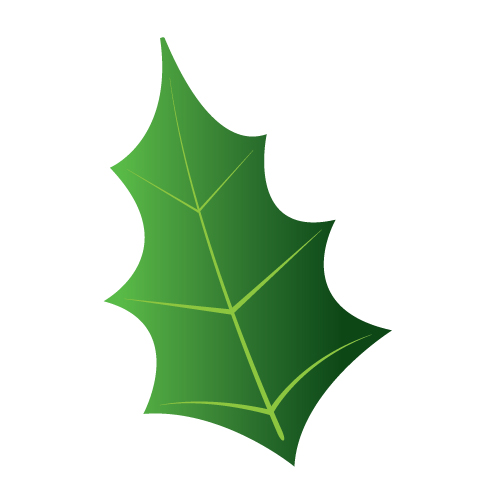
 Now apply the brush, that we have created in the previous step, to each individual path. Adjust the position of the anchor points, adjust the stroke if needed and set the Stroke color to
 #8DC63F.
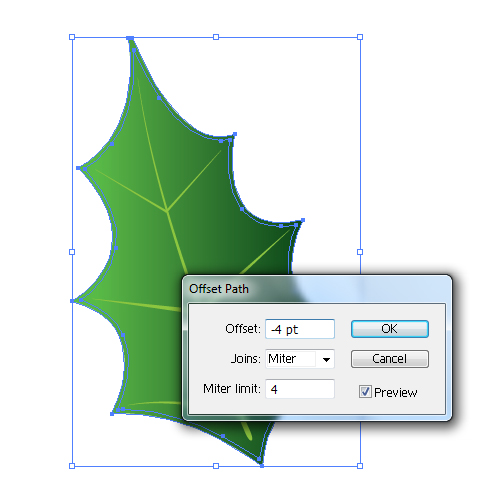
 Select the shape of the mistletoe and under Object select Path > Offset Path. Set the value for Offset to
 -4.
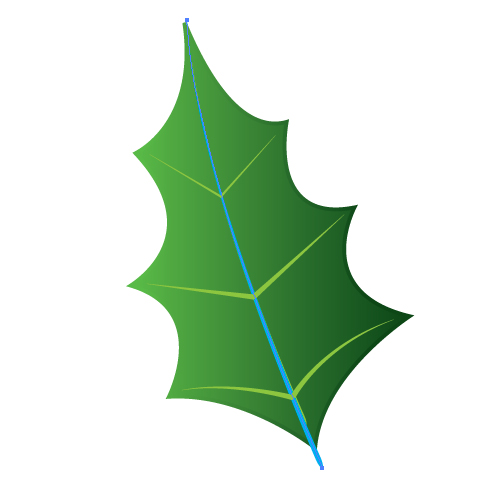
 Select the middle path we created in the previous step and duplicate it (
Ctrl / Cmd + C, Ctrl / Cmd + F). Grab the Direct Selection Tool (A) from the Tool Panel and move the end points as it is in the picture below. This way we’ve created a path that will help us divide the smaller shape of the mistletoe.
 Select the new path and the smaller shape of the mistletoe and under the Pathfinder Panel hit the Divide button. It will divide our shape in half.
 Ungroup (
Shift + Ctrl / Cmd + G) the new shape and apply some nice color gradients to the right side of the mistletoe.
 We will use the left part to create a smaller shape. Select it and under Object hit Path > Offset Path. Set the value for Offset to
 -4.
 Delete the larger part of the left side and apply the color gradient.
 Select all elements of the mistletoe leaf and Group them (
Ctrl / Cmd + G). Grab the Rotate Tool (R) from the Tool Panel and holding the Alt / Option key on the keyboard click underneath the leaf. Set the value for Angle to 120 degrees and hit the Copy button.
 To create another leaf rotated for another
 120 degrees simply hit the shortcut on the keyboard Ctrl / Cmd + D.
 As far as the mistletoe leaves are concerned we are done. Now we have to create some berries.
Grab the Ellipse Tool (
As far as the mistletoe leaves are concerned we are done. Now we have to create some berries.
Grab the Ellipse Tool (L) from the Tool Panel and create a circle (hold the Shift key on the keyboard to create a circle). Apply a red radial gradient.
 With the Ellipse Tool (
L) create two ellipses and apply darker radial gradients, like it is shown in the image below.
 Group (
Ctrl / Cmd + G) all the elements of the berry, create three copies of the berry and place them on the leaves. Scale down some of the leaves and berries and rearrange them until you reach a desirable result.
 Now Group (
Ctrl / Cmd + G) all of our elements for the Christmas sock (Christmas ball, candy cane and the mistletoe) and place it “in” the sock. Adjust the position and the angle of the elements as needed.
 With a nice floral background and some additional details and shadows you can turn your illustration into a nice Christmas greeting card. Voila!
 Conclusion
As you can see, the creation of the Christmas greeting card can be great fun. Christmas is an amazing holiday characterized by many wonderful motives and elements. There are numerous things you may create; snowflakes, gingerbread, presents, snowmen, etc. The creation of these elements require the use of different kinds of techniques, but all together you are making a catchy illustration which can be used for many different purposes.
This time we've had the opportunity to practice again with the Mesh Tool. For more practice feel free to visit the Halloween ghost tutorial where you can find some additional information regarding this useful technique. It may seem that the Mesh Tool is complicated to use, but actually it's not. Even when the illustration is finished it is possible to make minor or major changes in order to make improvements.
If you happen to have any questions feel free to post them in the comment section below. Hope you like the tutorial. Thank you for following along.
(rb)
Hi I am really struggling to uset he pen tool cannot seem to have any control ove it . Can only use it to draw points and no curves. Trying to do Christmas tutorial.
I have tried a lot of tutorials, but this one is by far the best I have had.
The build up is gradual and clear, the examples well thought out!
I’ll be having a go at your other tutotials as well.
Thank you for the superb effort!
Great details and insights! This will surely come in hand in the next couple of weeks! Thanks!
This should be helpful in the near future.
Another amazing tutorial! I was hoping to find something like this. I am having some trouble with Mesh Tool, but with your tutorial I can do some practice. Keep up the good work! Thank you!
Thank you all very much! I am really glad you like it and find it useful!