
WordPress: How to Enhance the Visual Editor With Custom Formats
Would you like to use custom formats in the visual writing editor of WordPress? Good idea, as adding styles gets you a lot of advantages. You can use your elements without having to change into the text mode. Thus, in this article, we'll show you how to extend the editor with custom formats.
The visual editor of WordPress is a neat thing. The most important formattings can be removed with a single click. You can enrich and structure your articles with elements. However, it 'd be good if the editor had a few more functions.
There certainly are a lot of plugins on the market that extend the editor with shortcodes. But do you really need them all? Or are a few elements like pretty buttons, for example, enough? This wouldn't slow your website down unnecessarily.
Of course, you can already switch into the text mode at any time to add your formatting. But user friendliness looks different.
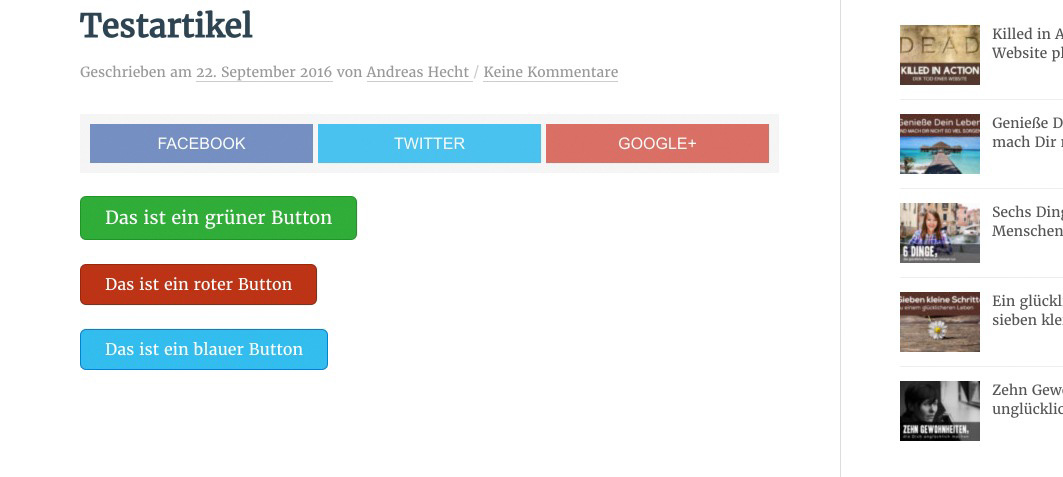
 The same thing can be seen when using them within an article.
 Adding Custom Styles is This Simple[/caption]
All you need to do is make sure to copy the entire array and place it below an existing one. In the screenshot, I marked the beginning and the end of the array. The green brackets mark the area.
Adding Custom Styles is This Simple[/caption]
All you need to do is make sure to copy the entire array and place it below an existing one. In the screenshot, I marked the beginning and the end of the array. The green brackets mark the area.
WordPress: Adding Own Styles to the Visual Editor Without a Plugin
Using own styles also means that we have to touch WordPress files. The additional code that we will create in a bit either goes into the functions.php of the active theme or into a custom site plugin. I recommend the latter.1 - We Create an Own Menu Item in the Editor
The following code creates an additional drop-down menu in the visual editor. The menu will give you the option to be able to choose and use your own styles. https://gist.github.com/anonymous/eb6b3acf39bfee4ffadf2f2e4a7cd7be2 - Creating the Options That Can be Chosen
Now, we need to set up the options that we want to add to the dropdown menu we just created. Afterward, you'll be able to use these formats. For this tutorial, we'll choose three buttons which we will get to use subsequently. https://gist.github.com/anonymous/459d62df1ac1cf3b2565756177c68d633 - Creating the Necessary CSS for the Buttons
The buttons are already usable. You can try it by setting up a new article, and then using the new function. However, the buttons don't look like buttons yet; a little CSS is needed for that. Copy the CSS into your theme's style.css, or create an own stylesheet for it. https://gist.github.com/anonymous/79229eef4aa434143d0d570d640646d54 - We Still Need a CSS for the Editor
For us to be able to see the correctly formatted buttons in the visual editor, we need aneditor-style.css.
Most of the time, you'll find the file within your theme's root index, or within a folder named CSS. If there is none yet, I recommend you set one up now. That's not really difficult. Simply create an empty CSS file named editor-style.css using an HTML editor.
Now copy the CSS from item three into the new stylesheet and save. Move it into your theme's main index. Now, all you need is a small PHP function that calls up the new stylesheet for your editor.
Noupe: The 9 Best Free HTML Editors for Web Developers (Windows-Edition)
https://gist.github.com/anonymous/e93ec4ed512b595c5271bcd865a19707
The Final Result: Our New Buttons
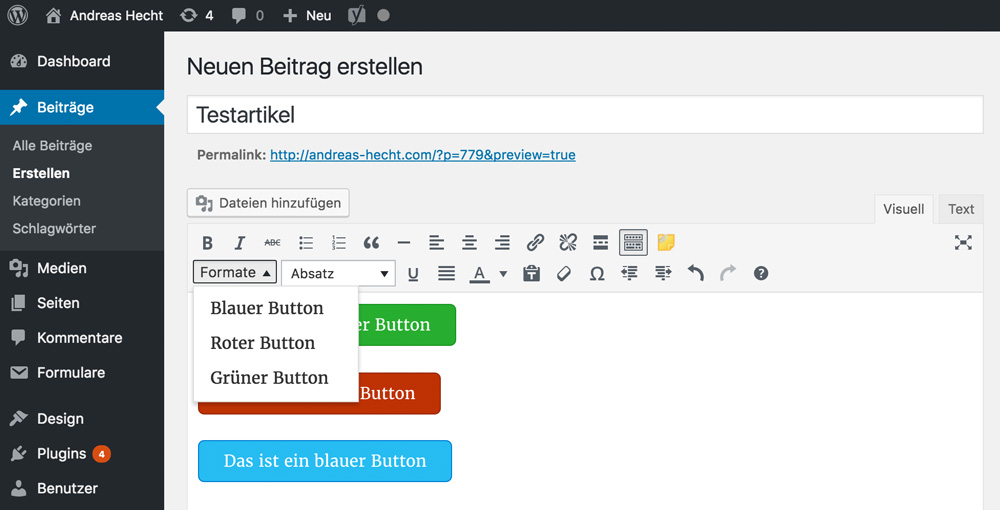
The new buttons are very easy to use, and only one mouse click away when writing a new article. In the Tiny MCE Editor, the formatted buttons will now look pretty:
The same thing can be seen when using them within an article.
How to Use the New Buttons
As we've set up the buttons using rather simple methods, you are not able to use a comfortable generator. Nonetheless, the new buttons controls are pretty easy. Just write the button text into the editor, mark the text, and then click on the new menu item "formats." Pick the button of your choice. Now, you've created a colored button. For a link, mark the button text again, and implement the link.Adding Other Elements - Made Simple
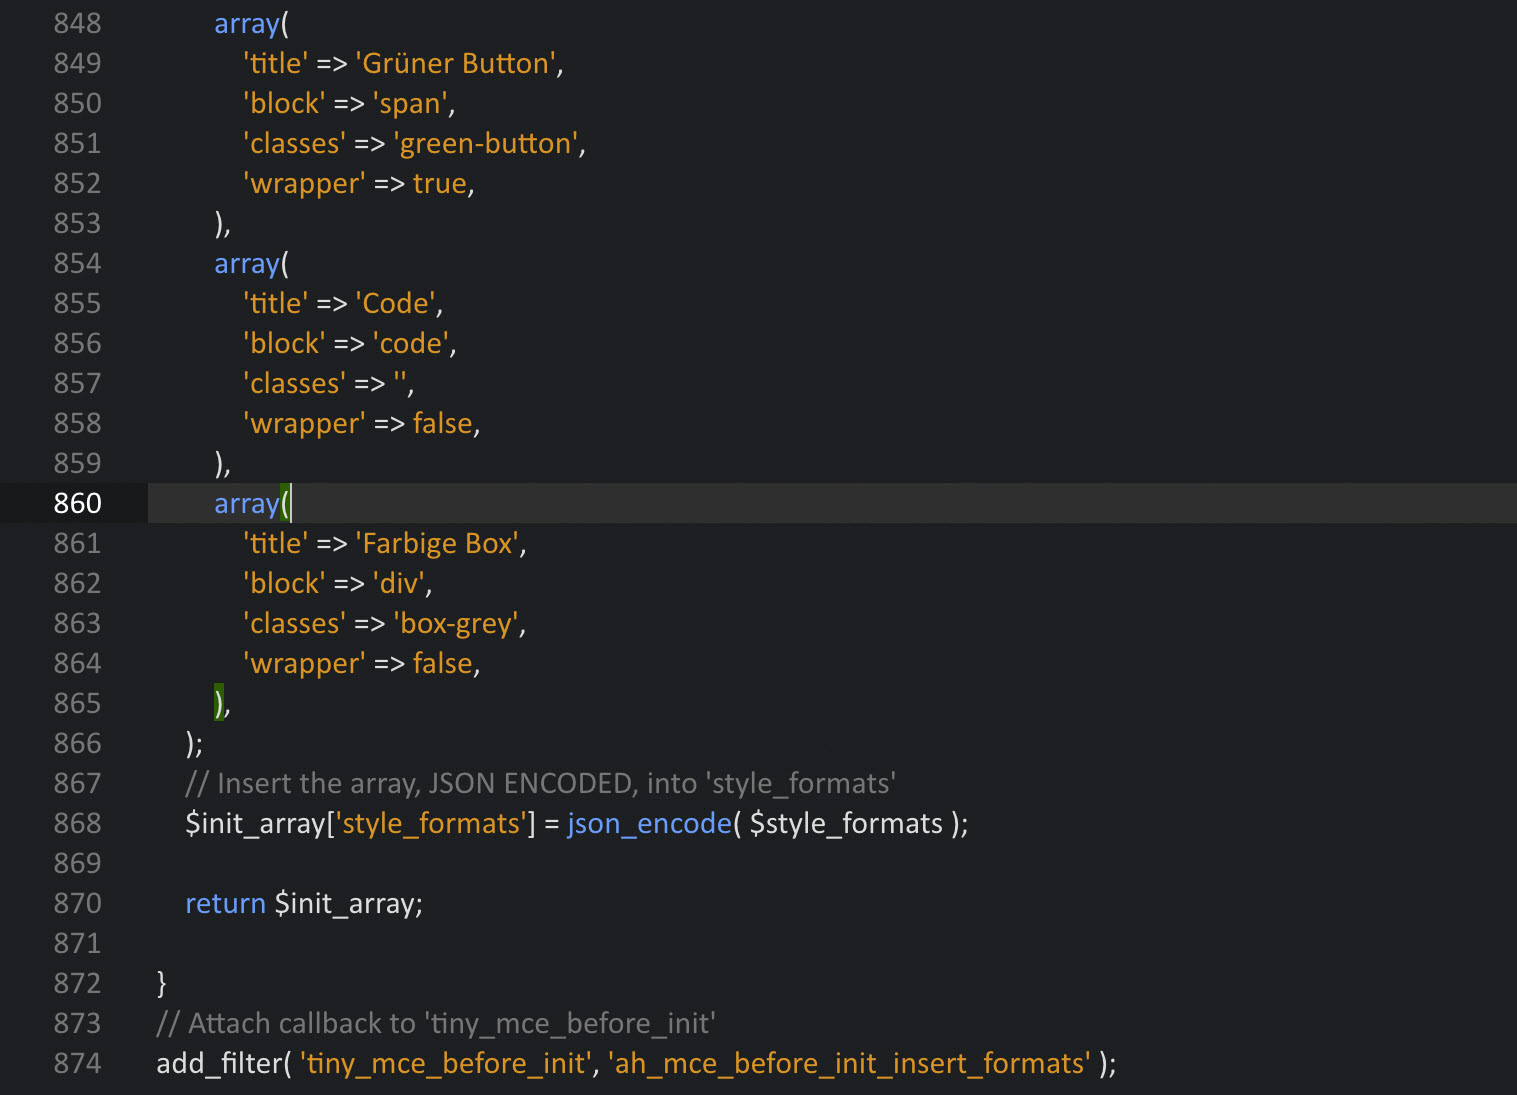
You can add other elements whenever you want to. Maybe, you are just like me and you use the code tag more than once? Or you want to create a colored box for highlighted text? No problem, the screenshot shows you what to alter in the PHP code of item two. [caption id="attachment_78167" align="alignnone" width="640"] Adding Custom Styles is This Simple[/caption]
All you need to do is make sure to copy the entire array and place it below an existing one. In the screenshot, I marked the beginning and the end of the array. The green brackets mark the area.
Thanks Andreas for this helpful post! I just spent the last 30 minutes reading on this and also have previously read your article on how to create a custom site plugin. I will be trying what some of what you discussed here on my next project as the benefits of this seem to be really cool!
Hi there, thanks for this tutorial. The steps were easy to follow and work perfectly. However, I have one question: how do I get the fonts in the visual editor to match exactly as the front-end of the website? Thanks for your help in advance!