
Anyone Up for a Cup of Coffee?
Following along this tutorial you’ll be learning how to use the Pathfinder Panel in Illustrator CS5 with its very useful features. Combining various forms with the Pathfinder tools, we can create nice shapes. Applying the gradients and colors to those shapes, we can achieve great results by creating a nice depth and perspective. Highlights and shadows are very helpful as well and make the artwork look very realistic.
[fblike]
Don’t forget to use the techniques wisely. Using this simple one you can create a nice artwork of a cup that can be used in a variety of ways, such as an icon in the Web design field or even for coffee shop menus. Now, let’s get down to business!
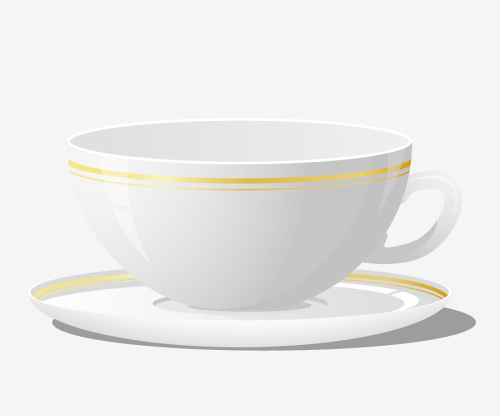
This is how the end result should look like:
 Select the Ellipse Tool (
 Grab the Direct Selection Tool code>(A), select the upper anchor point of the circle and remove it by hitting the Delete key on the keyboard. This way we’ll remove the upper part of the circle:
 Grab the Pen Tool (
 Take the Ellipse Tool (
 Now use the Pen Tool (
 We have to make the bottom of the cup more flat if we don't want to spill the coffee. Just grab the Pen Tool (
 Select the green part of the cup and the path from the previous step and hit the Divide button under the Pathfinder Panel:
 Ungroup (
 Let's create the edge of the cup. Select the pink ellipse and under the Object choose the Path > Offset Path. Set the Offset to
  Now we have two ellipses. Set the Fill color for the larger ellipse to white ( #FFFFF ):
 The smaller ellipse represents the inner part of the cup. Since the imaginary source of the light is on the upper left side, that side of the interior will be darker:
 Let's edit the handle a little bit. In that order we need to expand the path first. Select the handle and under the Object option, choose Expand:
 Make sure that the handle is not too big or too small for the cup. You can add some details. Take a look at your cup at home and try to copy the look of the handle.
Grab the Ellipse Tool (
Make sure that the handle is not too big or too small for the cup. You can add some details. Take a look at your cup at home and try to copy the look of the handle.
Grab the Ellipse Tool ( Holding the Shift key on the keyboard, select the handle as well. Under the Pathfinder Panel hit the Unite option:
 Now we have to adjust the anchor points a little bit to make a smooth shape of the handle:
 The handle should be within the shadow because it is on the right side of the cup (source of the light is the left side, and the handle is on the right side). Let’s apply a darker gradient and later we can add some reflections as well:

 Set the Stroke to
  Now we have to duplicate the shape of the cup. Hit the
  Apply the golden linear gradient:
 Repeat the previous step to create another, thinner line:
 Duplicate (
 Now duplicate the new shape we've just created and move it to the right side, scale it up a little bit and rotate it. Select both shapes and under the Pathfinder Panel hit the Minus Front button:
 Feel free to change the position and the angle of the new shape. Play around until you achieve the right look. Set the Fill color to white and lower the opacity to 40%:
 Grab the Pen Tool (
 Under the Object hit Expand:
 Select both, expanded path and the reflection and under the Pathfinder Panel hit the Minus Front button:
 Using the same technique create few more highlights and shadows:
 Now we can add a shadow and a highlight on the handle of the cup. Grab the Ellipse Tool (
 Duplicate the handle of the cup (
 Creating a highlight is pretty much the same. Duplicate (
 Under Object select Arrange > Send Back:
 Scale up the ellipse for our saucer a little bit and duplicate it (
 Next, duplicate the old ellipse (
 The next step would be to apply gradients and colors to our saucer. After that we can add more details. For the lower part of the saucer we will use a radial gradient:
 To the upper part of the saucer we will apply the linear gradient:
 Now we need a white edge for the saucer. Duplicate the ellipse (
 Set the Fill color of the new shape to white:
 Do the same for the other side. Create two copies, nudge one of them for
  Duplicate (
 Duplicate twice the big ellipse (
 Select both copies and under the Pathfinder Panel hit the Minus Front button. Set the Fill color to
  We need a small ellipse to put under the cup to simulate a tiny shadow from the cup. Set the Fill color to
  Duplicate the middle ellipse twice (
 Grab the Pen Tool (P) from the Tool Panel and draw the shape as it shown on the picture below. Set the Fill color to
  Take again the Pen Tool (
 Set the Stroke to
  Duplicate the big ellipse (
 Apply the linear golden gradient to the curve. Use the same golden linear gradient we used previously for the golden lines on the cup:
 Using the same technique create a thinner line:
 For the end we'll create one more reflection (but if you like you can create more than just one). Duplicate (
 Holding the Alt key on the keyboard click on the green shape and move it to the left side. This way you'll create a copy of the green shape and change the position of it at the same time:
 Select both ellipses and hit the Minus Front button under the Pathfinder Panel. Grab a Pen Tool (
 Set the Fill color to white. Adjust the position, size and the angle of the reflection we've just made:
 The last thing is to add the shadow under the saucer. Grab the Ellipse Tool (
 And Voila! Our cup is ready:

Creating a Cup Shape
First, we will create all the elements needed for the cup and after that we can continue with applying gradients and solid colors. Set the document size to500x500 pixels:
 Select the Ellipse Tool (
L) from the Tool panel and create a circle:
 Grab the Direct Selection Tool code>(A), select the upper anchor point of the circle and remove it by hitting the Delete key on the keyboard. This way we’ll remove the upper part of the circle:
 Grab the Pen Tool (
P) from a Tool Panel and click on the endpoints of the shape from the previous step. That way we'll close the path:
 Take the Ellipse Tool (
L) from the Tool Panel and create the ellipse as it shown in the picture below. Make sure that endpoints match. You can adjust the position of endpoints by using the Direct Selection Tool (A):

 Now use the Pen Tool (
P) and draw the handle for the cup. Set the Stroke to 14:
 We have to make the bottom of the cup more flat if we don't want to spill the coffee. Just grab the Pen Tool (
P) and draw a path as it shown in the picture below:
 Select the green part of the cup and the path from the previous step and hit the Divide button under the Pathfinder Panel:
 Ungroup (
Shift+Ctrl+G) the green shape, select the smaller part and hit the Delete key on the keyboard:
Applying Gradients
Time to apply some colors and gradients. Since our cup is white, we will apply mostly white-gray gradients. Darker parts will simulate the shadows. For the cup we will be using radial white-gray gradient. According to the imaginary source of the light above the cup (upper left side) so the left side of the cup should be lighter. Let's create the edge of the cup. Select the pink ellipse and under the Object choose the Path > Offset Path. Set the Offset to
 -2:
 Now we have two ellipses. Set the Fill color for the larger ellipse to white ( #FFFFF ):
 The smaller ellipse represents the inner part of the cup. Since the imaginary source of the light is on the upper left side, that side of the interior will be darker:
 Let's edit the handle a little bit. In that order we need to expand the path first. Select the handle and under the Object option, choose Expand:
 Make sure that the handle is not too big or too small for the cup. You can add some details. Take a look at your cup at home and try to copy the look of the handle.
Grab the Ellipse Tool (
Make sure that the handle is not too big or too small for the cup. You can add some details. Take a look at your cup at home and try to copy the look of the handle.
Grab the Ellipse Tool (L) from the Tool Panel and create two ellipses as such:
 Holding the Shift key on the keyboard, select the handle as well. Under the Pathfinder Panel hit the Unite option:
 Now we have to adjust the anchor points a little bit to make a smooth shape of the handle:
 The handle should be within the shadow because it is on the right side of the cup (source of the light is the left side, and the handle is on the right side). Let’s apply a darker gradient and later we can add some reflections as well:

Creating Details
Let’s create two fancy golden lines! The first step would be to select the larger ellipse and duplicate it (Ctrl+C, Ctrl+F). Holding the Shift key on the keyboard, move the copy downwards.
Now we need to remove the upper anchor point. Grab the Direct Selection Tool (A) from the Tool Panel to do that. Just click on the anchor point and hit the Delete key on the keyboard. Remove the Fill color and set the Stroke color to green:
 Set the Stroke to
 4 and under the Object hit Expand:
 Now we have to duplicate the shape of the cup. Hit the
 Ctrl+C and Ctrl+F (for copy and paste-in-front). Select the copy we've just made and the line and under the Pathfinder Panel choose Intersect:
 Apply the golden linear gradient:
 Repeat the previous step to create another, thinner line:
 Duplicate (
Ctrl+C, Ctrl+F) the shape of the cup twice. Move to the right side of one of the copies and select both copies. Choose the Intersect option under the Pathfinder Panel:
 Now duplicate the new shape we've just created and move it to the right side, scale it up a little bit and rotate it. Select both shapes and under the Pathfinder Panel hit the Minus Front button:
 Feel free to change the position and the angle of the new shape. Play around until you achieve the right look. Set the Fill color to white and lower the opacity to 40%:
 Grab the Pen Tool (
P) and draw the path. Set the Stroke to 3:
 Under the Object hit Expand:
 Select both, expanded path and the reflection and under the Pathfinder Panel hit the Minus Front button:
 Using the same technique create few more highlights and shadows:
 Now we can add a shadow and a highlight on the handle of the cup. Grab the Ellipse Tool (
L) and create the ellipse as it shown on the picture below:
 Duplicate the handle of the cup (
Ctrl+C, Ctrl+F) and by holding the Shift key on the keyboard, select the ellipse and the copy we've just created. Hit the Intersect button under the Pathfinder Panel. Set the Fill color to #C2C2C2:
 Creating a highlight is pretty much the same. Duplicate (
Ctrl+C, Ctrl+F) the handle twice. Move around one of the copies, scale it up or down, rotate; try out several things until you are happy with the result. Select both copies and under the Pathfinder Panel hit the Minus Front button. Set the Fill color to white (#FFFFF):

Creating a Saucer
For the saucer we’ll need the ellipse. We can’t create a new one because we need to stick to the same exact perspective we’ve created for the cup. Fror that reason, we will duplicate one of the ellipses we created earlier. Holding the Alt key on the keyboard, click on the larger ellipse and drag it downwards (don’t forget to hold the Shift key for straight drawing): Under Object select Arrange > Send Back:
 Scale up the ellipse for our saucer a little bit and duplicate it (
Ctrl+C, Ctrl+F). Grab the lower middle point of the selection box and drag it downwards (non-uniform scaling up). Now we have to move the ellipse upwards to make the side points to match:
 Next, duplicate the old ellipse (
Ctrl+C, Ctrl+F). Select that copy and the new ellipse and under the Pathfinder Panel hit the Minus Front button. Ungroup (Shift+Ctrl+G) the new shape and erase the upper part. You should end up with something like this:
 The next step would be to apply gradients and colors to our saucer. After that we can add more details. For the lower part of the saucer we will use a radial gradient:
 To the upper part of the saucer we will apply the linear gradient:
 Now we need a white edge for the saucer. Duplicate the ellipse (
Ctrl+C, Ctrl+F) twice and nudge one of the copies to the left side for 2 pixels. Select both copies and under the Pathfinder Panel hit the Minus Front button:
 Set the Fill color of the new shape to white:
 Do the same for the other side. Create two copies, nudge one of them for
 2 pixels to the right side and create a nice white edge by using a Minus Front button under the Pathfinder Panel:
 Duplicate (
Ctrl+C, Ctrl+F) the big ellipse and scale it down. Set the Fill color to #EDEDED. That is the spot where we actually place the cup — the middle point of the saucer:
 Duplicate twice the big ellipse (
Ctrl+C, Ctrl+F) and nudge one of the copies downwards:
 Select both copies and under the Pathfinder Panel hit the Minus Front button. Set the Fill color to
 #EDEDED. This way we've created the inner shadow on the saucer:
 We need a small ellipse to put under the cup to simulate a tiny shadow from the cup. Set the Fill color to
 #C6C6C6:
 Duplicate the middle ellipse twice (
Ctrl+C, Ctrl+F). Nudge one of the copies 2 pixel downwards. Select both copies and under the Pathfinder Panel hit the Minus Front button. Set the Fill color to #C6C6C6. This way we've created the inner edge of the middle part of the saucer:
 Grab the Pen Tool (P) from the Tool Panel and draw the shape as it shown on the picture below. Set the Fill color to
 #C6C6C6 and lower the opacity to 46%:
 Take again the Pen Tool (
P) and draw the path as you see on the picture below.
 Set the Stroke to
 4 and under Object select Expand:
 Duplicate the big ellipse (
Ctrl+C, Ctrl+F). Select the copy and the curve we've just made and hit the Intersect button under the Pathfinder Panel:
 Apply the linear golden gradient to the curve. Use the same golden linear gradient we used previously for the golden lines on the cup:
 Using the same technique create a thinner line:
 For the end we'll create one more reflection (but if you like you can create more than just one). Duplicate (
Ctrl+C, Ctrl+F) the largest ellipse of the saucer, scale it down and place it more to the right side:
 Holding the Alt key on the keyboard click on the green shape and move it to the left side. This way you'll create a copy of the green shape and change the position of it at the same time:
 Select both ellipses and hit the Minus Front button under the Pathfinder Panel. Grab a Pen Tool (
P) from the Tool Panel and draw the small curved path. Expand the path under Object > Expand. Select both, expanded path and the green shape we've just created and hit the Minus Front under the Pathfinder Panel:
 Set the Fill color to white. Adjust the position, size and the angle of the reflection we've just made:
 The last thing is to add the shadow under the saucer. Grab the Ellipse Tool (
L) from the Tool Panel and create the ellipse. Under the Object select Arrange > Send Back. Set the Fill color to #C6C6C6:
 And Voila! Our cup is ready:

But – wheres the coffee?
Hi nik,
Coffee can be made by using a technique described in this tutorial. It is a very simple thing to do. I left that out so people can try to create the coffee by themselves :-)
This is nice article
Thank you Shabir :-)
You’re the Inspiration itself
Aha! another good AI tutorial for me. Thanks for detail explanation
This is a very nice tutorial. I love how mine turned out!
This tutorial is great. I have not seen one as good and so hard to achieve like this one. But the result is superb. Thanks a lot.
Very Excellence Task. Thanks a lot for this.
this tutorial is great. thank of explanation